High Quality Chainsaw Bars Husqvarna Toys Hockfire Saws

Husqvarna 61 Build - 630 super / 162 closed port hybrid

slackinoff

Pinnacle OPE Member
Local time
10:01 AM
User ID
20772
Joined
Nov 24, 2021
Messages
572
Reaction score
1,736
Location
usa
Country flag
@Master Bud II - Hey thanks! I saw that yesterday before going for just the throttle plate. I got a good deal on the carb (20 bucks shipped) so its worth another 14 bucks to gamble on a new throttle plate to me.

We will see. Found the plate on ebay as well.

Screenshot_20220128-111841_eBay.jpg
 

slackinoff

Pinnacle OPE Member
Local time
10:01 AM
User ID
20772
Joined
Nov 24, 2021
Messages
572
Reaction score
1,736
Location
usa
Country flag
Update - Timing numbers below and the throttle plate solved the issue! Saw ran great yesterday in some 30 inch Post Oak, although I was wishing I had a 288!

@Stump Shot Timing numbers

Compression is 210psi with .024 squish, no base gasket.
Exhaust ATDC First ray of light - 102 (156 duration)
Transfers ATDC - 124
Blow down - 22
Intake opens ABDC - 110 or 70 ATDC so 140 degrees of Intake duration
 

Stump Shot

Disciple of Monkey's
GoldMember
Local time
10:01 AM
User ID
1377
Joined
Jun 5, 2016
Messages
31,745
Reaction score
199,558
Location
Northwoods of Wisconsin
Country flag
So... everything but the intake looks good, I would say try and take down the bottom of the intake near the cylinder side as close as you can to 160D(edit) as possible without grinding out the whole of the intake. Fine line here you have to make and all by eye for the most of it. So if it looks good at 155D might be best to quit there than try and get a little more and loose draft to your carburetor. This is a lot of the reason we machine these cylinders and eliminate this dilemma. Also while you're in there grinding don't forget to match the manifold and gasket/s to the cylinder removing any high spots. The sides at the cylinder can be straightened if very curved from the factory, leave a bit of curve in the bottom at the cylinder so as not to hang a skirt later when wear eventually becomes apparent.

Now the exhaust, this can be widened to 65% of the bore diameter and some of the arch taken out, but not too much so as the rings can get by successfully. Once completed there it can be worked outwardly to suit your fashion and again, port matching the muffler, heat shield and gasket is important. As far as polish goes that's up to the individual how far they are comfortable going.

This with a muffler mod and timing advance should make you a handy firewood saw.

P.S. Run a winter filter for best results. ;)
 
Last edited:

slackinoff

Pinnacle OPE Member
Local time
10:01 AM
User ID
20772
Joined
Nov 24, 2021
Messages
572
Reaction score
1,736
Location
usa
Country flag
@Stump Shot - That was extremely helpful! Thank you so much for taking the time to write that all out for me.

Question - 180 degrees of Intake timing sounds like a bunch, did I miss read that? I kinda had in my head to shoot for 78 for intake (156 duration), which is really close to what you also mentioned.

Also, what about the lower transfers? Should I blend in that ledge at the bottom?
 
Last edited:

Stump Shot

Disciple of Monkey's
GoldMember
Local time
10:01 AM
User ID
1377
Joined
Jun 5, 2016
Messages
31,745
Reaction score
199,558
Location
Northwoods of Wisconsin
Country flag
@Stump Shot - That was extremely helpful! Thank you so much for taking the time to write that all out for me.

Question - 180 degrees of Intake timing sounds like a bunch, did I miss read that? I kinda had in my head to shoot for 78 for intake (156 duration), which is really close to what you also mentioned.

Also, what about the lower transfers? Should I smooth out, blend in that ledge at the bottom?

Whoops, typo, should have been 160D, I'll edit that now that you mention it, thanks.
That ledge in the bottom is part of the bases strength across the transfer, I don't recommend it. Look for any bloopers in there and take them out for a smooth transition.
 

slackinoff

Pinnacle OPE Member
Local time
10:01 AM
User ID
20772
Joined
Nov 24, 2021
Messages
572
Reaction score
1,736
Location
usa
Country flag
Thanks! @Stump Shot

I'm about to go lay my marks out and do some grinding.

I forgot to ask what the "winter filter" is on these saws! The nylon mesh ones instead of the felt?
 

slackinoff

Pinnacle OPE Member
Local time
10:01 AM
User ID
20772
Joined
Nov 24, 2021
Messages
572
Reaction score
1,736
Location
usa
Country flag
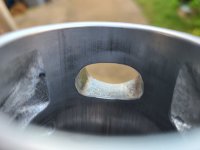
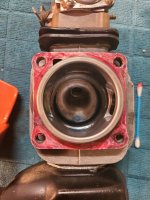
Got it ported. Intake ended up at 79, so 158 duration. Cleaning up the exhaust put it at 101, from 102.

I'm waiting on a threaded insert kit, after that I will will get it slammed together and running! I sloped the intake floor to keep the original size at the carb and minimal hogging out. I am not sure if I should have stopped around 76 or so, maybe, but I guess I will find out

20220206_163012.jpg


I did trim the ledge off the transfers a bit. Couldn't help myself.

20220206_163201.jpg
 

slackinoff

Pinnacle OPE Member
Local time
10:01 AM
User ID
20772
Joined
Nov 24, 2021
Messages
572
Reaction score
1,736
Location
usa
Country flag
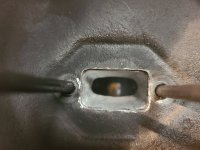
Here is the carb side. It's factory size. It looks a little uneven, but there's so little room to correct because of the gasket and the impulse line ridge. Everything is port matched though so as uneven as it looks, it's smooth with the intake and gasket


20220206_202217.jpg
 

slackinoff

Pinnacle OPE Member
Local time
10:01 AM
User ID
20772
Joined
Nov 24, 2021
Messages
572
Reaction score
1,736
Location
usa
Country flag
Tomorrow this should be running! My threaded insert kit will be here today. I hope that goes well, I have used taps and dies but never a threaded insert kit. I could have it running tonight but I need to wait overnight for the cylinder to seal down with the loctite. Btw - I wanted to note that that stuff worked great (loctite 518) as the cylinder sealant. Cylinder was not hard to remove and it cleaned off a lot easier than normal case sealant like hondabond, motoseal, ect.
 

Czed

Aluminium Member
GoldMember
Local time
11:01 AM
User ID
568
Joined
Jan 17, 2016
Messages
33,103
Reaction score
188,705
Location
Wv
Country flag
Here is the carb side. It's factory size. It looks a little uneven, but there's so little room to correct because of the gasket and the impulse line ridge. Everything is port matched though so as uneven as it looks, it's smooth with the intake and gasket


View attachment 326619
I use a bit of sealer on those gaskets
Not too much.
 

slackinoff

Pinnacle OPE Member
Local time
10:01 AM
User ID
20772
Joined
Nov 24, 2021
Messages
572
Reaction score
1,736
Location
usa
Country flag
Thread repair kit is nicer than I was expecting, came with a nice metal storage box.

I use a bit of sealer on those gaskets
Not too much.
Thanks for the tip, I am going to consider it....just worried about wrecking my precious OEM intake gasket (if I need to remove it later) that was tough to find and pricey. I think I will go ahead and do it and cross that bridge later, or just buy 3 or 4 next time I see some.

Edit - ( I just found two for 6 bucks shipped, oem) all is well. I will do a light coat.
 
Last edited:

slackinoff

Pinnacle OPE Member
Local time
10:01 AM
User ID
20772
Joined
Nov 24, 2021
Messages
572
Reaction score
1,736
Location
usa
Country flag
Got it finished up last night, and had a great time doing it! The threaded insert kit worked beautifully, I was very impressed. I also spent some time getting the muffler port matched up to the exhaust port and gasket. I never realized it had a decent overhang top and bottom. Do I need to re break this saw in? After work today I will be the first fire, not sure if I should do some test cuts or just a few heat cycles. I will be adding some pictures here in a second.

20220208_193559.jpg
20220208_200530.jpg
20220208_200945.jpg
 

slackinoff

Pinnacle OPE Member
Local time
10:01 AM
User ID
20772
Joined
Nov 24, 2021
Messages
572
Reaction score
1,736
Location
usa
Country flag
@Czed - Thanks for the tip again. I got to looking at my gasket and there was a part that I touched up that could been suspect near the impulse channel, so I went ahead added a light coat of sealant just to be sure.
 

slackinoff

Pinnacle OPE Member
Local time
10:01 AM
User ID
20772
Joined
Nov 24, 2021
Messages
572
Reaction score
1,736
Location
usa
Country flag
You could try running a 266 style filter holder and filter. ;)

I have been wanting to for at least a month! Lol.

My search for the later grey/black top or a 266 top has come up with nada so far. The two screw style wont fit under these early white tops unfortunately. If you know of any around (grey/black 61 top or 266 top)....help a guy out?!
 

Stump Shot

Disciple of Monkey's
GoldMember
Local time
10:01 AM
User ID
1377
Joined
Jun 5, 2016
Messages
31,745
Reaction score
199,558
Location
Northwoods of Wisconsin
Country flag
I have been wanting to for at least a month! Lol.

My search for the later grey/black top or a 266 top has come up with nada so far. The two screw style wont fit under these early white tops unfortunately. If you know of any around (grey/black 61 top or 266 top)....help a guy out?!

If I could I surely would. I would however recommend placing a want ad in the parts wanted section of the classifieds.
 
Top