High Quality Chainsaw Bars Husqvarna Toys Hockfire Saws

Porting an old Husqvarna 357

Kiwioilboiler

346 Pic Examiner
Local time
4:31 AM
User ID
12322
Joined
Apr 20, 2020
Messages
9,223
Reaction score
59,380
Location
Marsden Pt, NZ
Country flag
And that would turn me off to it.

My dd357 is very high strung. Lean on it, or take too much off the rakers and it ain’t happy. Keep the rakers right and the revs [very] high and it eats. My favorite saw period.
View attachment 318188
So yours is more 357y, if such a term existed?
 

Kiwioilboiler

346 Pic Examiner
Local time
4:31 AM
User ID
12322
Joined
Apr 20, 2020
Messages
9,223
Reaction score
59,380
Location
Marsden Pt, NZ
Country flag
I believe it's 357's are talked about being peaky, and Jason had said his was very much so, and that would make it more 357ish than your typical 357?
Or did I just go full Kenny?
What Ed said. More 357y. A 357 with even more 357 characteristics.
 

Wolverine

dilligaf
Local time
10:31 AM
User ID
373
Joined
Jan 1, 2016
Messages
7,042
Reaction score
35,515
Location
17325
Country flag
Oh I have the 359 and love it. Just intrigued by the whole stuffer technology.
Is it more about velocity than volume?

I believe it's 357's are talked about being peaky, and Jason had said his was very much so, and that would make it more 357ish than your typical 357?
Or did I just go full Kenny?
No, you didn’t lol. I think Dan kept it true to its design. A high speed limb saw (as my old dealer reminded me when I went in for anything). It’s happy at high revs but it isn’t a dog in and pull up saw. And I’m ok w that. It is after all, 56.5cc. If I want grunt, I have other tools in the shed.

I’ve only ever saw one builder grind on a piston before, and that was Scott doing R&D on a new model. What led you to that route @MAF143 ?
 

MAF143

Super OPE Member
Local time
10:31 AM
User ID
16099
Joined
Mar 30, 2021
Messages
146
Reaction score
510
Location
North Central Ohio
Country flag
What led you to that route @MAF143 ?


I had read about it on one of the porting threads here and it sounded to me like it makes sense. It doesn't change the timing of the exhaust port opening, but allows it to open faster when it does open. That in turn would allow it to flow more while the burnt gas is at its' highest pressure. Some prefer not to modify the piston simply in case if it ever needs replaced, the performance won't change. But since this is my saw and it will probably be staying in my woods, I thought why not. In a few years if I need to refresh this saw, I probably won't remember any of this anyhow if old-timers sets in...

Again, @huskihl may have to take me aside and explain the reality of it as he has before and not let me get too far off the rails. It's not like it took more than a couple minutes and if it turds the saw, a new piston isn't that big of a deal... I was actually surprised how good of shape this piston was when I opened it up. The ring was over the hill with a .040" end gap, but the piston looked and felt OK.

I view this as a learning experience for me and I don't have a problem with throwing my thoughts out there. If I'm wrong and someone explains why, it's a great learning experience for me and if others can learn a little from it or even just get a chuckle from it, I'm glad to share... LOL
 

MAF143

Super OPE Member
Local time
10:31 AM
User ID
16099
Joined
Mar 30, 2021
Messages
146
Reaction score
510
Location
North Central Ohio
Country flag
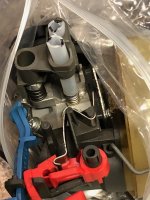
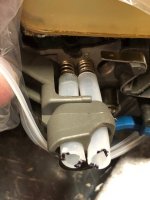
Speaking of getting off the rails. Back to the carb jet issue... I found my spline tool and you all were right,not deep enough to fit. Just another learning experience. Soooo, following some helpful advice ( @Kiwioilboiler knows who I'm talking about) on here, I found some tubing that fits the jet but it was just a touch too big to go through the holder bracket so I drilled those holes out carefully and extended the tube clear out close to where it meets the cover. I super glued the tube on the splines then notched and marked the end of the tube so I'll know where the screw driver flat is located down in there (that's the beef I have with having to use a screwdriver in the first place plus it slips out the side of the slot). Hopefully this eliminates the issues why I prefer the spline tool in the first place.

carb jets.jpg

carb jets2.jpg

I may have to shorten them if there is too much play in the anti-vibe. The limiters were all in place but I did have to replace the spring assembly in front of the throttle trigger because I couldn't locate a screw that was similar.
 
Last edited:

Benwa

I love the smell of premix in the morning
Local time
7:31 AM
User ID
5146
Joined
Jan 23, 2018
Messages
223
Reaction score
1,024
Location
Bow
Country flag
I had read about it on one of the porting threads here and it sounded to me like it makes sense. It doesn't change the timing of the exhaust port opening, but allows it to open faster when it does open.
It DOES change the port timing. Lowering the piston crown has the same effect as raising port roof in the cylinder. Get yourself a timing wheel and set it up. It'll all become apparent very quickly. All part of the learning process........ it's fun ain't it! Slippery slope my friend..... slippery slope haha
 

BlacknTan

Super OPE Member
Local time
10:31 AM
User ID
10910
Joined
Nov 8, 2019
Messages
204
Reaction score
761
Location
New York
Homemade bearing puller gizmo... I just drill more holes when I need to use it for something else. I used the same holes for this as fit into the generator ring mounting bosses under the flywheel. I used this tool for pushing the crank out of the flywheel side since the stuffers wouldn't allow the normal crank pusher to be used.

View attachment 317874

View attachment 317875

View attachment 317876

My tools aren't always pretty, but they get the job done. If I did saws a lot, I would buy some more tools, but half the fun of this is getting it done with my backwoods goofy azz homemade stuff.

Yes, all one has to do is us his (or her) head a little bit/ Nice job.
 

MAF143

Super OPE Member
Local time
10:31 AM
User ID
16099
Joined
Mar 30, 2021
Messages
146
Reaction score
510
Location
North Central Ohio
Country flag
It DOES change the port timing. Lowering the piston crown has the same effect as raising port roof in the cylinder. Get yourself a timing wheel and set it up. It'll all become apparent very quickly. All part of the learning process........ it's fun ain't it! Slippery slope my friend..... slippery slope haha


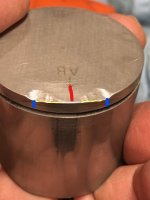
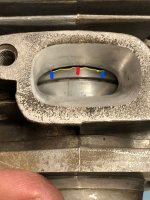
I do have a timing wheel and when my bearings come in I will check it and you will see that the exhaust will still crack at what it did in my first post of this thread where I mention the port timing. The piston crown in the middle of the port was not lowered at all, it remains un-altered where the red mark is in both photos. The crown now arcs to match the arc on the top of the exhaust port between the blue marks along the new yellow edge of the piston. So now when the port opens at 108*, (unless I took more than just carbon off the top of the port) instead of just opening at the middle (red mark), the whole area at the yellow edge opens at the same time allowing more spent charge to escape more quickly but at the same time in the cycle as if the piston was never altered. It's kinda like having a flatter top to the port without the risk of hanging a ring.

Now whether or not this will assist in performance I really can't say at this point. You are correct in that this is a learning process for me, but the geometry and math seems solid to me in this case.

Piston exhaust trim marked_LI (2).jpg

piston fit in port_LI (2).jpg

My apologies for my scraggly yellow lines, I'm not that good at drawing with a mouse...
 

MAF143

Super OPE Member
Local time
10:31 AM
User ID
16099
Joined
Mar 30, 2021
Messages
146
Reaction score
510
Location
North Central Ohio
Country flag
Still waiting on a few parts to finish this 357, but I was able to work on the muffler last evening.

I'm not a very good welder, I'm not a very good painter. But I brought 'er to the dance and I'm pretty sure she can twerk and two-step, so I'm just fine with it.

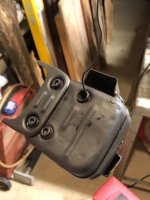
The original output was opened up some, screen removed, inner baffle turned into swiss cheese, and a nice hole in the side with a deflector added.

The plastic top cover was already burnt some so I cleaned that up and put 3 layers of metal tape over it.

muffler.jpg

Muffler 2.jpg
 

MAF143

Super OPE Member
Local time
10:31 AM
User ID
16099
Joined
Mar 30, 2021
Messages
146
Reaction score
510
Location
North Central Ohio
Country flag
funtion over form in my book. LOL

Not always fond of grotesque though!!! Good thing it'll have a cover over it and it's on the other end of the saw so I don't have to look at it!!!
 

MAF143

Super OPE Member
Local time
10:31 AM
User ID
16099
Joined
Mar 30, 2021
Messages
146
Reaction score
510
Location
North Central Ohio
Country flag
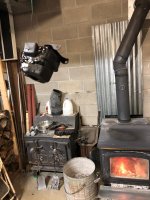
Tell the truth @MAF143 . You did your fire flue too ay.


LOL, that's some of that stove sealer crap that I stuck on there before lighting it this fall. My chimney is outside and when it's cold it doesn't want to draft till I get it warmed up and if there are any "leaky" spots in the flue it will push smoke into the basement for a moment till it warms to start drafting up... Theres 33' of stack outside so once draft gets going it pulls like a freight train. But when that outside chimney is cold it takes a moment to get it going the right way.

I'm no better laying down a bead of caulk than I am with laying down a bead welding... I am not an artist... I'm a get 'er done kinda guy...

If you've ever seen my truck you would know... LOL
 
Last edited:
Top