High Quality Chainsaw Bars Husqvarna Toys Hockfire Saws

Husqvarna 350/346 Repair Thread.

Onan18

OPE Sponsor
GoldMember
Local time
4:26 AM
User ID
344
Joined
Dec 30, 2015
Messages
4,444
Reaction score
24,737
Location
Georgia
Country flag
Is the 198 a direct bolt on or are there other pieces/modifications needed? I take it that carb has a bit more flow than the stocker?


You can use the stock intake setup but you have to open up the filter holder at the carb some or the choke will hang.
 
Last edited:

Dub11

Saw R skeery
GoldMember
Local time
3:26 AM
User ID
2014
Joined
Oct 21, 2016
Messages
34,438
Reaction score
146,045
Location
Kansas
Country flag
I use the 350/346 boot, it fits the cylinder better and the ooening on the cylinder side is actually larger than the 357 boot for some reason.

So let me get this down one more time.

You want to use the 346 boot then the 198 carb with the 357 filter holder and filter?
 

J. Dirt

Super OPE Member
Local time
4:26 AM
User ID
6409
Joined
Jun 13, 2018
Messages
376
Reaction score
1,028
Location
WNY
Country flag
You can use the stock intake setup but you hace to open up the filter holder at the carb some or the choke will hang.
Easy enough to remedy
 

PogoInTheWoods

Pinnacle OPE Member
Local time
4:26 AM
User ID
1190
Joined
Apr 23, 2016
Messages
1,943
Reaction score
3,856
Location
Ohio
Country flag
So...., back to saving my buddy 20 bux... (Been on the back burner since the last time I annoyed you guys. LOL )

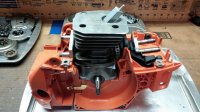
I actually managed to salvage the bearings and seals on the 350 that I'm also trying to salvage as economically as possible. Had one helluva time getting the bottom end to seal, tho..., even after grinding down the ends of the fasteners just to have that covered. Getting the previous pinches in the bearing holders lined back up with the seam between the cup and case when there's Dirko smeared all over em was the tricky part. Took a few stabs at it but the case held pressure all night. Still has a very small vac leak which doesn't seam to be the crank seals according to the grease test. About the only other place flexible enough to seal with pressure but leak with vac would be the impulse arrangement unless I'm overlooking something else. Think I'll see how it runs before chasing it too much further since it does hold at 4 ~ 5 inHg which should be enough to run the pump diaphragm. (Not sure what that spec would be if there even is one.) I actually did think about using a little Dirko for the impulse connections but felt I had a good fit without it and have never had any issues with these before. Anyone use sealant for these impulse connections?

Otherwise another successful intake bulkhead 'trim and fit' with a universal CV joint clamp. Works like a charm every time and is so butt simple it's stupid. (Yeah, right up my alley!) My last clamp or I'd go ahead and cut it off and smear some goo on the impulse connection to the intake flange just because.
0118191035b_resized.jpg
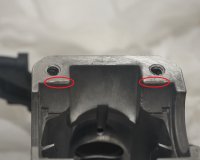
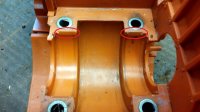
And speaking of bottom end leaks on these and bearing cover pinches, @Tor R posted this pic on Sawhawgz. It's a modification to the older cups to allow the bearing cover some pinch space so the surfaces properly seal instead of actually having a gap due to the rubber bunching up or squeezing out between the cup and case. There's still enough surface beside the bevel on the outside for a good seal, but also some room for the bearing cover rubber to squeeze out instead of bunching up. (The case also needs the corresponding mod.) Evidently the design was eventually changed to reflect this, but earlier saws suffered leaks as a result of the issue. Was wondering if anyone has tried this or has noticed the differences between earlier and later versions of the cups and cases. Apparently the issue wasn't corrected until 2001, so that leaves quite a few of these saws out there that could possibly benefit from this simple mod. Maybe Tor will chime in with some additional info. Certainly worth checking your next 340/345/350 rebuild to see what you have and whether it could possibly benefit from this simple modification. Probably also worth checking any aftermarket bearing cups you may get with some of the rebuild kits.
_DSC5431.jpg

0118191129_resized.jpg
 

NPKenny

Super OPE Member
Local time
1:26 AM
User ID
5030
Joined
Jan 12, 2018
Messages
292
Reaction score
745
Location
Lehi, AZ
Country flag
.

View attachment 147334
Modified bearing holder, all that is really necessary is to grind in the notch in the center. But while you have the burrs out anyways...

I’ve built a 346 /350 and hogged out this bearing holder similar to that pictured; basically case matching the cylinder. I’ve had regrets since and keep thinking I should go back in and fill in the space with JB Weld to decrease case volume. My saw runs great, but is lower RPM than I expected... Thoughts on decreasing case volume here?
 

Stump Shot

Disciple of Monkey's
GoldMember
Local time
3:26 AM
User ID
1377
Joined
Jun 5, 2016
Messages
31,192
Reaction score
194,828
Location
Northwoods of Wisconsin
Country flag
I’ve built a 346 /350 and hogged out this bearing holder similar to that pictured; basically case matching the cylinder. I’ve had regrets since and keep thinking I should go back in and fill in the space with JB Weld to decrease case volume. My saw runs great, but is lower RPM than I expected... Thoughts on decreasing case volume here?

That particular mod has been done plenty enough to warrant saying that's not the reason for your low rpm issue I believe.
 

huskihl

Muh fingers look really big
GoldMember
Local time
4:26 AM
User ID
360
Joined
Dec 31, 2015
Messages
22,582
Reaction score
143,753
Location
East Jordan, MI
Country flag
I’ve built a 346 /350 and hogged out this bearing holder similar to that pictured; basically case matching the cylinder. I’ve had regrets since and keep thinking I should go back in and fill in the space with JB Weld to decrease case volume. My saw runs great, but is lower RPM than I expected... Thoughts on decreasing case volume here?
Smooth out the square corners to promote flow. Might help, might not.

No problem with rpm in this one. But I did consider filling them before I ran it.

20190716_133058.jpg
 

huskyboy

Sorta a husqvarna guy...
Local time
4:26 AM
User ID
1352
Joined
May 30, 2016
Messages
10,025
Reaction score
43,462
Location
Ct
Country flag
I’ve built a 346 /350 and hogged out this bearing holder similar to that pictured; basically case matching the cylinder. I’ve had regrets since and keep thinking I should go back in and fill in the space with JB Weld to decrease case volume. My saw runs great, but is lower RPM than I expected... Thoughts on decreasing case volume here?
I ran my 350/346 with two different bearing caps, first... one with the division ground out and then with one with it left in. The saw ran noticeably stronger with the division left in. This is a stock cylinder not ported however. Interestingly the 346 cylinder lowers match perfectly to the 350 bearing cap, even the divider.
 

huskyboy

Sorta a husqvarna guy...
Local time
4:26 AM
User ID
1352
Joined
May 30, 2016
Messages
10,025
Reaction score
43,462
Location
Ct
Country flag
I would suggest to anyone with these saws not to use the 350 bearing cap with the coarse thread cylinder screws with the 346 cylinder. The saw broke off the cylinder screws 2 or 3 times until I swapped a later model fine thread bearing cap on it. The fine thread screws are stronger and fixed the problem. Make sure they don’t bottom out before the cylinder tightens as well.
 
Last edited:

huskyboy

Sorta a husqvarna guy...
Local time
4:26 AM
User ID
1352
Joined
May 30, 2016
Messages
10,025
Reaction score
43,462
Location
Ct
Country flag
A guy could tap and put inserts in a coarse thread cap too for fine thread cylinder screws too, just another option. The big coarse thread screws on the bottom seem to be ok since they are larger and stronger than the cylinder screws.
 

Kiwioilboiler

346 Pic Examiner
Local time
8:26 PM
User ID
12322
Joined
Apr 20, 2020
Messages
8,832
Reaction score
55,234
Location
Marsden Pt, NZ
Country flag
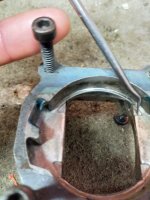
Lads I'm doing an early (2000) 350 and it's cap and case are NOT bevelled. Anyone scraped, sanded, filed or otherwise a bevel into the components successfully?
IMG_20210713_125041.jpg IMG_20210713_125057.jpg IMG_20210713_125113.jpg
 

PogoInTheWoods

Pinnacle OPE Member
Local time
4:26 AM
User ID
1190
Joined
Apr 23, 2016
Messages
1,943
Reaction score
3,856
Location
Ohio
Country flag
Whatever you have handy should work..., some methods better than others, of course. I would use a raker gauge file or a suitable Dremel attachment myself. Uniformity is less critical than the space created, provided it isn't excessive to the extent of affecting the desired sealing surfaces -- obviously. As illustrated previously, very little material needs removed for the rubber to not get pinched in the seam. Those pics were of a factory bevel.

BTW, it's good to see an actual example of the non-beveled parts for comparison.
 

Kiwioilboiler

346 Pic Examiner
Local time
8:26 PM
User ID
12322
Joined
Apr 20, 2020
Messages
8,832
Reaction score
55,234
Location
Marsden Pt, NZ
Country flag
Ok. Risers.
I'm in the fortunate position to have a box of H350 bits here now that includes 6 risers. So here we go....
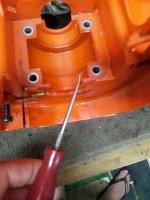
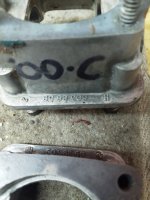
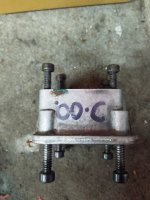
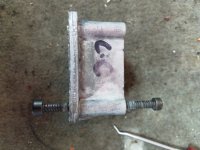
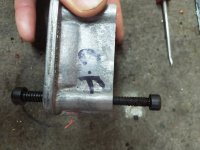
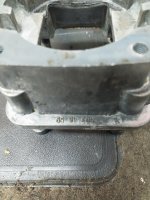
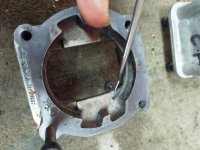
00 tagged saw. Coarse fasteners top and bottom. No relief bevel. Can be id'd on a case by shallow relief cast as shown by pointer. Also cast 'H' in base near part no. The part no is the Same right through.
IMG_20210716_104515.jpgIMG_20210715_162131.jpgIMG_20210715_162148.jpg
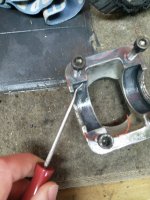
The next iteration appears to be seal bevel, but still coarse fasteners both sides. Now a 'K' casting with deeper top reliefs.
IMG_20210715_162314.jpg
Pic limit. Next post.
 
Last edited:

Kiwioilboiler

346 Pic Examiner
Local time
8:26 PM
User ID
12322
Joined
Apr 20, 2020
Messages
8,832
Reaction score
55,234
Location
Marsden Pt, NZ
Country flag
Version 3?
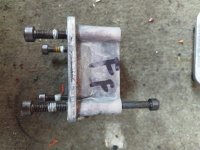
Coarse bottom, Fine top for the fasteners. K casting. Seal bevel, deep top relief.
IMG_20210715_162355.jpg
And finally, as found on an 06 tagged saw, the Holy Grail of risers so to speak.
Fine threads top and bottom, seal bevel. K casting. Deep top relief.
IMG_20210715_162618.jpg
Now the only way I can see to differentiate this casting from all the others is this tiny 'v' cast into the corner along from that same old serial number that is found on all the others. Bottom left in the pic.
IMG_20210716_104542.jpg
So hope that helps someone...
 
Last edited:

Kiwioilboiler

346 Pic Examiner
Local time
8:26 PM
User ID
12322
Joined
Apr 20, 2020
Messages
8,832
Reaction score
55,234
Location
Marsden Pt, NZ
Country flag
Sorry, this pic might be handy too.
All the bevelled seal caps have this deeper relief casting over the earliest version.
Unfortunately it's presence tells you nothing about the fastener situation.
IMG_20210715_162632.jpg
 
Last edited:
Top