High Quality Chainsaw Bars Husqvarna Toys Hockfire Saws

Husky 350 TLC

JeffWischer

Well-Known OPE Member
Local time
11:15 AM
User ID
32428
Joined
Apr 6, 2025
Messages
49
Reaction score
98
Location
Lincolnshire, IL
Country flag
Wow. Do you ever sleep?! Thanks. Since I posted that, I did a little more cross -checking. Husqvarna part number for my serial number in fact crossed to a pair of 44mm rings on a flash sale at HLS. Didn't see this particular one. Ordered a spark plug just to take some of the sting out of the shipping. Then I see this kit you found. Don't know if I can add it to an order I just placed...

The zip tie would have worked if I hadn't tapped (small ball peen hammer) one last time, even though I saw that the zip tie was slipping on one side but before the ring was starting into the bore. Any tips would be helpful. Maybe it's one of those hold-your-mouth-right things!
 

hacskaroly

2100 Fanclub Member
Yearly GoldMember
Local time
9:15 AM
User ID
27954
Joined
Nov 24, 2023
Messages
1,965
Reaction score
6,483
Location
Northern Idaho, Ehh
Country flag
The zip tie would have worked if I hadn't tapped (small ball peen hammer) one last time, even though I saw that the zip tie was slipping on one side but before the ring was starting into the bore.
Yes, it can be a challenge trying to juggle everything getting the piston into the cylinder. The tool that I listed has been very helpful, it is wide enough to allow for a little slippage and is finger pressure closed, so as the piston needs to slide in, the clamp can slide down. I started out trying to use a small flathead screwdriver to poke the ring in the groove as I was trying to get the cylinder down. Now I don't risk scratches from the metal screwdriver. I supposed if you used a wide zip tie, you might be able to get it.
 

JeffWischer

Well-Known OPE Member
Local time
11:15 AM
User ID
32428
Joined
Apr 6, 2025
Messages
49
Reaction score
98
Location
Lincolnshire, IL
Country flag
He shoots....He scores! Thanks to YOU! Went to my order and cancelled/deleted it. Then ordered rings as before, with the piston install kit! Shazam! Need to buy you lunch. Wall Drug is about half way- you game?!
 

hacskaroly

2100 Fanclub Member
Yearly GoldMember
Local time
9:15 AM
User ID
27954
Joined
Nov 24, 2023
Messages
1,965
Reaction score
6,483
Location
Northern Idaho, Ehh
Country flag
He shoots....He scores! Thanks to YOU! Went to my order and cancelled/deleted it. Then ordered rings as before, with the piston install kit! Shazam! Need to buy you lunch. Wall Drug is about half way- you game?!
I am glad you are able to get what you need! There have been lots of people on this site who have helped me out and have giving me lots of good advice and information...along with aiding and abetting my chainsaw acquisition disease (CAD)! :D
 

JeffWischer

Well-Known OPE Member
Local time
11:15 AM
User ID
32428
Joined
Apr 6, 2025
Messages
49
Reaction score
98
Location
Lincolnshire, IL
Country flag
I think that the zip tie, in order to be tight enough, was too tight in a sense, and didn't want to evenly slide. I can see how the kit parts are wider, and can stay engaged with the ring more evenly as it passes into the bore.

The big picture, as it were, is that this is my first venture this deep (all the way!) into a saw. So from here on, if I need or want to overhaul another one, I won't be venturing into the great unknown again. Will there be surprises? Of course. But even the second time around is less scary...

Thank you so much, again, for the insight and encouragement.
 

hacskaroly

2100 Fanclub Member
Yearly GoldMember
Local time
9:15 AM
User ID
27954
Joined
Nov 24, 2023
Messages
1,965
Reaction score
6,483
Location
Northern Idaho, Ehh
Country flag
Will there be surprises? Of course. But even the second time around is less scary...
Oh yeah, some saws don't require you to squeeze the ring, the cylinder is set to do that, some saws have two rings....just when you feel comfortable, you will end up with one with something else! But its fun to learn and see what is out there!
 

JeffWischer

Well-Known OPE Member
Local time
11:15 AM
User ID
32428
Joined
Apr 6, 2025
Messages
49
Reaction score
98
Location
Lincolnshire, IL
Country flag
So. HLSupply came through, ring(s) and install kit came today. 69 degrees tomorrow- just maybe "vroom" by supper!
So someone please tell me what's in the bag. Of course the ring compressors are obvious. Are those piston stops? They look a little like things I never got a clear look at in a few videos. And the kind-sorta tuning-forky lookin' thing is...?
 

hacskaroly

2100 Fanclub Member
Yearly GoldMember
Local time
9:15 AM
User ID
27954
Joined
Nov 24, 2023
Messages
1,965
Reaction score
6,483
Location
Northern Idaho, Ehh
Country flag
Are those piston stops? They look a little like things I never got a clear look at in a few videos. And the kind-sorta tuning-forky lookin' thing is...?
Yes, the black and white pieces are piston stops. They can be a challenge, sometimes you need a third hand to hold them in place when you start working off the clutch or flywheel. The longer plastic piece (tuning-forky thing) is used to slide under the piston and around the crank to help keep the piston in place when you are putting the cylinder on, sometimes helpful, sometimes not.
 

JeffWischer

Well-Known OPE Member
Local time
11:15 AM
User ID
32428
Joined
Apr 6, 2025
Messages
49
Reaction score
98
Location
Lincolnshire, IL
Country flag
Wow. Yeah, having "crashed and burned" on the first try, having the piston flopping around was a big part of my trouble. So the support will for sure help. Wall Drug for lunch is still on the table... :)
 

Chainmale

Super OPE Member
Yearly GoldMember
Local time
4:15 AM
User ID
14057
Joined
Oct 6, 2020
Messages
239
Reaction score
582
Location
Tasman New Zealand
Country flag
Yes, the black and white pieces are piston stops. They can be a challenge, sometimes you need a third hand to hold them in place when you start working off the clutch or flywheel. The longer plastic piece (tuning-forky thing) is used to slide under the piston and around the crank to help keep the piston in place when you are putting the cylinder on, sometimes helpful, sometimes not.
Great if using a base gasket. But can't use it when using sealant on both surfaces
 

JeffWischer

Well-Known OPE Member
Local time
11:15 AM
User ID
32428
Joined
Apr 6, 2025
Messages
49
Reaction score
98
Location
Lincolnshire, IL
Country flag
So. Out on the Plains, whereI lived over half of my adult life (Kansas, with much time in Oklahoma and Texas), we have an expression for why you can't get something back together- usually machinery of some sort- "You're not holding your mouth right." I'm apparently not holding my mouth right. Can't get the piston into the cylinder.

Using the "tuning fork" and the compressor that fits about perfectly. And a little grease around the ring area at top of piston and the lower 1/8" of the cylinder where the ring will first make entry. No luck. Many tries, but ring wants to grab the bottom of the cylinder.

So, I got out my Dremel tool, having first removed gasket and red anaerobic gasket maker that I was using a thin film of as tackifier-sealer. Ground a slight bevel to the mouth of the cylinder at the front and rear "extensions" that will first grab the ring. You all know what I mean. Polished with 400 and then 600 grit wet-or-dry for obvious reason. Tried again. Thought I was about to"there". A few taps with an 8 oz. ball peen hammer, just to encourage it the last way. Oops. One too many taps. Good thing I ordered the two pack.

Many additional attempts. Position ring compressor right flush with top of ring, so that cylinder "extensions" can engage the very top of piston, then push or tap the cylinder down to start engagement. Even when it seems to go down the first 1-2mm in a "square" fashion, the ring still seems to grab at the entrance of the cylinder. Then additional taps (gently) still eventually tilt the cylinder enough that I lose the "engagement" that I thought I had first established. And this is after the bevel/polish job.

????????
 

Mycamaro_68

By guess and by golly
Local time
11:15 AM
User ID
713
Joined
Jan 28, 2016
Messages
722
Reaction score
2,176
Location
Cedar Rapids, IA
Country flag
So. Out on the Plains, whereI lived over half of my adult life (Kansas, with much time in Oklahoma and Texas), we have an expression for why you can't get something back together- usually machinery of some sort- "You're not holding your mouth right." I'm apparently not holding my mouth right. Can't get the piston into the cylinder.

Using the "tuning fork" and the compressor that fits about perfectly. And a little grease around the ring area at top of piston and the lower 1/8" of the cylinder where the ring will first make entry. No luck. Many tries, but ring wants to grab the bottom of the cylinder.

So, I got out my Dremel tool, having first removed gasket and red anaerobic gasket maker that I was using a thin film of as tackifier-sealer. Ground a slight bevel to the mouth of the cylinder at the front and rear "extensions" that will first grab the ring. You all know what I mean. Polished with 400 and then 600 grit wet-or-dry for obvious reason. Tried again. Thought I was about to"there". A few taps with an 8 oz. ball peen hammer, just to encourage it the last way. Oops. One too many taps. Good thing I ordered the two pack.

Many additional attempts. Position ring compressor right flush with top of ring, so that cylinder "extensions" can engage the very top of piston, then push or tap the cylinder down to start engagement. Even when it seems to go down the first 1-2mm in a "square" fashion, the ring still seems to grab at the entrance of the cylinder. Then additional taps (gently) still eventually tilt the cylinder enough that I lose the "engagement" that I thought I had first established. And this is after the bevel/polish job.

????????
Does the piston slide into the cylinder without the rings installed?
 

Chainmale

Super OPE Member
Yearly GoldMember
Local time
4:15 AM
User ID
14057
Joined
Oct 6, 2020
Messages
239
Reaction score
582
Location
Tasman New Zealand
Country flag
If it's single ring you should be able to put it in by hand without the ring compressor. Are you sure the ring is the right size for the piston, or the piston is the right size for the cylinder?
 

JeffWischer

Well-Known OPE Member
Local time
11:15 AM
User ID
32428
Joined
Apr 6, 2025
Messages
49
Reaction score
98
Location
Lincolnshire, IL
Country flag
O.K. Thanks all.
Piston is 44mm. Ring "spec" is 44mm. The compressor compresses the ring all of the way into the groove when fully "pinched". Ring appears to be a perfect fit. And I learned that it fits and completely closes in exactly one position, where something inside of the groove accommodates the location of the "split". Poorly worded but you know what I mean. And yes piston goes in easily with no ring. It's all original.

But here's what I figured out at about 0200. I've done pistons and rings in cars and a tractor 3-point hitch lift. In every case, the rings are thicker and the entrance to the cylinder is flat/square. So a very small amount of ring (<1mm) can protrude from the compressor, but "find" the entrance to the bore.

But not with my saw. Even before the slight bevel/smoothing, the ring, after leaving the compressor after exactly 1.5mm travel, was still outside of the "square" cylinder bore. So it would immediately expand to slightly larger than the true bore diameter and catch/grab/hang on the slightly larger diameter slightly flared very outside entrance to the bore.

My gentle beveling did not make it worse. In fact, the piston goes a little farther before the ring grabs- maybe .5mm? But the ring is still grabbing the bore entrance where the slope is too "steep". I'm going to try to remove maybe 1mm from the very bottom of the bore entrance, carefully with an orbital sander. That way the ring will expand out of the compressor in the more "gently" sloped area that I created earlier, and closer to the "square" part of the bore. Wish me luck..

And why is this so difficult for me? I've seen two Matt Olson videos where he just pops it in. One just by reaching under with fingers. It looks so easy. The other one is using a zip tie, and it slides right in ,like, well, anything that just slides right into what it was supposed to slide right into! I don't know whether to laugh or cry. For over 60 years my hobbies have involved building and repairing all manner of fairly intricate things. My small hands and fingers are usually an asset for this type of endeavor. This is humbling, no doubt about it!
 

Mycamaro_68

By guess and by golly
Local time
11:15 AM
User ID
713
Joined
Jan 28, 2016
Messages
722
Reaction score
2,176
Location
Cedar Rapids, IA
Country flag
O.K. Thanks all.
Piston is 44mm. Ring "spec" is 44mm. The compressor compresses the ring all of the way into the groove when fully "pinched". Ring appears to be a perfect fit. And I learned that it fits and completely closes in exactly one position, where something inside of the groove accommodates the location of the "split". Poorly worded but you know what I mean. And yes piston goes in easily with no ring. It's all original.

But here's what I figured out at about 0200. I've done pistons and rings in cars and a tractor 3-point hitch lift. In every case, the rings are thicker and the entrance to the cylinder is flat/square. So a very small amount of ring (<1mm) can protrude from the compressor, but "find" the entrance to the bore.

But not with my saw. Even before the slight bevel/smoothing, the ring, after leaving the compressor after exactly 1.5mm travel, was still outside of the "square" cylinder bore. So it would immediately expand to slightly larger than the true bore diameter and catch/grab/hang on the slightly larger diameter slightly flared very outside entrance to the bore.

My gentle beveling did not make it worse. In fact, the piston goes a little farther before the ring grabs- maybe .5mm? But the ring is still grabbing the bore entrance where the slope is too "steep". I'm going to try to remove maybe 1mm from the very bottom of the bore entrance, carefully with an orbital sander. That way the ring will expand out of the compressor in the more "gently" sloped area that I created earlier, and closer to the "square" part of the bore. Wish me luck..

And why is this so difficult for me? I've seen two Matt Olson videos where he just pops it in. One just by reaching under with fingers. It looks so easy. The other one is using a zip tie, and it slides right in ,like, well, anything that just slides right into what it was supposed to slide right into! I don't know whether to laugh or cry. For over 60 years my hobbies have involved building and repairing all manner of fairly intricate things. My small hands and fingers are usually an asset for this type of endeavor. This is humbling, no doubt about it!
Have tried to slide the ring into the cylinder without the piston? You should be able to slide the ring into the cylinder and have a small gap in the split of the ring. If that does not work then the ring is the wrong size.
 

hacskaroly

2100 Fanclub Member
Yearly GoldMember
Local time
9:15 AM
User ID
27954
Joined
Nov 24, 2023
Messages
1,965
Reaction score
6,483
Location
Northern Idaho, Ehh
Country flag
And I learned that it fits and completely closes in exactly one position, where something inside of the groove accommodates the location of the "split". Poorly worded but you know what I mean.
That is called a locator pin. Keeps the ring from moving around and allows the ring to be installed correctly one way. Instead of using grease to get the piston/ring in, I use WD-40 or straight 2-stroke oil. I just smear it all over the piston and inside the cylinder and it burns off real easy when you start your saw.
 

JeffWischer

Well-Known OPE Member
Local time
11:15 AM
User ID
32428
Joined
Apr 6, 2025
Messages
49
Reaction score
98
Location
Lincolnshire, IL
Country flag
Yes, thanks. Have used 2-cycle oil on previous tries, for exactly the reason you gave. Didn't try the ring alone, but I'm sure it fits. With the red plastic ring compressor, I can easily pinch the ring to where it perfectly disappears into the groove. But I can try it, just to be sure.

Removed the very bottom of the cylinder bore, most of the beveled part. The ring was NOT going to slide down the bevel and compress on the way. Never removed where the piston rides at the bottom of the stroke, but I'm close. So I'm within say .5mm of the "square" cylinder bore. Theoretically the ring should be into the "square " part of the bore by the time the compressor lets go. But this all has to happen in less than 1.5mm! Just can't get it to start without the ring "catching" somewhere when the compressor lets go.
I tried using zip ties to hold the compressor closed, thinking two hands free would help. More trouble than it was worth. Hold compressor tabs with thumb and middle finger of left hand, and can use index finger to steady the cylinder. Using a small plastic mallet to tap with right hand. Gently. But can't lower the cylinder evenly enough for the ring to at least partially enter the bore 360 degrees. It always seems to grab somewhere, And is bulging out somewhere when the compressor lets go of the ring. Also try without tapping. Can't lower it as straight as needs to be done. Get on a plane and go see a dentist in Connecticut?!

It warmed up this afternoon to do what I described, but the sun is going down and I got cold. Warmer tomorrow. But I'm discouraged. I will try the ring test tomorrow. A 45mm ring in a 44mm package would explain a lot, but I really don't think that's it. It wouldn't disappear into the groove so completely if that was the case. I'm stumped.
 

hacskaroly

2100 Fanclub Member
Yearly GoldMember
Local time
9:15 AM
User ID
27954
Joined
Nov 24, 2023
Messages
1,965
Reaction score
6,483
Location
Northern Idaho, Ehh
Country flag
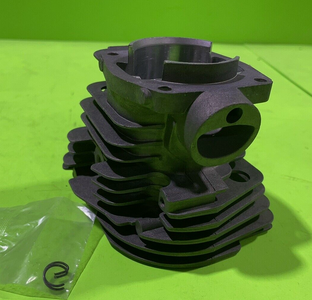
Is it possible to use a plastic flat head screwdriver (or something of the type and try to poke the ring in. My first few attempts at seating a piston in a cylinder that is what I did, just kept poking and adding a little pressure so the ring would not pop out. Its definitely one of those stand on your head with one eye closed to get it, but that might work since there is a little bevel. This is what your cylinder looks like, correct (just making sure I got the right picture in my head).

1746762036759.png
 
Top