High Quality Chainsaw Bars Husqvarna Toys

Echo cs 590,600,620 porting/mod/build thread

Cerberus

Cerberus the aardvark, not the hell-hound!!
Local time
9:05 PM
User ID
11523
Joined
Jan 20, 2020
Messages
292
Reaction score
120
Location
Florida (tampa area)
Once the ring is removed the boot can be "gently" forced out of the hole. Like a rubber grommet or plug.

Sent from my SM-S767VL using Tapatalk
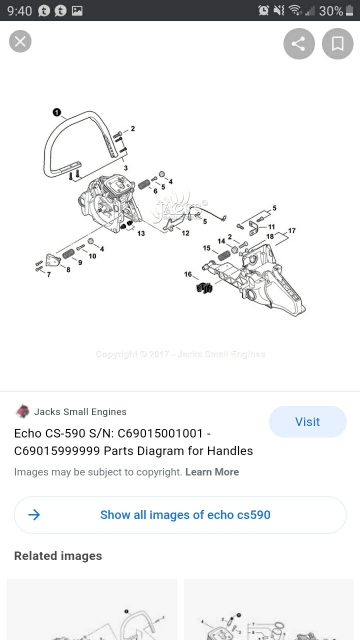
To be crystal clear...this ring comes-with, and is part-of, the intake manifold assembly. You'd re-insert it by removing the ring, inserting the rubber 'male' through the plastic wall 'female' and, from the far side, insert this metal ring?

I just want to be certain, the youtubes I have on this skip-over this part of dissembly/reassembly assuming everyone's taken apart cylinders before....have worked on pretty much everything else, many dozens of times, but never the p&c or crankcase...so stoked to do this especially with how easy it is grinding aluminum especially this large :p
 

Intoxsawcated

Super OPE Member
Local time
6:05 PM
User ID
5643
Joined
Mar 18, 2018
Messages
260
Reaction score
766
Location
ohadinrehtron
Country flag
Yup, remove the ring from the boot. Push an edge of the boot away from the orange hole and slip it towards the cylinder. The boot has a lip on it larger than the hole in the orange wall. Reninstalll in reverse order.

Sent from my SM-S767VL using Tapatalk
 

Intoxsawcated

Super OPE Member
Local time
6:05 PM
User ID
5643
Joined
Mar 18, 2018
Messages
260
Reaction score
766
Location
ohadinrehtron
Country flag
Looks like it would come apart fairly easy. Fewer parts than a 3 series husky.
eb7978579a42b5e906a6790b49c689c5.jpg


Sent from my SM-S767VL using Tapatalk
 

Cerberus

Cerberus the aardvark, not the hell-hound!!
Local time
9:05 PM
User ID
11523
Joined
Jan 20, 2020
Messages
292
Reaction score
120
Location
Florida (tampa area)
I think so!! Thanks a million, am gonna have to grit my teeth and "do the pull" (gonna let it sit in the sun to 'soften' ROFL), was honestly considering just running to my dealer but there's something quite embarrassing about asking "can you help remove my cylinder, so I can port it?" :p

Can I get-away with leaving my carb attached? Honestly I suck with carbs and engines, have rebuilt so many clutches, flywheels, mounted ignition coils to blocks whose female-holes were destroyed, so many 'salvage builds' but I never tuned carbs or engine-blocks so was really looking at this thinking "I should be able to generate enough 'slack room' to get the impulse line disconnected and remove that cylinder, w/o needing to disconnect&remove the carb" am I shooting myself in the foot with this thinking? I don't wanna spend more time doing this under a false impression I'm saving time (heck if it has to be removed, and I fail, I can just run to the shop and pay him to teach me how to properly remove/reconnect the carb! But realllly would be worlds easier for me if I could get that cylinder off w/o removing the carb)
 

Nutball

Here For The Long Haul!
Local time
8:05 PM
User ID
7732
Joined
Oct 31, 2018
Messages
4,042
Reaction score
11,036
Location
Mt. Juliet, TN
Country flag
Looks like you already have the carb off anyway, and it must be off to get the boot off because the little metal retaining ring needs to come out of the boot before the boot can be pushed through the plastic toward the cylinder. It really helps if you can pull the boot from the other side, which means unbolting the cylinder and lifting it away as you push the boot through.
 

Cerberus

Cerberus the aardvark, not the hell-hound!!
Local time
9:05 PM
User ID
11523
Joined
Jan 20, 2020
Messages
292
Reaction score
120
Location
Florida (tampa area)
Looks like you already have the carb off anyway, and it must be off to get the boot off because the little metal retaining ring needs to come out of the boot before the boot can be pushed through the plastic toward the cylinder. It really helps if you can pull the boot from the other side, which means unbolting the cylinder and lifting it away as you push the boot through.
I...I just have so much bad luck destroying hoses LOL but now that I think about it my experience is mostly from rebuilding salvaged-powerheads when I was starting so yeah those lines/carbs were always ready-to-break!! I shouldn't be so scared to pull hoses (in my mind it is/was still "you only remove a hose when absolutely necessary, and knowing you may need to go buy more hoses to complete what you're doing" :p )

What about the decomp valve? I'm on the fence Re leaving it in, or removing & plugging the hole with JB Weld... I like the idea of a decomp to help starting when unit is hot, but I'm afraid of the compression-loss (my new 590 here does not have the same compression that a new 490/390/etc did, I went back to the store and pulled cords, mine was slightly gentler than the rest, now after ~2.25hrs run-time its got more but that's to be expected...anyway I cannot help but thinking "Can't check the valve with my equipment, may as well remove it and eliminate a potential compression-robber"!! Thoughts? Or even just musings on whether more people leave them in / take them out when doing port work!
 

Cerberus

Cerberus the aardvark, not the hell-hound!!
Local time
9:05 PM
User ID
11523
Joined
Jan 20, 2020
Messages
292
Reaction score
120
Location
Florida (tampa area)
Thanks again for all the help guys, this really means a lot, this isn't "some project" it's a long-anticipated, first time porting (of a working powerhead), very big deal for me it is awesome to have this help I mean it's likely I'd have had to go to the shop 1+ times to do this w/o you guys, now am confident I'll get this done today :D Time to grab the driver and setup the bench!!!
 

Woodpecker

Sassy Madam
Staff member
GoldMember
Local time
9:05 PM
User ID
570
Joined
Jan 17, 2016
Messages
7,143
Reaction score
45,684
Location
The middle of the land shaped like a hand
Country flag
Thanks again for all the help guys, this really means a lot, this isn't "some project" it's a long-anticipated, first time porting (of a working powerhead), very big deal for me it is awesome to have this help I mean it's likely I'd have had to go to the shop 1+ times to do this w/o you guys, now am confident I'll get this done today :D Time to grab the driver and setup the bench!!!

And that’s why this place is so great! Beneath the salty rough surface there are some really stand up fellers here. Good on you @Ronie and @Nutball for helping out!
 

Cerberus

Cerberus the aardvark, not the hell-hound!!
Local time
9:05 PM
User ID
11523
Joined
Jan 20, 2020
Messages
292
Reaction score
120
Location
Florida (tampa area)
Is it typically necessary to need a rubber-mallet to un-seat the cylinder from crankcase? Any tips (or no-no's) on technique here? I'm 'fine' using my mallet to dislodge stuff, just anxious hitting this beautiful cylinder lol, but I've got the 4 cylinder-bolts fully backed-out, the intake manifold boot is clear/free of the orange plastic, I "know" it's just that gasket being sticky but not 100.0% so wanted to ask :D

Thanks a ton guys am so stoked:
20210918_121829.jpg
Close!!
I removed the impulse hose, because as I understand it I have to remove the other end of that from the bottom of the cylinder...but the fuel line just seems to "keep the carb with the handle" so, while I have drained the fuel tank already, I am not going to disconnect that line until/unless necessary, seems once I break-loose the cylinder/crankcase junction that it will be clear sailing, just reach in there to pull(push!) off the impulse hose's engine-end and then take my cylinder & get porting :D
 

Cerberus

Cerberus the aardvark, not the hell-hound!!
Local time
9:05 PM
User ID
11523
Joined
Jan 20, 2020
Messages
292
Reaction score
120
Location
Florida (tampa area)
Had no idea they existed, thank you!! Let me ask, is this because of the fear of JB Weld failing? Honestly would much prefer to just plug it if that would work the same just not 'fancy plugged' yknow? (will not be touching the decomp today, am considering this "porting #1 of 2" because I've yet to figure out whether I can get-away with some intake skirt reduction so I can boost intake duration to match the new increased exhaust duration, and also because I'm both:
- only doing like 50% of an exhaust advance as I intend to in my final build, and
- didn't setup to have the thing machined (or even to check squish) so my desire of a perfect 19/20 thosuandths squish will also be in 'round 2'!

And that’s why this place is so great! Beneath the salty rough surface there are some really stand up fellers here. Good on you @Ronie and @Nutball for helping out!
Hell yeah!!! This is obviously not even acknowledging the troves of information already here, that's why I consider this "porting 1 of 2" and am going milder, doing a "mild version of Tinman's 590 woods porting", with the intent to learn more to turn it up on session #2 (biggest variation from tinman's is I'm doing the Iron Horse style intake where there's pronounced ridging on the ceiling, not changing its timing or dimensions just the surface of the ceilling!)
 

Cerberus

Cerberus the aardvark, not the hell-hound!!
Local time
9:05 PM
User ID
11523
Joined
Jan 20, 2020
Messages
292
Reaction score
120
Location
Florida (tampa area)
WOW this thing is sharp, quite an improvement on the 25(28?)cc echo weed-whip cylinder that was my practice subject!!
20210918_130017.jpg 20210918_130542.jpg

Sadly most of the base stuck to the crankcase, not the cylinder, but hey I can jam-it to prevent chips and grind it off (what is preferred for this? I have basically everything, 3 small collet sizes on 1.5A dremel, then 6A 1/4" die-grinder, then proper angle grinder...if only I could just get in there w/ a flap disc :p I have most-every attachment so would love to hear suggestions on how to most-easily remove this base gasket!!

//praying I didn't use much/any lateral force when removing cylinder, I immediately see that force needed to be on a forwards/backwards plane of motion (in-line with the piston movement) and that lateral pressure would put lateral force onto the piston/cranks which I have to imagine is no bueno, hopefully there's some tolerance/strength here that I don't have much to worry about, genuinely cannot recall which direction the force was / did it with my hands so was probably more of a '360 around-the-edges' type of motioning than anything...it did come off gently enough, I think!!
 

Cerberus

Cerberus the aardvark, not the hell-hound!!
Local time
9:05 PM
User ID
11523
Joined
Jan 20, 2020
Messages
292
Reaction score
120
Location
Florida (tampa area)
With how easy it would be to do right now.... I know it's probably dumb as I haven't researched it enough yet but what would the potential downsides be if I increased intake duration a weeee bit by shaving intake-side-skirting? The idea of opening the exhaust, w/o increasing the "movement to it" or flow to it, seems like only doing half the job...will surely leave this for next time but would love thoughts on this, and to reiterate I am doing a very modest exhaust ceiling raise basically 3-4X what I'm losing from the gasket delete, I know raising the exhaust ceiling lowers my compression so I want to approach it stepwise, intentionally just doing "some now, and the rest on round-2"!
 

Ronie

Here For The Long Haul!
Local time
9:05 PM
User ID
5495
Joined
Mar 2, 2018
Messages
2,654
Reaction score
8,947
Location
NC
Country flag
Glad to see you got it off.
 

Cerberus

Cerberus the aardvark, not the hell-hound!!
Local time
9:05 PM
User ID
11523
Joined
Jan 20, 2020
Messages
292
Reaction score
120
Location
Florida (tampa area)
If anyone's got a good link on how to make a timing wheel from a drill chuck...I've got my wheel printed out, have my old beater drill....spent half an hour yesterday trying w/o success to remove the chuck, gave-up thinking "I'm only doing minor work that is easily 'back-tracked' by the pictures taken" (and am just doing a 'copy porting' so really just gotta ensure I'm ending near-50% of where Tinman ends up, relatively....easy to figure out physical #'s, w/o a degree wheel, in this case!) But do genuinely wanna make/use one, have plenty of other saws / porting jobs coming up if/when this goes well so I know I've gotta find a tutorial, youtube did not provide :/ Tempted to just take my grinder to it and gut it lol but don't wanna add that before doing my portwork am nervous enough expect I'll be able to back-track #'s within a couple degrees..
 

Cerberus

Cerberus the aardvark, not the hell-hound!!
Local time
9:05 PM
User ID
11523
Joined
Jan 20, 2020
Messages
292
Reaction score
120
Location
Florida (tampa area)
Glad to see you got it off.
Thanks again for your help man I owe you, cannot explain the feeling pulling that sucker off.....it is a beautiful cylinder, am about to get-to-grindin', gonna que-up Iron Horse's vid on how he does his 'slotted intake ceilings' and start work indoors with the 1.5A dremel using gentle bits, I got real far with them on my practice cylinder so -- if it takes 5X longer but ensures I'm doing things more evenly -- I'm plenty fine using quick-clogging sanding bits and the like :p Can run to Ace for a proper aluminum bit for the dremel, or swap to the 6A if necessary (which eats aluminum like butter even with regular carbide rasps, if it weren't so clunky it'd be all I'd use on this I wouldn't have even bought the dremel kit yesterday!)
 

Ronie

Here For The Long Haul!
Local time
9:05 PM
User ID
5495
Joined
Mar 2, 2018
Messages
2,654
Reaction score
8,947
Location
NC
Country flag
Good luck with your port job, I don't have enough experience to be giving out porting advice except what I said on AS yesterday.
 

Woodpecker

Sassy Madam
Staff member
GoldMember
Local time
9:05 PM
User ID
570
Joined
Jan 17, 2016
Messages
7,143
Reaction score
45,684
Location
The middle of the land shaped like a hand
Country flag
You’ll want to forget tinman and ironhorse. It’s pretty hard for the uninformed to tell the difference, but many YouTube porters don’t know exactly what they are doing. I just watched a guy by the name of bayou country saws put a degree wheel on a saw completely wrong and act like it was the defacto way to do it. Lots of bad info out there in video land. Itonhorse and tinman are generally regarded as hacks around here. Stick to the info you find here and you won’t go wrong with this saw. Hit up @Red97 as he is the one who started this thread. And don’t be afraid to keep asking questions.
 
Top