High Quality Chainsaw Bars Husqvarna Toys Hockfire Saws

Echo cs 590,600,620 porting/mod/build thread

Cerberus

Cerberus the aardvark, not the hell-hound!!
Local time
1:24 PM
User ID
11523
Joined
Jan 20, 2020
Messages
292
Reaction score
121
Location
Florida (tampa area)
You could buy a pop up piston for it if you're looking for more compression.

https://www.ebay.com/itm/1849476079...fvIHgiKTHLRkxeMHiMUNq_pQKAxQATtQaAlOPEALw_wcB

First I was like "OMG I how fast can Amazon get me one of these? 2nd ring *and* a 'riser' top on the piston to create more compression*, sign me up!" but then see @Nutball 's advisements and am now confused/uncertain.... Is Golf a brand or a type? And is 'brick' here meaning heavy/weight, IE heavier piston is slower, or 'brick' like 'bricked-engine' meaning maybe it has propensity to slam-into // heat-fuse to the top of the cylinder?

Would never have guessed there was legit 3rd-party performance parts for the 590, any others you guys know-of? Will be googling heavily now, obviously, but had thought such things as "good aftermarket performance-pistons" were a small niche focused on the 44*/66* crowd exclusively, apparently not :D

Can you swap pistons without taking apart the case? If I had to take the case apart, it'd be a deal-breaker (for now!)

2nd-ring seems to be a big highlight, I'd always been under the impression that the 2nd rings are "nice, but not too critical", would love to hear specifics IE maybe there's more compression because-of the 2nd ring? If so, are we talking 0.5psi or 5psi? Also, Re compression, is it true that the seal-off of a decomp-valve boosts compression? Is this "in theory" or actually >1%?

Would certainly get a better piston if I knew it'd net me 15psi or take my squish from 30 to 20thousandths, and I did not have to split the case in-half to replace it :P

Raising the exhaust 20% of the total height seems like a lot, how much did you raise it?
I'd thought I did 20% of OEM port-height on the exhaust-ceiling (and around 15% enlargement, relative to OEM-height, of the intake, by grinding its floor) however am now a bit uncertain if I did go as-far as I'd thought....will have a timing-wheel on it today (going to have to McGuyver something ugly because the chuck will NOT come off this old, corded, generic Black&Decker etry-level drill, the chuck is keyed and I can 'back spin' it but it just spins the engine and there's no 'lock' to stop the engine from spinning.... Going to need to come up with something else, shouldn't be very hard to make, calibrate/verify and put to use, so I can come back here w/ better #'s because I'm itching to get into Round-2 I have all the bits and everything am only holding-back til I finish "the plan"!

On the 600 and 620 I did I went the opposite direction and lowered the exhaust because I wanted it to have good torque to run a 24" bar. I think they are both at 109.
This blows my mind I mean I read the entire Exhaust porting thread here, have heard & learned a bunch on it and...this is the 1st time I've heard of hitting the exhaust-floor!

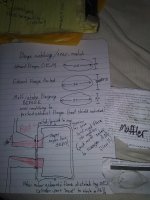
Would you mind explaining the logic behind "lower exhaust-floor for torque", and any other "related considerations" (IE what do you change/do to work with a lower exhaust-floor?), any enlightenment would be greatly appreciated, have dozens and dozens of hours of youtubes & reading, including 2 reads of the Exhaust Porting megathread here, and was utterly unaware of the concept of exhaust-floor timing changes until your post here! I mean, hitting the exhaust floor itself, I honestly cannot tell why the goal is anything-but "flare that thing out as-far-as-possible with the confines of the cylinder's aluminum body", for instance here's a crude sketch to show what I mean, Black ink is "OEM cylinder and muffler", and Red ink is material that'd be removed (note: pic has the muffler on as it was drawn for showing the muffler//outlet-flange port-matching that is necessary on this platform)
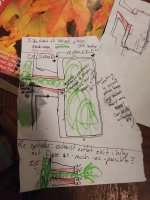
20210922_152713.jpg
[Green is gas/air/internal-volume!]
Sorry so crude but hopefully illustrates my point, in fact I'm GG over to the exhaust-megathread to ask there since "it belongs" but I'm having trouble understanding why, subsequent to choosing your inside-facing window's dimensions, from there to the exhaust port's exit-flange, all I can think is "you should dog it out as much-as-possible" (water obscures the top-most 'grinding' in my picture but that line was to show how you can still make a huge reduction of material starting from the OEM port-position you simply sacrifice some flare (maybe....unsure how-thin you can go...Honestly I can't see why you wouldn't want to get the outer-perimeter ("Outer exhaust-port flange perimeter") to be both:
- Circular (since circles flow best and, hey, it's easiest to port-match to the muff :P ), and
- as wide as the cylinder's material allows... NOT saying this about the port-window on the inside-face of the piston, but as it flares-out to the outer-exhasust-port-flange I can't see why you wouldn't wanna get paper-thin (well, close to it!) since I'd think more volume here = better, as a rule, for example flare all sides like this (only to a circle or as much of a circle as the OEM shape allows you to achieve, at least!)
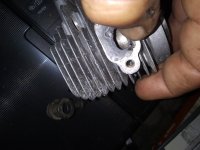
20210922_152818.jpg


Be back with timing #'s today or tomorrow, have tons of new tungsten bits so I can do it right, am blown away how well they work, anyway am eager to finish my "blueprints" so I can rip it off & get (back-to!) grinding ;D Sadly that chuck is NOT coming off my old Black&Decker entry-level, keyed-chuck corded drill, so frustrating but it just spins the engine backwards and there's no 'lock-out' to stop it so yeah that chuck isn't going anywhere, am just gonna use a "ghetto interacing" I mean it's just a disc I have to get flat, can check it @ tdc&bdc to ensure proper 'sync' before use but don't expect any fight doing this!!
 

Cerberus

Cerberus the aardvark, not the hell-hound!!
Local time
1:24 PM
User ID
11523
Joined
Jan 20, 2020
Messages
292
Reaction score
121
Location
Florida (tampa area)
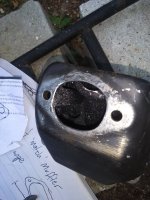
^that's a 25cc echo weed-whip cylinder, probably 10-15yr old, no powerhead to put it back-into it's just for grind-practice -- but did find it real interesting to see that "groove" / channel carved into the right-side-roof of the exhaust port (it's still visible in the the JPG from prior post even though I ground the edge of that port to <1mm, was still able to slope that grinding to keep that 'channel' so I could get a pic w/ it :P )
 

Cerberus

Cerberus the aardvark, not the hell-hound!!
Local time
1:24 PM
User ID
11523
Joined
Jan 20, 2020
Messages
292
Reaction score
121
Location
Florida (tampa area)
A way to work the upper transfers would be before a lathe, if someone was starting from scratch.

Still curious as to how many MM you raised/lowered the ports?
Thanks a ton for posting, your work here on this platform more-than speaks for itself (feel like you and the BG user have similar avatars, *constantly* confusing you two :P ) anyway would be very very curious what you consider optimal-#'s at this point, after having done multiple portings? Also.....did you advance its timing via the flywheel keyway? If so, how did you determine you could & determine just how many degrees? Seems this is something, like a base gasket/squish, that you just would rather ensure is "as optimal as you can get it" yknow??

For the #'s....will post below what I "aimed for and thought I was doing" but looking at my pics of the actual porting 'After' pics I don't suspect I got anywhere near as-full as I'd thought (I lost my sharpie line and finished by-eye, as I was thinking I was "being conservative" since Tinman did even more, but now he's got a video up saying "My ported 590 isn't performing right, still haven't resolved WHY" and Ronie here telling me he actually went the other way (exhaust floor, not ceiling) Would love hearing your #'s, I'll have a timing wheel on and get my true #'s by tomorrow if I can't get to it today but from what I tried to do (am guessing I really just hit like 3/4ths of this, and also will acknowledge I didn't get a"good&even" porting from the front to the back, IE hardly any material was removed from the exhaust port's exit-flange area (my 'Round 2' I'm thinking to make that exhaust port's "outwards flare" FAR more exaggerated, and more circular, basically as large as the flange material allows, then port-matching to the muffler like the hand-drawn JPG 2 posts up ;)
Errr I said I'd give the #'s :P

Re #'s, in millimeters:
Exhaust:
OEM height was 10.5mm, I made it 13.125mm (25% boost)
Intake:
OEM height was 15mm, I made it ~17.25mm (15% boost)

I removed base gasket as well, am thinking of "heavily sanding", like 5X, this area to get an extra few thousandths next time(I wonder if it's better, for performance, to use a pop-up or an OEM domed piston inside a dropped cylinder?) Also want to just JB Weld the plug, because I can't stop thinking "if I make a fat plug, I can get eek-out a lil bit more compression in the combust chamber" lol ;D (although I do have the mindset of "Many small improvements can add-up to a large overall improvement" when approaching this!)

Depending on your porting it should like 12.8k out of the cut no load.

Stock carb has to have the L needle way in to get higher rpm even with the H closed off. With the L way in it makes them a pain to start and return to idle. Best is to swap the carb nozzle and re tune.

Limiter in the 590 coil is 13.2-5k 620 coil is unlimited. I have seen over 15k on that coil.
Over 15k??? Wow ok then I guess that is probably unlimited lol!!

Seeing you mention to someone else Re RPM's.... Red, my saw is new and has always been "feeling like it has low compression", and NEVER did it hit RPM's I liked or expected, but it pulled & cut hard so I was plenty fine... But hearing the #'s you guys are talking of, how much of a drop in RPM would you guys be seeing if you 'fattened up' the carb? I guess I'm just uncertain how much I could/should be getting out of a stock 590 as, initially, cut-speed was like 7-7.5, now it's 9-9.5k RPM....nowhere near the 10k+ you guys are seeing and I can't tell if I'm just running everything so fat that I'm limiting myself, or if my tach sucks, or if something's wrong (saw cuts where a 60cc "should"!) Fuel is eth free, fresh, 40-45:1 using HP Ultra, carbs always set rich but I know the H jet on my 590 is barely past 1/2 turn out, H is maybe sitting at 5/8 now. L was fattened enough to just before it'd load-up & bog-down on idle from too much fuel, it's hovering right around 2600 idling now so will be leaning L the slightest bit to get factory-spec'd 2800 idle ....but RPM in-cut, cannot tell WTH is wrong,it's not just the 590 it's my 355t as well, thing never ever hit the big #'s I was expecting, would like to say it's the tach but the thing seems to run great in every way I can test it!
 

Ronie

Here For The Long Haul!
Local time
1:24 PM
User ID
5495
Joined
Mar 2, 2018
Messages
2,668
Reaction score
8,993
Location
NC
Country flag
Would you mind explaining the logic behind "lower exhaust-floor for torque",
I did't lower the exhaust floor I cut the base and that lowered the exhaust roof. My rudimentary understanding of it is that a lower exhaust gives you more torque and a higher exhaust give you more RPM but if it's to high it will have a narrow working RPM range. Like I said before, I'm not a porter and have only done my own saws but of the ones I have done I prefer the ones with more torque.
 

Ronie

Here For The Long Haul!
Local time
1:24 PM
User ID
5495
Joined
Mar 2, 2018
Messages
2,668
Reaction score
8,993
Location
NC
Country flag
flare that thing out as-far-as-possible with the confines of the cylinder's aluminum body",
I can't really help you with that question, on almost all the exhaust I've done I've only made them a little bigger to get a cone shape and haven't taken it to maximum diameter that I could. I don't have a pic of my 600 or 620 exhaust exit but here's one of my 2152, maybe if I'd opened it up more it would be a little faster, I don't know but it's a very fast saw with lots of torque.

thumbnail_KIMG1513.jpg
 

Hillbilly01

Well-Known OPE Member
Local time
1:24 PM
User ID
12512
Joined
May 7, 2020
Messages
48
Reaction score
157
Location
Northwest PA
Country flag
Have been wondering... Is most-of the gains from porting achievable via dremels and other basic gear? I guess I'm looking at my "compression stalemate" here fearing going down this porting-path til I get a good enough handle to realize that a good port-job requires true metal-fab machining, is this generally the case? As mentioned I was planning to get a subtle milling off the bottom of my cylinder but it's got protrusions so can't be done on a flat lathing setup, this kind of gear isn't something I would even know where to begin asking for access to tradesmen for (and can only imagine what they'd wanna charge me) This'd mean if you're not privvy to a machining shop, your portwork will always be 2nd rate, am not saying I'd be uninterested if that were the reality but just want to know upfront if it's so!

It can be cut in a lathe. You just have to cut a set of soft jaws to the inside diameter of the cylinder, then chuck up on the inside of the cylinder, stopping the bottom of those protrusions against the face of your jaws. Then take an o.d. grooving tool with enough clearance and use the back side of the insert to cut the bottom of the cylinder where it meets case. Just measure the outside diameter of those protrusions and program your tool to cut down until you're like .06 or .07mm per side away from that outside diameter of those protrusions. There is a plenty big enough chamfer on the case that the radius on your grooving insert won't cause the cylinder to sit up off the case once it's assembled. I believe I took .2286mm(.009") off the bottom of mine to get the squish to .4862mm(.019") when it was dry. Figuring the motoseal would take me safely above .020".
 

Cerberus

Cerberus the aardvark, not the hell-hound!!
Local time
1:24 PM
User ID
11523
Joined
Jan 20, 2020
Messages
292
Reaction score
121
Location
Florida (tampa area)
Should do the trick.
These high RPM-ranges.... As mentioned my stock/new 590 didn't have nearly the RPM you guys are seeing, but my 355t (1.25->1.5yrs old now) also never got anywhere close to its limiter...is this me doing something wrong, or an artifact of using a "2-checks per second, china-ordered, under-$10" tachometer? (I know nobody could be sure but I find it odd, now, reflecting & realizing I NEVER hit RPM's anywhere near others' and I don't mean "my saws aren't modded well" I mean even outta-box conditions..

I did't lower the exhaust floor I cut the base and that lowered the exhaust roof. My rudimentary understanding of it is that a lower exhaust gives you more torque and a higher exhaust give you more RPM but if it's to high it will have a narrow working RPM range. Like I said before, I'm not a porter and have only done my own saws but of the ones I have done I prefer the ones with more torque.

Thanks a ton for clarification, was really throwing me for a loop pondering exhaust-floor lowering! So to be clear... You didn't touch any of the inside-perimeter of that exhaust port? How many degrees did your ports drop from your gasket? I didn't get OEM numbers but will get my post-squish numbers soon (I suspect my unit to be "on the high-end" of their model-to-model variance when it comes to squish, IE I suspect mine's higher than most others because my compression is lower than it should be and there's no other reason I can fathom, P&C are both shiny&un-scathed, muff isn't "open-can'd", no other good reason (except maybe a wimpy/leaky decomp valve? Gotta say I'm beyond tempted to get rid of mine, did you keep yours? Is it true that, if I use JB weld, I can "add extra" that effectively reduces, just by a lil, the volume of my combustion chamber, thereby increasing compression further?)

Re heights // effects.... The high-roof = higher-RPM (but with lower torque!) is one I've definitely heard.... Still uncertain but it seems it also increases compression because-of the increased blowdown period. Never heard Re lower floor being associated with torque though, hopefully someone can help elaborate/explain the floor a lil better (I'll be updating, and'll link it here, that Exhaust Port megathread and this is one of my big Q's!)

Re "I prefer torque"...I felt same, but keep getting hints that it's not as simple as that (IE some kinda "nice and neat inverse-linear correlation between RPM and torque, and we only need find the sweet-spot"), am not done w/ the Porting megaseries yet so not yet in-position to request or suggest this but IMO a newbie like myself would GREATLY benefit from some 'megathread' on "The typical causative effects of various port-work" (as well as "The Interplay between the ports, the casing and other engine components, and power" to kinda 'piece things together' because the port-specific threads are hardly authoritative they're chock-full-o information but I couldn't produce a good/complete working summary from any of the threads I've read yet (I don't mean I can't read, I mean there's too much info missing / unclear) Don't get me wrong I'm grateful.as.fuuuq for that resource, and the other megathread that tries collecting porting links, am just hating that I'm convinced I'll finish this series and still not be comfortable making my own #'s for my 32cc "pig saw" that is my next saw to be ported and one I will certainly need to choose my own #'s on!

[PS- Re powerband...I've yet to hear of anything effecting the range of the powerband -- I'd say that, ideally, we should want a super-tight powerband that is peaked right at our cutting-RPM -- but it seems that case-volume being larger leads to more top-end power, whereas lower case-volume leads to more lower-end power...So I can tell you that when I touch my case I'll certainly be thinking to remove as much as I can get-away with!!]

I can't really help you with that question, on almost all the exhaust I've done I've only made them a little bigger to get a cone shape and haven't taken it to maximum diameter that I could. I don't have a pic of my 600 or 620 exhaust exit but here's one of my 2152, maybe if I'd opened it up more it would be a little faster, I don't know but it's a very fast saw with lots of torque.

View attachment 309829
May I ask what kinda tool you use? I only got a $20 walmart-dremel, after finding my good 6A, 1/4" collet die grinder was too large....anyway I did my 1st round using sanding stones, lol was trying to be extra conservative, but just got my 1st of 2 packs of 1/8" collet carbide burrs for the 1.5A walmart-dremel, barely $40 when I add the pack of long-shank bits that are still en route and JESUS does this thing carve!! I have years of work using the 6A grinder with regular carbide rasps on deadwood so this lil thing is super easy for me to control, I'm hoping I can really hog out the exhaust port's flare....will be posting to Exhausts momentarily got held-up on the bench here :P


~~~~~~~~
Product-recommendation request: Cheapest tachometer I can use w/o thinking "is this so *s-wordty that it's ONLY use is for setting Idle speed?" Also, cheapest digital calipers I can use for checking solder for squish? My calipers are analog, any 'tricks'? If I need digital, will the $30 Harbor freight unit cut it? If not, again, reco's would be greatly appreciated!!
 

Red97

Mastermind Approved!
GoldMember
Local time
1:24 PM
User ID
385
Joined
Jan 2, 2016
Messages
7,494
Reaction score
54,120
Location
MI
Country flag
Thanks a ton for posting, your work here on this platform more-than speaks for itself (feel like you and the BG user have similar avatars, *constantly* confusing you two :p ) anyway would be very very curious what you consider optimal-#'s at this point, after having done multiple portings? Also.....did you advance its timing via the flywheel keyway? If so, how did you determine you could & determine just how many degrees? Seems this is something, like a base gasket/squish, that you just would rather ensure is "as optimal as you can get it" yknow??

For the #'s....will post below what I "aimed for and thought I was doing" but looking at my pics of the actual porting 'After' pics I don't suspect I got anywhere near as-full as I'd thought (I lost my sharpie line and finished by-eye, as I was thinking I was "being conservative" since Tinman did even more, but now he's got a video up saying "My ported 590 isn't performing right, still haven't resolved WHY" and Ronie here telling me he actually went the other way (exhaust floor, not ceiling) Would love hearing your #'s, I'll have a timing wheel on and get my true #'s by tomorrow if I can't get to it today but from what I tried to do (am guessing I really just hit like 3/4ths of this, and also will acknowledge I didn't get a"good&even" porting from the front to the back, IE hardly any material was removed from the exhaust port's exit-flange area (my 'Round 2' I'm thinking to make that exhaust port's "outwards flare" FAR more exaggerated, and more circular, basically as large as the flange material allows, then port-matching to the muffler like the hand-drawn JPG 2 posts up ;)
Errr I said I'd give the #'s :p

Re #'s, in millimeters:
Exhaust:
OEM height was 10.5mm, I made it 13.125mm (25% boost)
Intake:
OEM height was 15mm, I made it ~17.25mm (15% boost)

I removed base gasket as well, am thinking of "heavily sanding", like 5X, this area to get an extra few thousandths next time(I wonder if it's better, for performance, to use a pop-up or an OEM domed piston inside a dropped cylinder?) Also want to just JB Weld the plug, because I can't stop thinking "if I make a fat plug, I can get eek-out a lil bit more compression in the combust chamber" lol ;D (although I do have the mindset of "Many small improvements can add-up to a large overall improvement" when approaching this!)


Over 15k??? Wow ok then I guess that is probably unlimited lol!!

Seeing you mention to someone else Re RPM's.... Red, my saw is new and has always been "feeling like it has low compression", and NEVER did it hit RPM's I liked or expected, but it pulled & cut hard so I was plenty fine... But hearing the #'s you guys are talking of, how much of a drop in RPM would you guys be seeing if you 'fattened up' the carb? I guess I'm just uncertain how much I could/should be getting out of a stock 590 as, initially, cut-speed was like 7-7.5, now it's 9-9.5k RPM....nowhere near the 10k+ you guys are seeing and I can't tell if I'm just running everything so fat that I'm limiting myself, or if my tach sucks, or if something's wrong (saw cuts where a 60cc "should"!) Fuel is eth free, fresh, 40-45:1 using HP Ultra, carbs always set rich but I know the H jet on my 590 is barely past 1/2 turn out, H is maybe sitting at 5/8 now. L was fattened enough to just before it'd load-up & bog-down on idle from too much fuel, it's hovering right around 2600 idling now so will be leaning L the slightest bit to get factory-spec'd 2800 idle ....but RPM in-cut, cannot tell WTH is wrong,it's not just the 590 it's my 355t as well, thing never ever hit the big #'s I was expecting, would like to say it's the tach but the thing seems to run great in every way I can test it!


Did you raise the exhaust? And lower the intake floor?

If you raised the intake it may be very close to snagging the ring.

That is quite a ways up with the exhaust port, I am curious what degrees that ends up at.

May not have enough transfer duration to take advantage of the raised exhaust.

Your saw should tune well around 13k out of the wood. You may be extra rich on the tune. That will slow things down too.
 

Cerberus

Cerberus the aardvark, not the hell-hound!!
Local time
1:24 PM
User ID
11523
Joined
Jan 20, 2020
Messages
292
Reaction score
121
Location
Florida (tampa area)
Oh I wanted to share... I'm anal/OCD as-can-be when it comes to air-filtration and no fines ever getting into/past my carb's venturi, anyway thanks to this forum I learned in-advance of purchase that the 590's air filter is known for letting fines through, which isn't because "too low a micron-count"/too-porous a filtration media, but by poorly-sealed interfacing in that area...

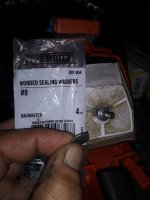
SO... I do the usual of using grease (I use 'heavy marine grease' by Lucas, it's blue and 'calcium sulfonte' type) around my interfaces -- eager to hear better options, red Permatex works great, until some usage and it falls-apart due to no tolerance for gasoline, am currently thinking the new Motoseal I have may actually be a good gasket-maker for airboxes! Anyways what I wanted to share was a VERY simple, cheap piece I consider requisite for proper sealing:
20210922_174601.jpg
These lil suckers fit onto that central shaft perfectly in fact you have to fight/spin them on, and you can literally 'peg' the air-filter into place with just the washer's pressure on the shaft! And Re concerns of "now there's something pushing-into the filter", I pushed-into mine and it can take far more flex than the outer cover's nut will *ever* push it, you could put 3 of these onto the center bolt and it would not be a problem but 1, with some marine grease under it before you press it into/onto your air-filter, is plenty for sealing-off that center post which I am gonna go on a limb and say I suspect was the primary location of fines-entrance!
 

Ronie

Here For The Long Haul!
Local time
1:24 PM
User ID
5495
Joined
Mar 2, 2018
Messages
2,668
Reaction score
8,993
Location
NC
Country flag
You didn't touch any of the inside-perimeter of that exhaust port? How many degrees did your ports drop from your gasket?
I did but I didn't go as far as I could have was what I was trying to say.

I didn't check the timing before and after a base gasket delete but my guess would be it changed a little more than a degree.
 

Ronie

Here For The Long Haul!
Local time
1:24 PM
User ID
5495
Joined
Mar 2, 2018
Messages
2,668
Reaction score
8,993
Location
NC
Country flag
You was asking about the exhaust port, here's a screen shot of Red97's exhaust from page two or three of this thread. Did you take any pics of your port work?

Screenshot 2021-09-23 1.04.33 PM.png
 

Cerberus

Cerberus the aardvark, not the hell-hound!!
Local time
1:24 PM
User ID
11523
Joined
Jan 20, 2020
Messages
292
Reaction score
121
Location
Florida (tampa area)
Stupid Q but that ^ linked decompression-plug (not valve!) is 'generic' branded and doesn't mention Echo...and I cannot locate one onilne that specifies it's for a 590/620 chamber....

I would've wanted to order overnight/2-day via Amazon (and will if any generic works!) BUT, considering JB Weld does seem to legitimately work, I can't help think: "Why can't I just go to Ace Hardware, cylinder-in-hand, find the closest-fit nut that I can to plug the hole, and use JB Weld as my 'Loctite' when inserting this nut?", that'd work just fine right?

(This is solely a "timing/rushing" thing, am aiming to do my 2nd/final round either tomorrow or over the weekend if tomorrow doesn't work, am needing to meet-up with a friend who'll be determining how thick my squished-solder is LOL so that I can get that part right, seems a pretty damn critical/primary part of the job to get right, the squish! Still uncertain if 20 is ideal, or if I can go for 18 thousandths....will ask that in the Compression thread, have some gnarly unique grinding I want to show there / get critiqued!!)
 

Cerberus

Cerberus the aardvark, not the hell-hound!!
Local time
1:24 PM
User ID
11523
Joined
Jan 20, 2020
Messages
292
Reaction score
121
Location
Florida (tampa area)
Did you raise the exhaust? And lower the intake floor?

If you raised the intake it may be very close to snagging the ring.

That is quite a ways up with the exhaust port, I am curious what degrees that ends up at.

May not have enough transfer duration to take advantage of the raised exhaust.

Your saw should tune well around 13k out of the wood. You may be extra rich on the tune. That will slow things down too.
I'll time my intake the next time I open it up, when I did Round-2 I wasn't gonna change it (had already removed 1-1.25mm of flooring) so didn't measure just better-shaped the intake in Round-2 and VERY slightly widened it (honestly it was really more for matching/tapering-into the rounded-corners I did, am uncertain if "chamfer" is the right word because some seem to intentionally make a beveled edge which my brain just doesn't comprehend, I can only see smooth being better so my ports' inner-perimeters are smoothed (echo has realllly sharp-edged bevels, they're nice looking and am sure they don't snag but expect flow/speed of an 11k RPM machine to be better the smoother the edges!)

I also did a subtle 'flaring' of the intake's outer perimeter (the flanging where it mates to the intake-boot) to ensure there's never a misalignment (I hate when they machine something like that to such tight tolerances, makes it more-than-likely you're not getting 100.0%...but if you grind/chamfer the outer-flange edge of the intake, you eliminate that worry :D
Intake's outer-perimeter flared for intake-boot:
20210927_204940.jpg

Exhaust was raised a lil more, initial job was not remotely as aggressive as I'd thought (LOL the pictures I have of it should've made that more than clear to me, felt pretty silly when first comparing :P ), final height was 106.125* (that is an average of 3 measurements, my 3 "data sets" for this had VERY little variance, am incredibly confident that number is accurate within 0.25* probably closer)

Exhaust and intake were 'shaped' a little, didn't make them "Stihl squares with rounded-edges" like my instinct was screaming to, but worked-towards that (gently, it's not much, they're still decidedly ovalesque!) In doing this, and in 'rounding' my chamferring, I ended up just barely widening both of the ports (didn't need to measure the piston because it was truly like 0.25mm increases, just enough to match/blend/taper my new inner perimeter shapes!

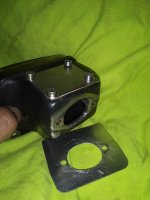
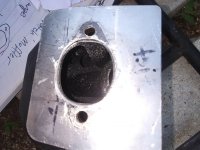
Re shapes, I made the exhaust's outer-flange about as large as I could get-away with (limiting factors being the metal of the cylinder itself, and the mating-surfaces for muffler/heat-shield), and of course ensured full port-matching to the heat-shield&muffler (picture-limiting so will make a 2nd post beneath this to show the muffler, it's pretty unusual for a 590)
20210928_183540.jpg

Re transfer-duration...I feel ridiculous but have never even heard that term, and am stretching my brain trying to understand how to measure it (especially in a saw like this where the uppers have slightly different heights...I'm still not sure why they separate the 2 channels in the 1st place, so far as I can tell they're moving air/charge in the same direction as one another!) HOWEVER, I did bore-out/flare out the bottom of my transfers, after seeing that they did not mate perfectly to the casing (was losing like .125mm of my lower transfers because of how they sat on the case), so I did the bottom of the lowers and then just-enough of the lowers to blend-into their new bottom profile:

Will say that I'm still wondering if the best designs aren't really doing a radical change to the case-side (and flared cylinder-side) of the transfer-porting, for instance here's one that I did to illustrate the example/idea in my head, one side is untouched, the other side has one half carved, and one half marked with Sharpie to show what I mean:
20211008_113223.jpg and here's a (VERY ROUGH!) carving on the cylinder to take that increased "lower transfer basin capacity", and funnel/condense (pressurize?) it as it goes upwards to escape from the uppers: 20211008_113254.jpg Though admittedly I'm still confused as hell by why the transfers are "aimed" as they are, wish there were some slow-moving GIF illustrating the movement of gas/charge pulses through the engine as the piston goes up&down!

Re the/my 590 though, here's my final transfers:
20210927_205200_HDR.jpg


Re tuning, I'm happy that my perma-mounted tachometer is showing me 11's all the time now (had never done that before, in its 8hrs of use!), but have yet to really even attempt tuning it....have it in my head that it may be worthwhile to just film it and request help here because I have a couple others I want someone-else to hear (one to help me with, and one to verify I actually do have it 'perfect' :D)
 

Ronie

Here For The Long Haul!
Local time
1:24 PM
User ID
5495
Joined
Mar 2, 2018
Messages
2,668
Reaction score
8,993
Location
NC
Country flag
I can only see smooth being better so my ports' inner-perimeters are smoothed (echo has realllly sharp-edged bevels, they're nice looking and am sure they don't snag but expect flow/speed of an 11k RPM machine to be better the smoother the edges!)
The bevel around the ports that the rings cross is to help ease them in and out of the port, the wider the port, the more of the ring slips in.

Forgive me if I'm misunderstanding what you were trying to say.
 
Last edited:

Cerberus

Cerberus the aardvark, not the hell-hound!!
Local time
1:24 PM
User ID
11523
Joined
Jan 20, 2020
Messages
292
Reaction score
121
Location
Florida (tampa area)
I did but I didn't go as far as I could have was what I was trying to say.

I didn't check the timing before and after a base gasket delete but my guess would be it changed a little more than a degree.
Tinman's videos showed almost no difference on the #'s after removing it (I guess that's because this is a longer stroke / thinner piston than normal for this displacement? Which is why it's slower but torquier?)

You was asking about the exhaust port, here's a screen shot of Red97's exhaust from page two or three of this thread. Did you take any pics of your port work?

View attachment 309959

I have since stopped doing all that.
Red could you elaborate on this? Ronie yes I had that picture, among many others, on my screens (3-screen setup here ;D ) while doing my porting work!! Lots by Red97 and BGE!!

I did kinda disagree with whether the "most common" muff mod on these 590's is "just make a big hole on the top of the rear-half of the baffling", I would've thought that ideal a month ago -- when I still thought my empty-can 355t muffler was 'optimal' -- but since learning of the roles mufflers play in performance, and why a properly tuned muffler increases power from an engine, it made me re-think the 590 muffler...

I'd already made that big hole on the top, so I just sealed the entire top off....this of course blocks the OEM "straw" exit-hole, but I replaced that (which ONLY allowed exhaust-escape from the front of the baffle) with a pair of holes on the upper-front of the muffler, this IS staying with the OEM design of no gas escaping from the rear-half of the muffler, only I doubled/tripled the size of the holes in that central baffle, and the new exit-holes on my muffler are about 1/3rd larger than the OEM one was (they total around 75% of the area of my ported/flared exhaust flange)

Muffler port-matching, or as I began calling it "over-matching" because seeking perfection is not ideal here IMO (because any misalignment during install means you're now choking flow a lil, whereas if the heat shield's perimeter is 5% larger than the exhaust flange, and the muffler's intake is 5% larger perimeter than the heat shield, you can bolt-up everything assured your exhaust gas is taking a nice smooth expanding path from the cylinder straight-into the wall of the baffle in the muffler:
ugly sketching of how I'm seeing this:
20210930_132728.jpg
^ pressed paper into the ports to get true shapes (yes my port-perimeters are awful, cest la vie can just say it's my 1st time so be easy ;D ), used these to ensure that "the red ink" from the picture would b how my exhaust charge would move, expanding and unrestricted, until it's inside the muffler nailing the central baffle/the 'breather tube'.

some pics of my 590's muffler:
20210929_183718.jpg
20210929_174755.jpg 20210929_174825.jpg
I had VERY small mating-surfaces to work with so ensured they were very very smooth for a good seal, wish I knew of SOME kinda product to use here, obviously this would just turn Motoseal to goo :P

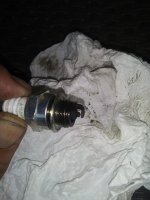
Re running fat, would be curious if my spark-plug tells anyone here anything (this is after about 5-6hrs usage, run 'slightly to moderately fat' with 45:1 eth-free with HP Ultra...though just did switch-over to Red Armor the other day!)
20210926_190113.jpg
 

Cerberus

Cerberus the aardvark, not the hell-hound!!
Local time
1:24 PM
User ID
11523
Joined
Jan 20, 2020
Messages
292
Reaction score
121
Location
Florida (tampa area)
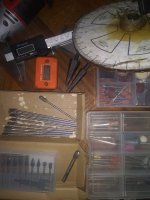
OH!! And because you guys are awesome and I'm so thankful I figured you'd get a good chuckle out of my "porting kit" ;D
20210930_125215.jpg
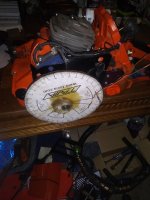
Why yes, that is a fiberglass'd, home-printed, on-cardboard timing wheel!! Had to get new everything after my 1/4" grinder proved far too unwieldy for porting (was critical to getting through that fat rear wall on the muffler though, because port-matching the muffler isn't just about its outside-perimeter, that wall is like >3mm thick you have to taper that wall or you'll stop gas-expansion before the muffler!)
edited-to-add a couple more:
Timing my exhaust :P
20210926_180251.jpg

But all hack-work aside, it's not even tuned yet and still a real boost to both speed and torque, was very happy with how hard I could push the 20" before bogging the chain, also had made it a "sled/undercarraige shield", dyed some body panels like on my 355t so it'd match (RIT Dye More, mixing the blue with these oranges gives a great plum color that won't fade ;) ) oh and I cut a bit off the top-cover, couldn't help but notice it had more restriction than any other saw I compared it to, so kinda trimmed a lil from the bottom-edge of the front of the top-cover:
20210910_194832.jpg 20210910_194701.jpg 20210910_194620.jpg (the 355t was dyed about 1.75yrs ago, and while it's not my go-to climbsaw it still comes out to every job and sits in the sun! I use my 25cc til I need the 355, I'm a small guy so climbsaw-weight matters even more to me!)
 
Last edited:

Cerberus

Cerberus the aardvark, not the hell-hound!!
Local time
1:24 PM
User ID
11523
Joined
Jan 20, 2020
Messages
292
Reaction score
121
Location
Florida (tampa area)
The bevel around the ports that the rings cross is to help ease them in and out of the port, the wider the port, the more of the ring slips in.

Forgive me if I'm misunderstanding what you were trying to say.
In trying to make shorter posts (yup those are short for me :P ), am having trouble conveying things fully..
I see the bevel/chamfering/rounding of these edges as serving two roles (insofar as our interventions are concerned),
#1 - keeping that sprung-ring on the piston from getting caught-up, and
#2 - the movement of gas through the cylinder

My thinking was that the 'goal'/intention would be to maximize #2, while remembering that #1 must not be violated (and so far as I understood it, it's far riskier to, say, widen the port than it would be to have a less than stellar chamfering job)

However I was trying to convey more, I just made a drawing to illustrate...3 different 'port corners' at the spots where gas goes from the cylinder to the exhaust-port, they are top-to-bottom ordered from worst to best (IMO/in my head)
20211008_121319.jpg
Just cutting the exhaust-port into the cylinder, w/o even rounding the sharp edges, would be the top one..... the middle one would be Echo's OEM cylinder, where instead of a sharp-edge they have a sharp-bevel, it looks nice but I have to imagine that #3/the lowest, where things are rounded, would be best- for flow and the piston ring (for the same reasons, actually)
 

Cerberus

Cerberus the aardvark, not the hell-hound!!
Local time
1:24 PM
User ID
11523
Joined
Jan 20, 2020
Messages
292
Reaction score
121
Location
Florida (tampa area)
OH.... couple things I meant to ask-or-mention:

Squish&Compression: My 590 always felt like it had weak compression (like, when side-by-side with other on-the-shelf echo 490's and the like, as-if it were among the lowest compression that still passes their QC for selling) Further, even after 'getting better' at applying thin Motoseal, I'm still squishing barely 26.5 thousandths.... My understandings &gut tell me that the biggest gains for my saw are here, addressing these two (very-related) issues, and that doing so is either or both of the following:
1- popup piston replacement ($50 seems fair,. and it has a 2nd ring which I like),
2- dropping cylinder by CNC

However, as much as I believe those were among the most important areas for my 590, I fear that - now that I've gone and pored it - that it may be too late for me to go back and address the squish/comnpression (IE if I drop the cylinder I may freeport...and Re pop-up's, am still uncertain if they're meant to just be "plug&play", or if they're for use in-conjuntion-with a dropped cylinder...IE whether the only way to get&use a pop-up is if you actually have CNC access to optimize your cylinder for the new piston!)

So yeah am still VERY eager to find whether I can/should still go for tighter squish/better compression by one-or-both of those ^ routes, or - because I already ported it - if I'm now too-late :/


~~~~~~~~~

I asked in another thread but can't find it (think it may've been on AS forum) but does anyone have OEM-spec port timing for both 590 and 620? I know their P&C's are interchangeable so far as fitment, and the 2nd ring on the 620 piston, but upon rewatching echo-canada's youtube, the guy/rep is clearly saying the 620 is both "More aggressive ignition and port timing numbers", I'd LOVE to see a side-by-side of the timing#'s for these 2 cylinders (also side-by-side pics would be amazing as well, specifically curious Re width and shape of ports)


~~~~~~~~~

The 620's superiority isn't just the carb it's also the coil but I"m failing to see why anyone would bother swapping to a 620 coil for their 590.....coils just spark once-per-revolution, the difference between 590 adn 620 coils is simply their relative spark-timing, and this is somthing you can just adjust anyways (IE filing keyway on a 590 flywheel to get the same degrees before TDC as the 620 coil would've fired...this should be 100.0% identical in performance, no?

~~~~~~~~~~~~~~~~~~~~~~~~~~~~~~~~~~~~~~~~~~~~~~~~~~~~~~~~~~~~~~~~~~~~~~~~~~


Thanks again for all the awesome info this thread (and the others on this platform) made it very do-able to "begin porting", which I've wanted to for years, am still very very hesitant porting my climbsaws - which are the most-important, of course - because their layouts are just so different, gonna need to go youtube some tutorials :P 6mo ago I would've guessed I'd never have tried this, had doted on the idea for years & years, it was only when I saw the prices of bigger saws did I begin thinking "I have to do this"!!
 
Top