


You are using an out of date browser. It may not display this or other websites correctly.
You should upgrade or use an alternative browser.
You should upgrade or use an alternative browser.
McCulloch Super Pro 125c build thread
- Thread starter p61 western
- Start date
PogoInTheWoods
Pinnacle OPE Member
- Local time
- 6:52 AM
- User ID
- 1190
- Joined
- Apr 23, 2016
- Messages
- 1,943
- Reaction score
- 3,850
- Location
- Ohio
Great thread. Subbed for the home stretch.
- Local time
- 3:52 AM
- User ID
- 232
- Joined
- Dec 24, 2015
- Messages
- 8,939
- Reaction score
- 62,270
- Location
- Coastal Oregon
I decided to piggy-back onto this thread (I hope Mike doesn't mind), since it's raining here and I have to take a break from annual home repairs.
It's been over a year since I built a saw for myself so I decided to tear into an original SP-125c parts rig that I was lucky enough to buy from RocketRoss.
If you haven't had the chance to deal with Ross, he's one of the really good old boys here.


It's been over a year since I built a saw for myself so I decided to tear into an original SP-125c parts rig that I was lucky enough to buy from RocketRoss.
If you haven't had the chance to deal with Ross, he's one of the really good old boys here.
- Local time
- 3:52 AM
- User ID
- 232
- Joined
- Dec 24, 2015
- Messages
- 8,939
- Reaction score
- 62,270
- Location
- Coastal Oregon
Most of a 125 tear-down is fairly pedestrian, but I wanted to point out the clutch - if it's an original non-molested 125, the clutch nut will be reverse thread
and the clutch just pulls right off. I hold the entire saw in one hand by the clutch drum and tap on the end of the crank (with the clutch nut flush on the end) with
my brass hammer until the clutch starts to slide off.
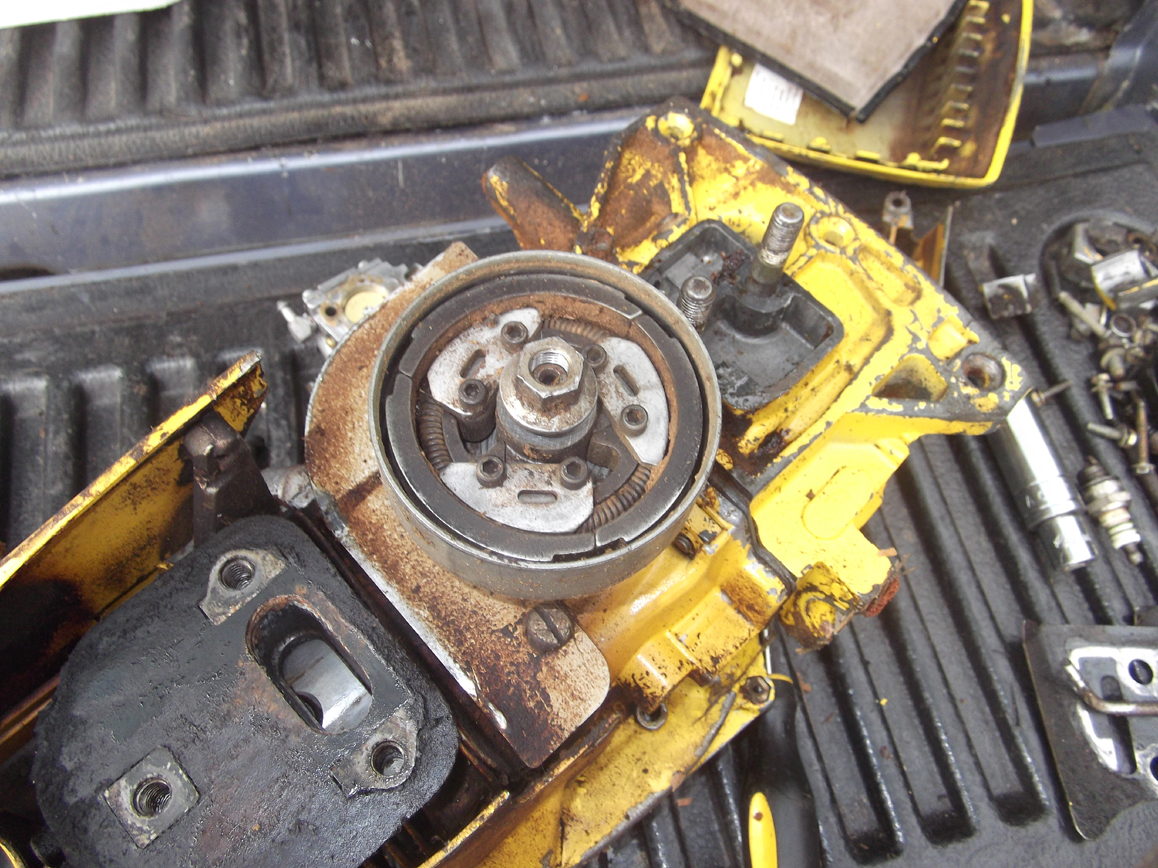

and the clutch just pulls right off. I hold the entire saw in one hand by the clutch drum and tap on the end of the crank (with the clutch nut flush on the end) with
my brass hammer until the clutch starts to slide off.
Last edited:
- Local time
- 3:52 AM
- User ID
- 232
- Joined
- Dec 24, 2015
- Messages
- 8,939
- Reaction score
- 62,270
- Location
- Coastal Oregon
When it comes to pulling the flywheel, you want to use some sort of puller to avoid damage. I've bought a couple of cheap steering wheel pullers over the
years and I've combined the two to create a pretty good pulling kit. The good thing about a cheap steering wheel puller is the drive bolt is usually a lot softer than
any crankshaft, so you don't run the risk of damaging a crank. I use old stripped out Stihl bar nuts on the pulling bolts to seat them on the pulling bar snugly.
Last edited:
- Local time
- 3:52 AM
- User ID
- 232
- Joined
- Dec 24, 2015
- Messages
- 8,939
- Reaction score
- 62,270
- Location
- Coastal Oregon
Pulling the points/ignition/flywheel backing plate is easy enough - I just hold the saw up by the plate and gently tap on the end of the crank with the flywheel nut flush
using my brass hammer. The backing plate will slowly come off. As long as you're gentle with it, it will come right off. Sometimes if a saw has been rebuilt, people will
goop up the backing plate where it meshes with the crankcase and it'll be "glued" on there pretty good (depending on what sealer was used).
- Local time
- 3:52 AM
- User ID
- 232
- Joined
- Dec 24, 2015
- Messages
- 8,939
- Reaction score
- 62,270
- Location
- Coastal Oregon
Pulling the oil tank is easy - there are four oil tank bolts, two short ones on the flywheel side, and two long ones on the PTO side. If the tank
still has oil in it, this is good - the oil helps prevent mag rot.
still has oil in it, this is good - the oil helps prevent mag rot.
- Local time
- 3:52 AM
- User ID
- 232
- Joined
- Dec 24, 2015
- Messages
- 8,939
- Reaction score
- 62,270
- Location
- Coastal Oregon
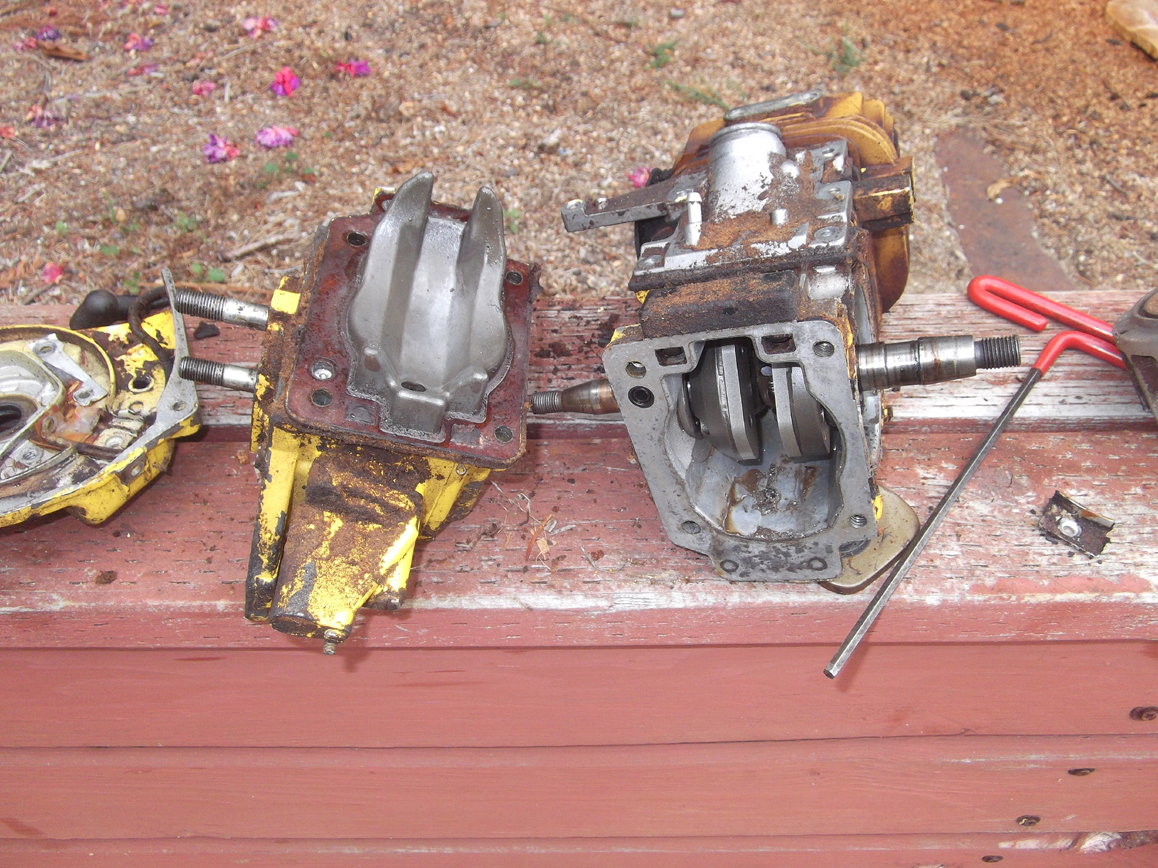
Removing the crank can be tricky - you have to line up the shoulder of the crank with a relief in the crankcase, and make sure the connecting rod is out of the way.
Set the clutch nut flush and tap the crank out with your brass hammer. The crank goes out on the flywheel side, which has the large opening and the shoulder relief.

Set the clutch nut flush and tap the crank out with your brass hammer. The crank goes out on the flywheel side, which has the large opening and the shoulder relief.
- Local time
- 3:52 AM
- User ID
- 232
- Joined
- Dec 24, 2015
- Messages
- 8,939
- Reaction score
- 62,270
- Location
- Coastal Oregon
This saw is pretty much unmolested - the bearings you see here are the original Mac main bearings that do not have a cage and have split races. You can just barely see the
line on the bearing races where they are split. The balls are packed in tightly and the bearing pockets hold the races closed so the bearing doesn't come apart. It's actually a
high performance design.
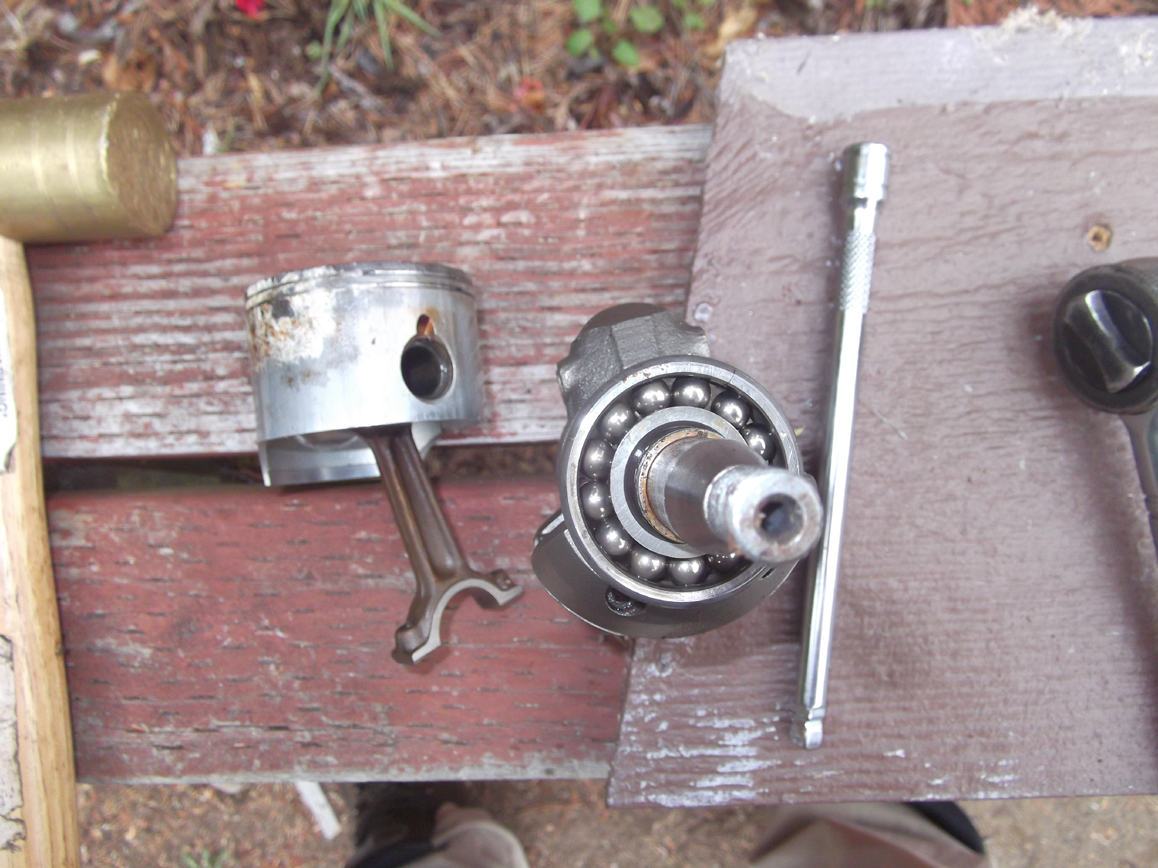

line on the bearing races where they are split. The balls are packed in tightly and the bearing pockets hold the races closed so the bearing doesn't come apart. It's actually a
high performance design.
- Local time
- 3:52 AM
- User ID
- 573
- Joined
- Jan 17, 2016
- Messages
- 2,675
- Reaction score
- 14,397
- Location
- cape cod ma.
Nice build, I have one more of these 125's that I need to get to. It will be a full rebuild
like this one Jacob is doing.
like this one Jacob is doing.
qurotro
Cookie Cutter
One piece cast crank? Wow.This saw is pretty much unmolested - the bearings you see here are the original Mac main bearings that do not have a cage and have split races. You can just barely see the
line on the bearing races where they are split. The balls are packed in tightly and the bearing pockets hold the races closed so the bearing doesn't come apart. It's actually a
high performance design.
- Local time
- 3:52 AM
- User ID
- 2003
- Joined
- Oct 18, 2016
- Messages
- 28,858
- Reaction score
- 125,918
- Location
- GFY
Might as well throw this in here while I'm slacking lol. Don't mind one bit Jacob. Should prove to be a good place for others to look to for 125 build ideas and tips.I decided to piggy-back onto this thread (I hope Mike doesn't mind), since it's raining here and I have to take a break from annual home repairs.
It's been over a year since I built a saw for myself so I decided to tear into an original SP-125c parts rig that I was lucky enough to buy from RocketRoss.
If you haven't had the chance to deal with Ross, he's one of the really good old boys here.
- Local time
- 5:52 AM
- User ID
- 1377
- Joined
- Jun 5, 2016
- Messages
- 31,070
- Reaction score
- 194,200
- Location
- Northwoods of Wisconsin
Might as well throw this in here while I'm slacking lol. Don't mind one bit Jacob. Should prove to be a good place for others to look to for 125 build ideas and tips.
...cause we'll all be too old waiting on you. Lol
- Local time
- 3:52 AM
- User ID
- 232
- Joined
- Dec 24, 2015
- Messages
- 8,939
- Reaction score
- 62,270
- Location
- Coastal Oregon
One piece cast crank? Wow.
I think so...McCulloch had some awesome things going on in the day. Bob McCulloch was a legendary engineer and designer and most of the old-timers on the kart forums
call him the "Grandfather of the modern two-stroke." These SP cranks though have the bolt-on
crank weights and McBob always said that they make a smoother running saw.
When I pull these split-race bearings off the crank, I pinch the race in my vice and use a Husqvarna case-splitting tool to work the bearings off. If you don't pinch the races
on these bearings, the races will open and the ball bearings will fall out and then you're left with the inner race stuck on the crank. For dirty fasteners, I just load them all up
in an old motor oil bottle and fill it with straight gas and give it a good shake and let it sit for ten minutes or so. Then I pour the gas in my scrap gas container and pour
out all the fasteners on an old towel.


- Local time
- 3:52 AM
- User ID
- 2003
- Joined
- Oct 18, 2016
- Messages
- 28,858
- Reaction score
- 125,918
- Location
- GFY
Now that I moved it's a lot longer trip to Terry's house. I need to take him more parts....cause we'll all be too old waiting on you. Lol
- Local time
- 5:52 AM
- User ID
- 1377
- Joined
- Jun 5, 2016
- Messages
- 31,070
- Reaction score
- 194,200
- Location
- Northwoods of Wisconsin
Now that I moved it's a lot longer trip to Terry's house. I need to take him more parts.
Take that Beetle Bug out for a cruise.
- Local time
- 5:52 AM
- User ID
- 714
- Joined
- Jan 28, 2016
- Messages
- 2,819
- Reaction score
- 18,950
- Location
- Dike, Iowa
Just a note on post #406; two of the six holes for the crank case cover are tapped 1/4-20 so you can use your same puller to remove it. I have used the tap, tap, tap method but the puller is actually quicker and easier.
This photo is from a 640 and not the Super series engines, but the Super series are equipped the same way.

This is a 795 which is the Super series design.

Mark
This photo is from a 640 and not the Super series engines, but the Super series are equipped the same way.
This is a 795 which is the Super series design.
Mark
- Local time
- 3:52 AM
- User ID
- 2003
- Joined
- Oct 18, 2016
- Messages
- 28,858
- Reaction score
- 125,918
- Location
- GFY
Great tip Mark. I wish I knew this before I tore mine down.Just a note on post #406; two of the six holes for the crank case cover are tapped 1/4-20 so you can use your same puller to remove it. I have used the tap, tap, tap method but the puller is actually quicker and easier.
This photo is from a 640 and not the Super series engines, but the Super series are equipped the same way.
View attachment 198321
This is a 795 which is the Super series design.
View attachment 198322
Mark
- Local time
- 5:52 AM
- User ID
- 639
- Joined
- Jan 21, 2016
- Messages
- 8,024
- Reaction score
- 42,598
- Location
- Missouri
One piece cast crank? Wow.
Only the Pro Mac 8200 has a 3 piece crank like a modern saw.
- Local time
- 5:52 AM
- User ID
- 714
- Joined
- Jan 28, 2016
- Messages
- 2,819
- Reaction score
- 18,950
- Location
- Dike, Iowa
I'm sure all of the old McCulloch crankshafts are forgings, but yes, the only one I've seen with a "modern" three piece style crankshaft is the PM8200. All of the vintage saws use loose needles and a split connecting rod. Use a little grease to get the needles to stick to the rod during assembly.

Use some grease to stick the needles to the cap when you assemble it as well.

I am told the kart guys used to leave one or two of the needles out when building an engine to allow a little more clearance on the crankshaft end of the rod. Most McCulloch service manuals remind you to count the needles as you put them in and inspect the crankcase for any lost ones before the engine is buttoned up.
Mark
Use some grease to stick the needles to the cap when you assemble it as well.
I am told the kart guys used to leave one or two of the needles out when building an engine to allow a little more clearance on the crankshaft end of the rod. Most McCulloch service manuals remind you to count the needles as you put them in and inspect the crankcase for any lost ones before the engine is buttoned up.
Mark
Similar threads
- Replies
- 43
- Views
- 2K