Cerberus
Cerberus the aardvark, not the hell-hound!!
- Local time
- 3:07 AM
- User ID
- 11523
- Joined
- Jan 20, 2020
- Messages
- 292
- Reaction score
- 120
- Location
- Florida (tampa area)
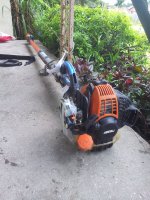
While a user was generous enough to direct-message me with similar-enough Echo pole-saws, which did let me successfully complete my 'Broken-in-half 266 to working-and-stronger-than-OEM 266'(though it is like 5lbs heavier now, w/ all the excessive bracing I did to the shaft!!) \
However now that it's "done", I'm looking to mod its choked-up engine as well as a more-thorough 'overhauling'/clean&re-grease of the shaft-to-cutter area(and cutter's gearing/internals, so far am just jamming marine-grease wherever I can fit it and relying on back&forth extension of the pole to seat it, should bite the bullet and do the god-awful full shaft-dissembly again, was stretching my lithium to finish it and it was so dirty I remember thinking 'if you succeed in repairing this, you'll wanna re-visit these areas for long-term reliability' but before doing so would like to have a guide, FWIW there's 3 sets of guides for the 266/266h(the H just means "no loop handle" so far as I can tell), Echo's breakdown has mine in the 'middle' serial# category ie it's serial starts E205 and the other two categories' serials don't even start with E2 so it's a 'middle gen' I guess)
My guides don't show me where the 'hidden' carb screws are (I know I can google for this specific item) or how to re-lube anything as a dealer would, for instance now that I've rebuilt this tool and used it I can't use it for >2-3min before the powerhead's metal-casing starts getting so hot that I fear there's friction somewhere there *should* be lubed w/ heavy-grease, just dunno where...have marine-grease and a 'parts/salvage' echo-stringtrimmer-powerhead so am gonna go dissemble that and get a feel for how the internals are (FWIW, e-replacement-parts is very good w/ diagrams, I can *see* all the parts through their diagrams which I can't applaud them enough for/will be ordering to show support, but what I need is to know how an Echo tech approaches one of these if, say, someone brought it in saying "this area got 100% depleted of heavy-grease", I don't need step-by-step but some "order of operations" and dissembly-guidance from an OEM-guide would be so huge to me here!!
Thanks a ton for any&all help
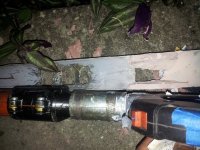
(and to prove I'm 'invested'/not tire-kicking here, and in-spirit of showing our embarrassingly-ugly prototype-work[it has since been 'aesthetically updated', as much as a steel tube can be ;D ], here's the fixed 266, received as snapped-in-half for free, spent $35 @Echo for the new coupler and a good amount at home depot[though I also dove-into learning/using fiberglass here so can't put all that cost onto this project!] for the overlay(s, actually!), ugly and like 5lbs heavier on a 20lbs machine lol but should be far stronger than any OEM 266's!
Note that there's also a "top" steel 2" overlay pipe, just showing this way to show the bottom-half of the coupler is also bolstered-up beneath the "real" bracing-overlay, idea is to have WAY less shock-pressure ever hit the cuff, instead distribute/spread it along the pole at the >5 mount-points of the overlay-shelling McGuyverin', gotta love it ;D

However now that it's "done", I'm looking to mod its choked-up engine as well as a more-thorough 'overhauling'/clean&re-grease of the shaft-to-cutter area(and cutter's gearing/internals, so far am just jamming marine-grease wherever I can fit it and relying on back&forth extension of the pole to seat it, should bite the bullet and do the god-awful full shaft-dissembly again, was stretching my lithium to finish it and it was so dirty I remember thinking 'if you succeed in repairing this, you'll wanna re-visit these areas for long-term reliability' but before doing so would like to have a guide, FWIW there's 3 sets of guides for the 266/266h(the H just means "no loop handle" so far as I can tell), Echo's breakdown has mine in the 'middle' serial# category ie it's serial starts E205 and the other two categories' serials don't even start with E2 so it's a 'middle gen' I guess)
My guides don't show me where the 'hidden' carb screws are (I know I can google for this specific item) or how to re-lube anything as a dealer would, for instance now that I've rebuilt this tool and used it I can't use it for >2-3min before the powerhead's metal-casing starts getting so hot that I fear there's friction somewhere there *should* be lubed w/ heavy-grease, just dunno where...have marine-grease and a 'parts/salvage' echo-stringtrimmer-powerhead so am gonna go dissemble that and get a feel for how the internals are (FWIW, e-replacement-parts is very good w/ diagrams, I can *see* all the parts through their diagrams which I can't applaud them enough for/will be ordering to show support, but what I need is to know how an Echo tech approaches one of these if, say, someone brought it in saying "this area got 100% depleted of heavy-grease", I don't need step-by-step but some "order of operations" and dissembly-guidance from an OEM-guide would be so huge to me here!!
Thanks a ton for any&all help
(and to prove I'm 'invested'/not tire-kicking here, and in-spirit of showing our embarrassingly-ugly prototype-work[it has since been 'aesthetically updated', as much as a steel tube can be ;D ], here's the fixed 266, received as snapped-in-half for free, spent $35 @Echo for the new coupler and a good amount at home depot[though I also dove-into learning/using fiberglass here so can't put all that cost onto this project!] for the overlay(s, actually!), ugly and like 5lbs heavier on a 20lbs machine lol but should be far stronger than any OEM 266's!
Note that there's also a "top" steel 2" overlay pipe, just showing this way to show the bottom-half of the coupler is also bolstered-up beneath the "real" bracing-overlay, idea is to have WAY less shock-pressure ever hit the cuff, instead distribute/spread it along the pole at the >5 mount-points of the overlay-shelling


