High Quality Chainsaw Bars Husqvarna Toys Hockfire Saws

The Metalworking Thread

64poncho

Well-Known OPE Member
Local time
9:01 PM
User ID
23391
Joined
May 6, 2022
Messages
55
Reaction score
248
Location
Central Maryland
Country flag
I figured alot of guys would never think to use a mill in this manner, as an improvised lathe, so it seemed worth sharing. It's gotten me out of a bind on a few occasions. Sometimes, you just have to find a way to use what's in front of you.
Nice job to salvage the part! I’ve seen a guy I work with do that on a large horizontal boring mill.
 

Attachments

  • IMG_0006.jpeg
    IMG_0006.jpeg
    162 KB · Views: 27

Wilhelm

I'm here for the sick'n twisted company
Yearly GoldMember
Local time
3:01 AM
User ID
1204
Joined
Apr 28, 2016
Messages
13,554
Reaction score
53,025
Location
Croatia
Country flag
View attachment 423619

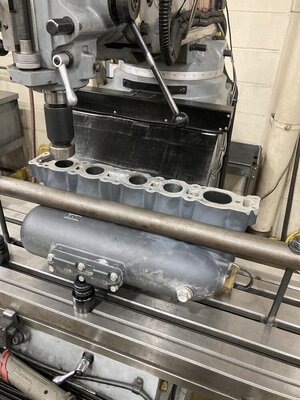
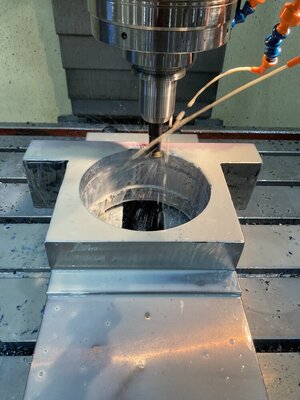
So, I found myself needing a small piece of cast iron this week, to repair/rework a hole that was drilled off-center in a bearing housing. We didn't have any stock available, aside from another cast iron blank that had porosity on the finished OD (material issue, so it got scrapped). I chopped a small chunk out of the good side of the part, and then rounded off one end on the belt sander.

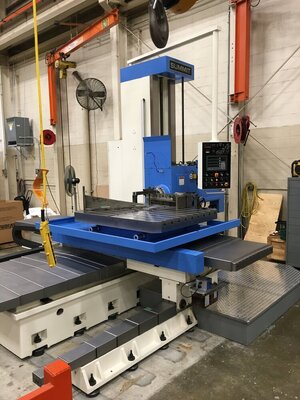
Every single lathe in the shop was occupied, so I made the decision to make the entire patch piece in the knee mill.

View attachment 423620

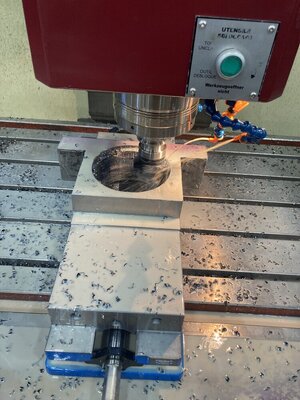
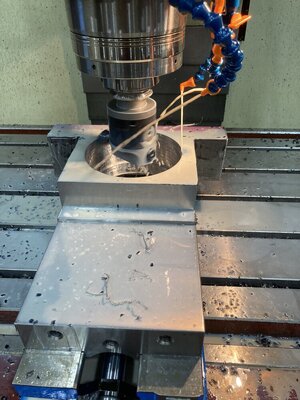
Using the mill's quill power feed, a lathe tool in the vise, and the part blank in a collet, I turned the blank to the desired size for threading. I chose 1/4-20 in this instance

View attachment 423622

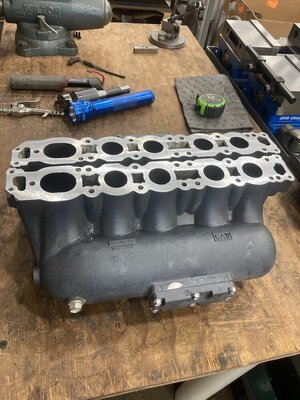
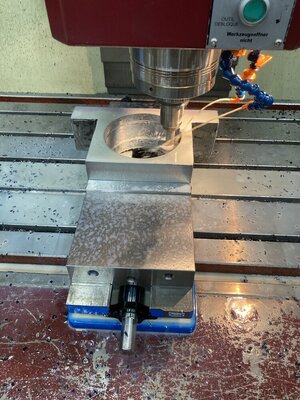
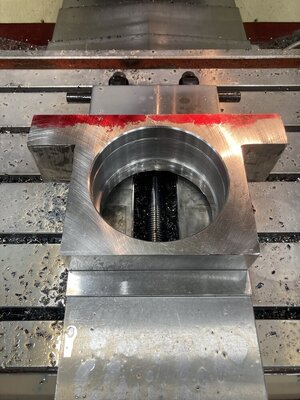
Ran a sharp die over my cast iron "pin" and then drilled and tapped the bad hole in the part to match my newly created plug. Then, I installed my piece of cast iron threaded rod with red loctite, and milled the top down flush. The new hole was drilled and tapped in the proper location, and the repair is acceptable for what that hole will do.

View attachment 423625

I figured alot of guys would never think to use a mill in this manner, as an improvised lathe, so it seemed worth sharing. It's gotten me out of a bind on a few occasions. Sometimes, you just have to find a way to use what's in front of you.
I have access to mills but not lathes.
So yeah, I get my "Lathe" going on a mill.
Though I have never clamped my workpiece into the mill spindle.

One can do lathe work on a mill, but not milling work on a lathe.

Love Your ingenuity plugging that hole.
I did similar patchwork in an aluminum blank that for no obvious reason had several holes in it.
 

Firewood Hoarder

Just a firewood hack
Yearly GoldMember
Local time
8:01 PM
User ID
15730
Joined
Feb 14, 2021
Messages
749
Reaction score
5,213
Location
Wisconsin
Nice job to salvage the part! I’ve seen a guy I work with do that on a large horizontal boring mill.

Love Your ingenuity plugging that hole.
I did similar patchwork in an aluminum blank that for no obvious reason had several holes in it.

Thank you for the kind words, fellas. I think I have a few other pictures of me using a mill "Wrong" somewhere... I will have to see if I can find them.

Edit, found another example

Screenshot_20240623_063516_Gallery.jpg

In this situation, I had a 24" long piece of bronze I wanted to make some bushings from, to repair some old farm machinery for my uncle. I didn't have access to lathe at this time(working out of my garage in this instance).

I used toe clamps to clamp a 2x2x.250" piece of square tube to my mill table, and hung it over the backside of the table. I clamped a v-block to the tube, and clamped the bronze bar into the v-block. I placed an automotive jack stand under the bar, to provide a positive stop against gravity and pressure from the spindle. I swung the mill head over, and used my offset boring head to turn the bushing OD to size. I was able to drill and ream in the same setup, so I had finished size on the OD and ID of my blank, long enough for 3 bushings.

Then, it was just a matter of using my porta-band to cut the bushing blanks off the end of the bar, and using my indexing head and its 3-jaw chuck in the mill, to square up the ends and chamfer.

Process would have been faster on a lathe, but it was Sunday and I didn't feel like going in to work 7 days in one week.
 
Last edited:

Firewood Hoarder

Just a firewood hack
Yearly GoldMember
Local time
8:01 PM
User ID
15730
Joined
Feb 14, 2021
Messages
749
Reaction score
5,213
Location
Wisconsin
Speaking of welders, I had a chance to try out my little 120v inverter stick welder today. It was something of an impulse purchase while browsing Temu, my logic at the time being "it would be nice to have something relatively portable." For $60 shipped, I figured I had spent more on dumber items.

20240623_083055.jpg

I was sharpening the blades on my mower deck for the compact tractor, and noticed the baffle had a cracked weld. I saw a chance to test drive the little welder.

20240623_084523.jpg

I wire brushed the area and got setup. Found a piece of scrap metal of similar thickness and burned a couple rods to figure out where I wanted the amperage. I ended up at 70 amps on the dial, which did not feel like 70, maybe 55-60. I had to use 1/16 6013 rods, as my sleeve of 6013 3/32 rods was conveniently put back empty (past me hates future me).

20240623_084814.jpg

After some light wire brushing, this is what I got.
It isn't pretty (more spatter than I care for), due to my lazy weld prep, but this little welder did nice for what it is. Holds an arc well, and seems to have enough oomph for lighter work. Only complaint is it seemed a little light on the actual amperage put out compared to what the dial reads. Will have to add some more stick welding electrodes to my shopping list.
 

64poncho

Well-Known OPE Member
Local time
9:01 PM
User ID
23391
Joined
May 6, 2022
Messages
55
Reaction score
248
Location
Central Maryland
Country flag
Coworker brought these exhaust manifolds in today from a Yamaha 350 HP outboard. Needed to have the flange surface trued up. They were twisted / warped. Set up on the mill & fly cut. Removed .012 inch to clean up.
 

Attachments

  • IMG_0587.jpeg
    IMG_0587.jpeg
    175.6 KB · Views: 13
  • IMG_0584.jpeg
    IMG_0584.jpeg
    128.4 KB · Views: 12
  • IMG_0583.jpeg
    IMG_0583.jpeg
    173.9 KB · Views: 12

srcarr52

Shop rat, backyard slice cutter.
GoldMember
Local time
9:01 PM
User ID
522
Joined
Jan 12, 2016
Messages
4,111
Reaction score
26,981
Location
Iowa City
Country flag
I have access to mills but not lathes.
So yeah, I get my "Lathe" going on a mill.
Though I have never clamped my workpiece into the mill spindle.

One can do lathe work on a mill, but not milling work on a lathe.

Love Your ingenuity plugging that hole.
I did similar patchwork in an aluminum blank that for no obvious reason had several holes in it.

I've seen lathe gang tooling setup on smaller hobby style cnc mills. I think Tormach even sold a setup for their mills.
 

Wilhelm

I'm here for the sick'n twisted company
Yearly GoldMember
Local time
3:01 AM
User ID
1204
Joined
Apr 28, 2016
Messages
13,554
Reaction score
53,025
Location
Croatia
Country flag
I tried my new flux welder at its highest amp setting today.
20mm/ 5/6th" thick steel pieces.
One side mildly V-ground, the other just I-weld touching.
2" long welds.

V-ground, doesn't look too bad
IMG_20240630_202457.jpg
IMG_20240630_203416.jpg

Just bumped together
IMG_20240630_202507.jpg
IMG_20240630_203424.jpg

Just play/test welds, I know they aren't close to perfect!
Gonna cut it across to get an idea how deep the puddles penetrated.
IMG_20240630_203451~2.jpg
 

Firewood Hoarder

Just a firewood hack
Yearly GoldMember
Local time
8:01 PM
User ID
15730
Joined
Feb 14, 2021
Messages
749
Reaction score
5,213
Location
Wisconsin
I tried my new flux welder at its highest amp setting today.
20mm/ 5/6th" thick steel pieces.
One side mildly V-ground, the other just I-weld touching.
2" long welds.

V-ground, doesn't look too bad
View attachment 424561
View attachment 424563

Just bumped together
View attachment 424564
View attachment 424565

Just play/test welds, I know they aren't close to perfect!
Gonna cut it across to get an idea how deep the puddles penetrated.
View attachment 424566

Looks like with the v-groove you got good penetration. I'd trust that weld.
 

Wilhelm

I'm here for the sick'n twisted company
Yearly GoldMember
Local time
3:01 AM
User ID
1204
Joined
Apr 28, 2016
Messages
13,554
Reaction score
53,025
Location
Croatia
Country flag
Looks like with the v-groove you got good penetration. I'd trust that weld.
On the V-grove weld side is next to no splatter.
As if the arc liked being deeper in the puddle.

I don't do much welding, though I might feel confident to take on a project or two with this welder.
 

Firewood Hoarder

Just a firewood hack
Yearly GoldMember
Local time
8:01 PM
User ID
15730
Joined
Feb 14, 2021
Messages
749
Reaction score
5,213
Location
Wisconsin
On the V-grove weld side is next to no splatter.
As if the arc liked being deeper in the puddle.

I don't do much welding, though I might feel confident to take on a project or two with this welder.

Probably better shielding of the arc and puddle, having the groove help contain everything. Does your welder have the ability to add shielding gas as well? I haven't done much with flux-core wire; most of my welding has been stick, MIG or TIG.
 

Wilhelm

I'm here for the sick'n twisted company
Yearly GoldMember
Local time
3:01 AM
User ID
1204
Joined
Apr 28, 2016
Messages
13,554
Reaction score
53,025
Location
Croatia
Country flag
Probably better shielding of the arc and puddle, having the groove help contain everything. Does your welder have the ability to add shielding gas as well? I haven't done much with flux-core wire; most of my welding has been stick, MIG or TIG.
No, this is a pure flux welder.
I could have gotten a 4-in-1 for about twice the price of this one (100€) but I liked the local warranty option as opposed to shipping something forth and back.
I may still invest in a 4-in-1 down the road, go with the highest Amp unit that will run on 220Volt AC (mono).
For now I will play with this one I just got, and try sell the previous flux welder that didn't meet my expectations.

Any idea how to expose a weld cross section?
Acid, heat, combination of both?
Let it rust and hope the weld oxidizes at a different rate? :thinking:
 

Wilhelm

I'm here for the sick'n twisted company
Yearly GoldMember
Local time
3:01 AM
User ID
1204
Joined
Apr 28, 2016
Messages
13,554
Reaction score
53,025
Location
Croatia
Country flag
I fell in love with MIG as an apprentice, always wanted to own a MIG welder.

I used to have access to 600 Amp water cooled units at work, till they decided to scrap them all and outsource welding jobs to contractors.

This 120 Amp inverter flux welder brings me close to the welds I remember getting with MIG as an apprentice so I am quite happy with it.
Although, I have yet to utilize this new welder on something meaningful as I have done only play & test welds.
 

Wilhelm

I'm here for the sick'n twisted company
Yearly GoldMember
Local time
3:01 AM
User ID
1204
Joined
Apr 28, 2016
Messages
13,554
Reaction score
53,025
Location
Croatia
Country flag
Heating up the welded steel chunk and dousing it in oil did reveal the weld depth.
Not as much as I thought it would, but sufficient to expose the weld/bead.
Top bump weld, bottom V-groove weld.

IMG_20240701_103934~2.jpg

And flipped around in an attempt to get a different viewing angle.
Top V-groove, bottom bump.

IMG_20240701_103908~2.jpg
 

64poncho

Well-Known OPE Member
Local time
9:01 PM
User ID
23391
Joined
May 6, 2022
Messages
55
Reaction score
248
Location
Central Maryland
Country flag
Bearing block for large steel roll. Mill boring, finish bore, snap ring groove, chamfer, completed bore. Bore for bearing, 6.300 inch. Still have to do mount holes & 1/4” pipe grease hole.
 

Attachments

  • IMG_0588.jpeg
    IMG_0588.jpeg
    156.4 KB · Views: 7
  • IMG_0589.jpeg
    IMG_0589.jpeg
    153.6 KB · Views: 7
  • IMG_0590.jpeg
    IMG_0590.jpeg
    192.1 KB · Views: 7
  • IMG_0591.jpeg
    IMG_0591.jpeg
    124.2 KB · Views: 7
  • IMG_0592.jpeg
    IMG_0592.jpeg
    167.6 KB · Views: 7

Wilhelm

I'm here for the sick'n twisted company
Yearly GoldMember
Local time
3:01 AM
User ID
1204
Joined
Apr 28, 2016
Messages
13,554
Reaction score
53,025
Location
Croatia
Country flag
Another test weld.
Deeper V-grind prep, cut and blackened it to reveal the weld, then broke it. The weld did deform before it cracked.
20mm thick steel, just 0.8mm thin flux core wire.
The weld is most likely hardened from cooling down too fast - it actually isn't that bad.

IMG_20240706_212243.jpgIMG_20240707_125215~2.jpgIMG_20240707_125226~2.jpgIMG_20240707_130316~2.jpgIMG_20240707_130435~2.jpg
 

Wilhelm

I'm here for the sick'n twisted company
Yearly GoldMember
Local time
3:01 AM
User ID
1204
Joined
Apr 28, 2016
Messages
13,554
Reaction score
53,025
Location
Croatia
Country flag
Getting there.
These are NLA and the ones we have are either worn through, or too coarse, or adapted/custom made by my dad.

IMG_20240706_183951.jpgIMG_20240706_200920.jpgIMG_20240706_200927.jpgIMG_20240708_203351.jpgIMG_20240708_203401.jpg

Still have to make the three hookup points and a little bit of fitment bending.
These will be twice the thickness of the OEM ones, they should hold/suffice for a decade or so.

They're corn mill meshes.
 
Last edited:
Top