High Quality Chainsaw Bars Husqvarna Toys Hockfire Saws

Saw builds

MarkEagleUSA

Pinnacle OPE Member
GoldMember
Local time
9:20 AM
User ID
461
Joined
Jan 9, 2016
Messages
586
Reaction score
2,355
Location
CT
Country flag
Whenever I do a seal I also use some 2T oil to help things along (hence why I suggested glossy business cards). I think it helps eliminate any friction the seal rubber may encounter and helps keep it from rolling.

Spring out of it?
He said it was intact.
 

Mattyo

Youtube speciawist
GoldMember
Local time
9:20 AM
User ID
441
Joined
Jan 8, 2016
Messages
4,282
Reaction score
10,911
Location
Farmington, CT
Country flag
J...u were right....and I thought I took video of me saying that but apparently that part of the vid got lost. Still...I feel better now...and you will like the vid.

Thanks guys
 

jmssaws

Banneded
Local time
8:20 AM
User ID
291
Joined
Dec 28, 2015
Messages
10,024
Reaction score
37,290
Location
Missouri
What oil you breaking it in with? Appears to be pretty strong, nice work man!
The same oil i break all of them in on,klotz benol at 32:1 91 efree.

I will note that this is the tightest saw I've ever seen,with no cylinder on it is had to put the flywheel back on to turn it.
If the seals wasn't already in it is could fix it by getting it hot and smacking it with a hammer,I've got pretty nasty with it and couldn't help it.
You can hear in the video how held back it is, I'll get it loosened up tomorrow one way or another. ;)
 

Brewz

Free Range Human in a Tax Farm
Local time
12:20 AM
User ID
550
Joined
Jan 16, 2016
Messages
4,217
Reaction score
14,305
Location
Hunter Valley - Australia
Country flag
Jay I have had that happen and worked out a way to align the bearing to take the load off it.

I will take a pic later to better describe what I do
 

jmssaws

Banneded
Local time
8:20 AM
User ID
291
Joined
Dec 28, 2015
Messages
10,024
Reaction score
37,290
Location
Missouri
Jay I have had that happen and worked out a way to align the bearing to take the load off it.

I will take a pic later to better describe what I do
I've had it happen lots of times and I just heat it up and smack it with a hammer and it's fixed but that is a saw without seals to worry about burning.
This saw has seals.

I'll make several hard cuts tomorrow and if it hasn't loosened any I'll pull the seal and fix it.
 

Brewz

Free Range Human in a Tax Farm
Local time
12:20 AM
User ID
550
Joined
Jan 16, 2016
Messages
4,217
Reaction score
14,305
Location
Hunter Valley - Australia
Country flag
I don't know how you assemble but here is how I do it and fix the issue.

I put both bearings on the crank
I heat the flywheel side case and drop the crank and bearing in first.
I then tap in my locating screws to the flywheel half of the case just sticking up enough to hold the gasket and sit the gasket in place.
I then heat the clutch side case half and slide it down over the bearing.

Because it cools and grips the bearing outer race before you can get the case halves screwed together, tightening the case halves in will pull the clutch side bearings outer race in with it, making the crank tight to turn.

Once the case halves are tightened, I take a long pin punch about 3/16 dia and sit it against the inner edge of this bearing race and give it a love tap from the flywheel side.

That will pop it back into alignment, well it does for the way I put it together anyway.

I will take a pic illustrating what I mean when I get him if that's confusing.

Hitting the shaft may help but wont correct the alignment issue properly.
 

Brewz

Free Range Human in a Tax Farm
Local time
12:20 AM
User ID
550
Joined
Jan 16, 2016
Messages
4,217
Reaction score
14,305
Location
Hunter Valley - Australia
Country flag
Also, I heat my case halves in a little mini oven to get nice even heat into them.
Works great
 

jmssaws

Banneded
Local time
8:20 AM
User ID
291
Joined
Dec 28, 2015
Messages
10,024
Reaction score
37,290
Location
Missouri
I don't know how you assemble but here is how I do it and fix the issue.

I put both bearings on the crank
I heat the flywheel side case and drop the crank and bearing in first.
I then tap in my locating screws to the flywheel half of the case just sticking up enough to hold the gasket and sit the gasket in place.
I then heat the clutch side case half and slide it down over the bearing.

Because it cools and grips the bearing outer race before you can get the case halves screwed together, tightening the case halves in will pull the clutch side bearings outer race in with it, making the crank tight to turn.

Once the case halves are tightened, I take a long pin punch about 3/16 dia and sit it against the inner edge of this bearing race and give it a love tap from the flywheel side.

That will pop it back into alignment, well it does for the way I put it together anyway.

I will take a pic illustrating what I mean when I get him if that's confusing.

Hitting the shaft may help but wont correct the alignment issue properly.
I didn't put bearings in it,the owner installed them before he sent it for porting. I always heat the cases then install the bearings in the case,use the oil pump for a stop.
Let them sit for 5 min then the bearings have heat soaked then I can put most together with my hands.
 

Mattyo

Youtube speciawist
GoldMember
Local time
9:20 AM
User ID
441
Joined
Jan 8, 2016
Messages
4,282
Reaction score
10,911
Location
Farmington, CT
Country flag
394 squish measured s/p milling the case .020 - .019" with a gasket :)

put an old ring in the cylinder, tighten down, move the degree wheel up to 118, and now I've got my line to cut to w/ the dental tools. Before I make the cuts, I'll take a business card and cut it to where it'll be easy to replicate this transfer port height next time :)
 

Time's Standing Stihl

Below me...
Local time
9:20 AM
User ID
1179
Joined
Apr 20, 2016
Messages
11,248
Reaction score
64,402
Location
Central Iowa
Country flag
I didn't put bearings in it,the owner installed them before he sent it for porting. I always heat the cases then install the bearings in the case,use the oil pump for a stop.
Let them sit for 5 min then the bearings have heat soaked then I can put most together with my hands.
That is how I did it. ...
 

paragonbuilder

Mastermind Approved!
Local time
9:20 AM
User ID
384
Joined
Jan 2, 2016
Messages
9,229
Reaction score
33,866
Location
Norwich, CT
Country flag
My 262 took a digger and will be down until fixed

Dan if I get the parts could I bring my parts and injured saw down your way for the surgery? It could be an opportunity for you to check out Randy's cylinder work etc. (plenty of pics on here, but would be cool maybe for you to see first hand). Maybe whoever is around could stop by too (Matty? RIChevy? Marcello?) I would need help or would need to send the saw to one of you guys w/ way more experience for repair. I would be so bummed if I introduced and air leak or the like being a green as I am on working on saws.... learning opportunity for at least some of the work.

Of course Eric. Let me know when you have them and we will make it happen.


Sent from my iPhone using Tapatalk
 

Brewz

Free Range Human in a Tax Farm
Local time
12:20 AM
User ID
550
Joined
Jan 16, 2016
Messages
4,217
Reaction score
14,305
Location
Hunter Valley - Australia
Country flag
I am not going to pretend I know best here for one second, so please dont take it as such. I consider myself the saw novice here.
I was trained to rebuild electrical motors and they are actually very similar to a saw in the way the bearings mount and locate the main drive part centrally within the case..

Here is what I was taught.

The electric motor has a rotor which must be correctly centered to stop it running with any lateral force exerted on the bearings which kills them, similar to a crank.
Most electric motors, like most saws, have a non drive end (flywheel side) where the bearing goes in and has a machined end where the bearing will seat up against. This is called the locating bearing and with the bearing seated up against the shaft stop, should hold the rotating center where it is supposed to be.

I was taught that this end should always be assembled first by putting the bearing on the shaft to its mounting shoulder, and then in the housing to locate the motor shaft where it needs to be.

The dive end is different. It does not matter where it is located in the housing which is why the bearing is sometimes larger. Its job is to take the load or radial force. As long as it is mounted up against the shaft shoulder for stability, its good.

The thought of using the oil pump as a seating stop screams against everything I was taught. It could be an after market pump with slightly different dimensions which will not seat the bearing up against the crank shaft shoulder properly.

This would destroy an electric motor's bearings very fast due to the magnetic force pulling against the bearing laterally to correct the center rotor misalignment, but it can probably be gotten away with in a saw as the force is all radial (up and down). So as long as the crank is center enough and there is enough lateral play in the piston to allow it to center its self, it will work fine.

Not ideal but it will work.

Now as I said..... I am not 2 stroke expert but I have been trained in how to install and work with bearings to make them last.
When I do anything I think of what forces are being put where and if it dont spin freely when assembled, something is wrong.


The way I described assembling above will pinch the drive side bearing a bit tight when the case halves are tensioned together, but a light tap (which is unfortunately not as easy on some saw models as it is on an 1122 Stihl) will push the upper bearing race back over and center it.

This saw went together tight and with one tap of the punch as shown below, the crank latterly rolled and dropped to it its low gravity center by its self, and spun with no restriction.
I wont continue unless I have this state.

I dont want to tell any of the more experienced folks here how to do things as I am learning, but just want to share my thoughts and knowledge.
100% happy to be corrected on any of my thoughts above when it comes to putting a saw together, I encourage it!

I hope this helps a bit.
One of the bearing races will need to be tapped in or out to release the pressure.
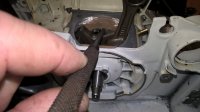
WP_20160712_22_00_38_Pro.jpg
 

Brewz

Free Range Human in a Tax Farm
Local time
12:20 AM
User ID
550
Joined
Jan 16, 2016
Messages
4,217
Reaction score
14,305
Location
Hunter Valley - Australia
Country flag
Thinking about it more, the seating/locating in the 2 stroke motor will be less critical that an electric motor.

My method will be an issue if access to tap the top bearing race over is an issue, like on the 2100 I have just had a look in.
I think I will stick with my method for 1122 saws and similar, and for others, I will try the "fit the bearing in the housing first" method as it makes sense.

I am thinking that there is no one way that will correctly do every saw, but I will still fit the flywheel case half first as I do believe it is the locating end to center the crank correctly
 

Brewz

Free Range Human in a Tax Farm
Local time
12:20 AM
User ID
550
Joined
Jan 16, 2016
Messages
4,217
Reaction score
14,305
Location
Hunter Valley - Australia
Country flag
I rebuilt a 371 husky for a bloke who cuts fire wood for a living.
It was tighter that I liked after the rebuild and no tapping would change this.
I figured it was just how the saw was

He has flogged it all winter cutting many tonnes of iron bark and told me yesterday when I dropped off the MS660 he bought from me, that it was still running like a new one.
 
Top