High Quality Chainsaw Bars Husqvarna Toys

Need some info on this saw

Czed

Aluminium Member
GoldMember
Local time
9:14 PM
User ID
568
Joined
Jan 17, 2016
Messages
32,125
Reaction score
182,433
Location
Wv
Country flag
As long as I find a switch that fits it should work even if I have to run a new wire. I found the wire for the kill switch, just no switch. Would love a part number for the carb kit, hopefully the nozzle is still good on this one...


Will do, I’ll check the parts diagram to see what you mean, thank you!

the rebuild is a go ahead so this should be fun. I’ll get it fully apart here and inspect it all.

thanks again!
The am carb kits are perfectly fine I'm using 18 or 20 now
2.50 or so a piece.
 

Stump Shot

Disciple of Monkey's
GoldMember
Local time
8:14 PM
User ID
1377
Joined
Jun 5, 2016
Messages
31,070
Reaction score
194,200
Location
Northwoods of Wisconsin
Country flag
Thanks for that info. The p&c look pretty good with only a small score mark on the exhaust side. More disassembly will tell me more.
I’m getting pretty good at cutting gaskets although buying an AM set would be easiest. Anyone have any links for a gasket set?

bearings and seals I can get at my local transmission supply store. So really to get into this deeply I’m gonna round up gaskets, carb kit bearings and seals. I have most husky tools at this point at least enough to split the cases etc.

another complaint from him is that it’s leaking oil badly. So I’ll have to see what’s going on there

any tips tricks for when I rebuild this? Other than what you mentioned? Any oil pump issues or gaskets that are hard to come by etc?


Before splitting, measure the gap between the case side the crankshaft with a feeler gauge, this is what you will use to assemble and know where to set the first case half.
 

kneedeepinsaws

Pinnacle OPE Member
GoldMember
Local time
7:14 PM
User ID
12933
Joined
Jun 21, 2020
Messages
805
Reaction score
1,712
Location
Oil Country
Country flag
Before splitting, measure the gap between the case side the crankshaft with a feeler gauge, this is what you will use to assemble and know where to set the first case half.
Awesome will do
 

kneedeepinsaws

Pinnacle OPE Member
GoldMember
Local time
7:14 PM
User ID
12933
Joined
Jun 21, 2020
Messages
805
Reaction score
1,712
Location
Oil Country
Country flag
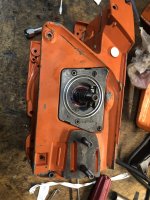
Tore it down to nothin, measured the clutch side crank to wall clearance at .75mm

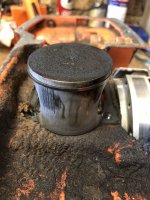
piston is shot, ring is partially stuck
Big end play on crank, tiny bit.
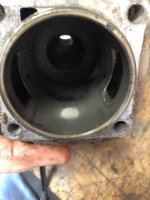
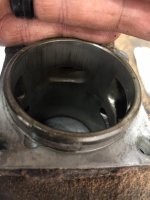
Cylinder scoring, might be re-usable if cleaned up

One of the main bearings didn’t survive the pressure of the case puller.. was fairly smooth before case separation and when I checked it after the case came on quite rough... might as well just replace them they are cheap enough.

really like the oil seal design on this saw, makes it very very user serviceable. One is pressed into the oiler and the other is pressed into a collar that can be removed on the flywheel side.

thankfully the flywheel key came out with zero problems, I hate those things on old saws.
Flywheel was stuck in there good as well as the bearings in the case. But got it all out.
Some pics of the carnage
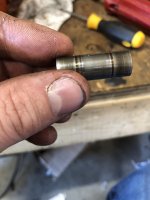
060B425F-501F-4689-B0B9-64D9A08AA644.jpeg CB9D1DB1-ED70-4AF1-97D9-BA2981036782.jpeg 5E815FE3-AACB-4FC3-BD5A-75D51950EE7B.jpeg CBAE95E3-0ABF-4DF0-A9E2-35957B641971.jpeg
 

fossil

Pinnacle OPE Member
Local time
9:14 PM
User ID
374
Joined
Jan 1, 2016
Messages
1,743
Reaction score
7,622
Location
Ontario, Canada
Country flag
Do you have a p/n for the Oregon kit? They drum is warped and the tangs for the rim are chewed up some, not to mention the bearing is not feeling that great. Gonna keep the clutch cause it’s good @fossil (thanks!!) but like I said drum is done.

Here's a handy Oregon chart for the sprockets. You'll see two for the 266. One is for before SN 0510000 one another for after.
 

Attachments

  • Oregon Sprocket Overview - Reference.pdf
    1.6 MB · Views: 6

kneedeepinsaws

Pinnacle OPE Member
GoldMember
Local time
7:14 PM
User ID
12933
Joined
Jun 21, 2020
Messages
805
Reaction score
1,712
Location
Oil Country
Country flag
Here's a handy Oregon chart for the sprockets. You'll see two for the 266. One is for before SN 0510000 one another for after.
Thank you!

I had no idea that there was a 6 and 7 spline for rims??? I thought splined was splined either big or small.

cylinder is out of the hot tank and although there are visible scratches there is nothing I can feel with my fingernail!!! Little bit of 600 grit in there and I’m gonna re use this cylinder.
 

fossil

Pinnacle OPE Member
Local time
9:14 PM
User ID
374
Joined
Jan 1, 2016
Messages
1,743
Reaction score
7,622
Location
Ontario, Canada
Country flag
Thank you!

I had no idea that there was a 6 and 7 spline for rims??? I thought splined was splined either big or small.

cylinder is out of the hot tank and although there are visible scratches there is nothing I can feel with my fingernail!!! Little bit of 600 grit in there and I’m gonna re use this cylinder.


Six is pretty rare now.

Small 7 and regular 7 are still common.
Best wishes on the rebuild. 266's are one of the benchmark saws.
 

kneedeepinsaws

Pinnacle OPE Member
GoldMember
Local time
7:14 PM
User ID
12933
Joined
Jun 21, 2020
Messages
805
Reaction score
1,712
Location
Oil Country
Country flag
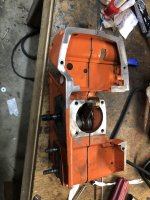
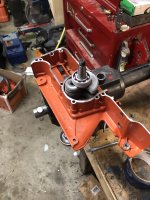
C1693FFF-123A-4994-89D0-C1454F71BF24.jpeg 1E24F839-D48E-4BA5-A4D5-366B8371D10D.jpeg 5A8C2D20-313E-48F9-9DA5-271AEA81B52E.jpeg Rebuild going good.
Wire wheeled the cases and clean them up really good. Had an o-ring kit but none the right size for oiler/flywheel side crank seal housing. Reused the old ones but added some rtv. they were in pretty good shape.
Had a set of china new bearings lying around, cleaned them thoroughly with carb cleaner and air compressor then oiled them in a ziplock.
I used Tinmans method of putting the cases together. It worked well without any special tools which I don’t have for this model of saw. Used the oil pump as a depth gauge just like he did for the crank bearing. When both halves were together I tapped the crank to center. It just went really smooth:)
So now I ordered a meteor piston and will wait on that then do my leak down test. If that’s good then I’ll move onto the next step and do the carb rebuild. It’s an old tillitson, I know tinman mentioned the rebuild kit part number in his recent video so I’ll have to watch that again and then order it. hopefully these tillitsons clean up well in varsol, if they don’t then I’ll have to order (hopefully) an aftermarket carb that fits the original intake block and throttle/choke setup.
Piston won’t be here for a couple weeks, maybe three so until then no big updates me thinks :)
Once again thanks all for the help!!
 

kneedeepinsaws

Pinnacle OPE Member
GoldMember
Local time
7:14 PM
User ID
12933
Joined
Jun 21, 2020
Messages
805
Reaction score
1,712
Location
Oil Country
Country flag
Yes I watched more tinman and he said the same thing.
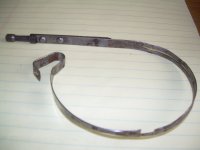
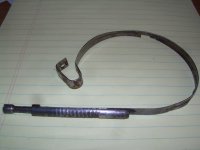
The brake still locks, but the band is gone. It’s a long stretch but finding a similar style band may or may not work...
I wonder if using some recoil spring and shaping it with heat would fit?
It’s either that or just buy an AM 272 brake cover or leave it.
 

fossil

Pinnacle OPE Member
Local time
9:14 PM
User ID
374
Joined
Jan 1, 2016
Messages
1,743
Reaction score
7,622
Location
Ontario, Canada
Country flag
Yes I watched more tinman and he said the same thing.
The brake still locks, but the band is gone. It’s a long stretch but finding a similar style band may or may not work...
I wonder if using some recoil spring and shaping it with heat would fit?
It’s either that or just buy an AM 272 brake cover or leave it.

I have often thought a bandsaw blade could be turned into one.

I never got around to trying.
 

kneedeepinsaws

Pinnacle OPE Member
GoldMember
Local time
7:14 PM
User ID
12933
Joined
Jun 21, 2020
Messages
805
Reaction score
1,712
Location
Oil Country
Country flag
I have often thought a bandsaw blade could be turned into one.

I never got around to trying.
Good idea, I will have to see exactly how he brake is affixed to the mechanism and see if it is doable with the skills I have. When I get to it I’ll share my results
 

kneedeepinsaws

Pinnacle OPE Member
GoldMember
Local time
7:14 PM
User ID
12933
Joined
Jun 21, 2020
Messages
805
Reaction score
1,712
Location
Oil Country
Country flag
Take a look at what you are up against.
View attachment 295733 View attachment 295734
Thanks for that you saved me the the time of
Taking it apart myself.

the rod from mine can be saved and used on the new piece of steel. The bends I think I can do, securing the rod to the band will be a challenge. rivets me thinks, finding ones that are strong enough other than your typical aluminum ones will be a small quest.
for now im not too worried about creating the slit in the band but just copying the shape.
Challenge accepted :)
 

kneedeepinsaws

Pinnacle OPE Member
GoldMember
Local time
7:14 PM
User ID
12933
Joined
Jun 21, 2020
Messages
805
Reaction score
1,712
Location
Oil Country
Country flag
Go to a 320 grit or 400 wet.
The rings will come in faster and you carry more oil on the cylinder wall during break-in runs.
Thanks the 600 actually was too weak to do anything. I lightly scuffed with 220 cause that’s all I had and it worked. I’ll pickup some 320 and try that
 
Top