High Quality Chainsaw Bars Husqvarna Toys Hockfire Saws

HOMELITE Homelite Thread

PogoInTheWoods

Pinnacle OPE Member
Local time
6:53 PM
User ID
1190
Joined
Apr 23, 2016
Messages
1,954
Reaction score
3,881
Location
Ohio
Country flag
"the right guy"
That would Sean Carr if he's still hanging around the forums. Not sure he's over here. Been on AS for as long as I remember.

Saved a lotta guys asses who did dumb stuff to their aluminum or needed old stuff resurrected..
 

fossil

Pinnacle OPE Member
Local time
6:53 PM
User ID
374
Joined
Jan 1, 2016
Messages
1,840
Reaction score
8,384
Location
Ontario, Canada
Country flag
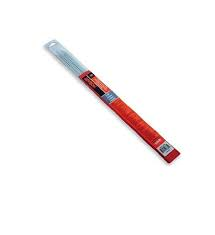
I've used aluminum brazing rod to fill the hole and drilled and tapped it to the correct size.

Measure the hole depth before you fill it so you don't drill too far.

While the aluminum is molten, stir with a thin rod the get any air pocket out of the bottom of the hole.


Works well for me.
 

fossil

Pinnacle OPE Member
Local time
6:53 PM
User ID
374
Joined
Jan 1, 2016
Messages
1,840
Reaction score
8,384
Location
Ontario, Canada
Country flag
Yes. I use a Map gas torch. Make sure you clean the hole out before you fill the hole. Leave a bit of excess aluminum above the hole surface as it shrinks a bit when it cools.
Make sure you follow the instructions for the filler rod.
 

hacskaroly

Pinnacle OPE Member
Local time
3:53 PM
User ID
27954
Joined
Nov 24, 2023
Messages
994
Reaction score
3,228
Location
Northern Idaho
Country flag
Yes. I use a Map gas torch. Make sure you clean the hole out before you fill the hole. Leave a bit of excess aluminum above the hole surface as it shrinks a bit when it cools.
Make sure you follow the instructions for the filler rod.
Right on, sounds good, I appreciate the information. Do you have a favorite brazing rod brand you use? It will give me something to look for so I don't get the wrong thing and make things worse...lol :D
 

fossil

Pinnacle OPE Member
Local time
6:53 PM
User ID
374
Joined
Jan 1, 2016
Messages
1,840
Reaction score
8,384
Location
Ontario, Canada
Country flag
Last edited:

PogoInTheWoods

Pinnacle OPE Member
Local time
6:53 PM
User ID
1190
Joined
Apr 23, 2016
Messages
1,954
Reaction score
3,881
Location
Ohio
Country flag
Cool to know. (Hi, Tim!)

Will still need the bit and tap, though. Makes sense if you already have them.

But for the price of the rods and gas alone you could get whole the E Z-Coil kit and and know if it's gonna fly in10 minutes. If not, the other method is still always an option.
 

Oletrapper

Active OPE Member
Local time
6:53 PM
User ID
30335
Joined
Oct 23, 2024
Messages
16
Reaction score
36
Location
KY
Country flag
Cool to know. (Hi, Tim!)

Will still need the bit and tap, though. Makes sense if you already have them.

But for the price of the rods and gas alone you could get whole the E Z-Coil kit and and know if it's gonna fly in10 minutes. If not, the other method is still always an option.
Just a quick question, If the hole is approx. 1 1/4 deep, can more than one heli-coil or EZ-Coil be installed? Better yet, should you if you can? Thanks, OT
 

PogoInTheWoods

Pinnacle OPE Member
Local time
6:53 PM
User ID
1190
Joined
Apr 23, 2016
Messages
1,954
Reaction score
3,881
Location
Ohio
Country flag
I've done it. Not recommened simply because the threads won't necessarily meet correctly and can essentially create a cross-thread kind of mess requiring a significant amount of luck that you can still get the fastener in without hosing everything. Otherwise you may end up having to drill the inserts out (if you can remove the fastener) which risks hosing the tapped threads and needing to bump up a size and doing it all over again.

Best to use the appropriate insert for the job. One and a half times the fastener diameter is generally the recommended length.
 
Last edited:

fossil

Pinnacle OPE Member
Local time
6:53 PM
User ID
374
Joined
Jan 1, 2016
Messages
1,840
Reaction score
8,384
Location
Ontario, Canada
Country flag
Cool to know. (Hi, Tim!)

Will still need the bit and tap, though. Makes sense if you already have them.

But for the price of the rods and gas alone you could get whole the E Z-Coil kit and and know if it's gonna fly in10 minutes. If not, the other method is still always an option.
Hi Poge!
 

hacskaroly

Pinnacle OPE Member
Local time
3:53 PM
User ID
27954
Joined
Nov 24, 2023
Messages
994
Reaction score
3,228
Location
Northern Idaho
Country flag
Just a quick question, If the hole is approx. 1 1/4 deep, can more than one heli-coil or EZ-Coil be installed? Better yet, should you if you can?
I did that for a cylinder stud on an 075 (mounted into a 055 body - modified of course). It originally had a Helicoil, but the stud was longer and wobbled a little with just the one Helicoil. I took it all apart and reinserted two new Helicoils and used red thread locker and the stud is much more stable, no longer wiggly like a little kids loose tooth. Since the hole was already deep enough to accommodate the two coils, I didn't have to do any extra drilling.
 

Oletrapper

Active OPE Member
Local time
6:53 PM
User ID
30335
Joined
Oct 23, 2024
Messages
16
Reaction score
36
Location
KY
Country flag
I've done it. Not recommened simply because the threads won't necessarily meet correctly and can essentially create a cross-thread kind of mess requiring a significant amount of luck that you can still get the fastener in without hosing everything. Otherwise you may end up having to drill the inserts out (if you can remove the fastener) which risks hosing the tapped threads and needing to bump up a size and doing it all over again.

Best to use the appropriate insert for the job. One and a half times the fastener diameter is genrally the recommended length.
Well, the heli-coil kit hasn't arrived yet so I don't know if the coils come in different lengths or not. The photo of the kit seemed to show them all being the same length. That's why I asked the question. I can certainly see where the threads from one coil to the next might not line up. Thanks for your reply. OT
 

Oletrapper

Active OPE Member
Local time
6:53 PM
User ID
30335
Joined
Oct 23, 2024
Messages
16
Reaction score
36
Location
KY
Country flag
I did that for a cylinder stud on an 075 (mounted into a 055 body - modified of course). It originally had a Helicoil, but the stud was longer and wobbled a little with just the one Helicoil. I took it all apart and reinserted two new Helicoils and used red thread locker and the stud is much more stable, no longer wiggly like a little kids loose tooth. Since the hole was already deep enough to accommodate the two coils, I didn't have to do any extra drilling.
LOL "no longer wiggly like a little kids loose tooth" Love that analogy. Something I can relate to. lmao OT
 

Oletrapper

Active OPE Member
Local time
6:53 PM
User ID
30335
Joined
Oct 23, 2024
Messages
16
Reaction score
36
Location
KY
Country flag
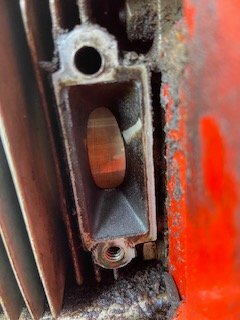
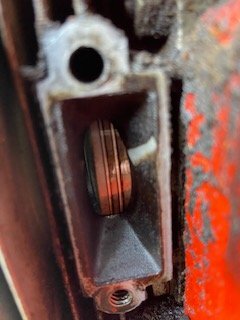
Well, I have decided not to drill and tap the muffler bolt hole. In my opinion, there just isn't enough material there. Also, I think it would weaken the integrity of the cylinder head itself. I have decided to do the below. :)
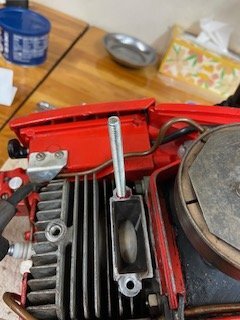
IMG_0769.jpg
/\Used a 1/4 20 4" bolt. Locktite everything and reached the 1/4" of remaining un-striped threads at the bottom of the hole.
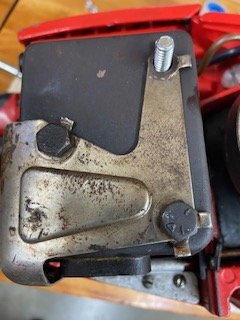
IMG_0771.jpg
/\The bottom long bolt and the left short bolt are in also with locktite.
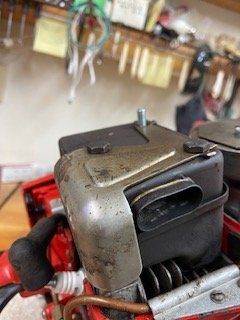
IMG_0772.jpg
/\Bolts tightened down using locktite and will let cure for a couple of days before I put the nut on the stud. Will use locktite on nut and then bend the lock tabs into place and cut off the excess stud above the nut. Once cured, I'll finish putting this old beauty back together and get one of my younger friends to fire it up. I'm sure it won't take too long to learn if the stud repair is going to hold. I'll try and attach a video. Thanks everybody for the input. OT :cool:
 
Last edited:

Oletrapper

Active OPE Member
Local time
6:53 PM
User ID
30335
Joined
Oct 23, 2024
Messages
16
Reaction score
36
Location
KY
Country flag
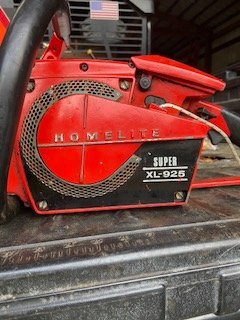
Just a little history on this IMG_0740.jpgHomelite Super XL-925
Belongs to a friend. He said he picked it up for $100 after a few beers. The guy selling it wanted $200 and said he paid $700 for it new. ??? lmao
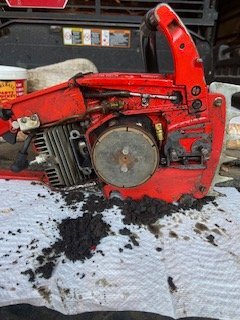
Piston and rings are pristine. No corrosion anywhere. Appears to have had very little use. The chain (chisel) is even sharp and no wear on the bar. Oil pump functional but the only bad thing is that the previous owner was using used motor oil for chain lube. What a mess. I've ordered a carb kit for it as I know that what's in there now will probably be hard as a rock. Also a new fuel lines.
I will try to post some pics of this beauty if I can get my phone to transfer them. Keeps saying no new photos found. Maybe someone here can help me with that. No youngsters around here that could fix it in a heart beat. lol :cool: OT
IMG_0748.jpg
/\ Piston pristine
IMG_0750.jpg
/\ As are the ring/rings
IMG_0753.jpg
/\ Cleaning it up. Previous owner had used motor oil in the oil tank. What a mess.
So far, I have rebuilt the tillotson hs151 carb, replaced fuel lines, replaced exhaust gasket (none on the saw when it arrived, repaired striped muffler bolt, cleaned, cleaned, cleaned. lmao Should know in a day or two how well it will run. Thanks everyone for your input on the muffler bolt repair. :cool:OT
 
Last edited:

PogoInTheWoods

Pinnacle OPE Member
Local time
6:53 PM
User ID
1190
Joined
Apr 23, 2016
Messages
1,954
Reaction score
3,881
Location
Ohio
Country flag
Looks good. The repair was quite resourceful as well.

If I may offer one additional observation; the Loctite may not hold up to the heat over time if the saw will be used on any type of regular basis. Heat is actually what is used to free up fasteners for removal in high temp Loctite applications -- such as muffler bolts/nuts.

Should you find a need to revisit the approach, I'd recommend JB-Weld instead of another application of Loctite simply due to the slop involved along the stripped area of the threads..

Otherwise, well done.
 

Oletrapper

Active OPE Member
Local time
6:53 PM
User ID
30335
Joined
Oct 23, 2024
Messages
16
Reaction score
36
Location
KY
Country flag
Looks good. The repair was quite resourceful as well.

If I may offer one additional observation; the Loctite may not hold up to the heat over time if the saw will be used on any type of regular basis. Heat is actually what is used to free up fasteners for removal in high temp Loctite applications -- such as muffler bolts/nuts.

Should you find a need to revisit the approach, I'd recommend JB-Weld instead of another application of Loctite simply due to the slop involved along the stripped area of the threads..

Otherwise, well done.
Thank you. Actually, I considered JB-Weld which I have, but I couldn't find it. So, loctite it is. lol I know heat will soften it so I'll tell the owner to keep an eye on it. If it should come out, I'll try the JB. I bought 2 of the 4" bolts so I have a spare. Again, thanks for the compliment. :cool:OT
 

Oletrapper

Active OPE Member
Local time
6:53 PM
User ID
30335
Joined
Oct 23, 2024
Messages
16
Reaction score
36
Location
KY
Country flag
Good morning all. Well, it's all back together and it fired up on the second pull. I cheated a little though. Because of the carb rebuild and all new fuel lines, I pulled it through about a dozen times with the choke on and the spark plug out just to get the system primed. As I suspected, this saw has had very little use. It literally screams. Because I no longer have enough arse to start an 82cc saw, I enlisted man mountain bean (my buddy Austin) to start it. Hopefully the video is below. Nope, it will not allow me to post the video. Y'all just have to take my word for it. lol Maybe someone here can tell me how videos can be attached to a thread? Thanks everyone. OT
 

hacskaroly

Pinnacle OPE Member
Local time
3:53 PM
User ID
27954
Joined
Nov 24, 2023
Messages
994
Reaction score
3,228
Location
Northern Idaho
Country flag

Oletrapper

Active OPE Member
Local time
6:53 PM
User ID
30335
Joined
Oct 23, 2024
Messages
16
Reaction score
36
Location
KY
Country flag
Last edited:
Top