High Quality Chainsaw Bars Husqvarna Toys

200t porting plan feedback

NorcalFlyingsquirrel

Well-Known OPE Member
Local time
11:40 AM
User ID
4565
Joined
Nov 10, 2017
Messages
90
Reaction score
125
Location
Santa Cruz Mountains
Country flag
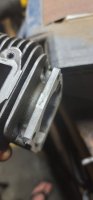
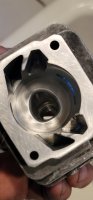
Hello, been lurking and reading, grinding and testing, wanted to run a porting plan by you guys before I f up a very nice cylinder. Built a ghetto squish cutter (file tail in a groove on an old cylinder) and cut the base on a belt sander, got .015 tapering to .020 on the inside squish band.
Currently
In 80, top ring covered at bdc
Ex 104
Trans 136 or 32 deg blowdown

Planning on ex back to 100, widen and polish, matched and internally ported muffler with west coast outlet after screen.
80 intake, square up and widen to skirt -.05
25 degrees blowdown with staggered 1-2* side to side, and in to ex, per mcdalvee Hillbilly Grinder, intake side 5 or 6* up and ex side flattish. hope to have enough room to put some curve in the back.

Qs any reason to leave the exhaust low for torque, i hate to give up displacement, and any reason to leave the intake narrow for velocity?

Ps this is my step up removal saw after the 2511. 16" bar w full chisel. Will tweak timing once done.

Thanks for your time and experience,

G
 

av8or3

So many saw ... so little time...
GoldMember
Local time
2:40 PM
User ID
9318
Joined
Apr 24, 2019
Messages
1,829
Reaction score
7,646
Location
Waleska,Ga.
Country flag
I don’t know anything about porting a saw. But I like your resourcefulness. The band cutter is killer. I love making tools, especially when they work.
 

NorcalFlyingsquirrel

Well-Known OPE Member
Local time
11:40 AM
User ID
4565
Joined
Nov 10, 2017
Messages
90
Reaction score
125
Location
Santa Cruz Mountains
Country flag
I can't help you with timing numbers, but at least you were up front about using the belt sander.
It worked great, scribed my desired removal around the base with the calipers, the tried to do short even hits qhile rotating it. Finished it off with the random orbital and then a #250 on a flat surface.
 

drf256

Dr. Richard Cranium
GoldMember
Local time
2:40 PM
User ID
319
Joined
Dec 29, 2015
Messages
9,375
Reaction score
61,614
Location
Strong Island NY
Country flag
Why not pop the file out and add some adhesive based sandpaper to the piston top? That way you and sand your band flat.

The problem with the belt sander is 2 fold. First, the base may not be flat enough to seal to the case and if it’s off you can crack the base or an ear when you snug it down. Second, and most important, if you are off side to side the error will magnify as the distance from the base goes up the cylinder.

We had an infamous member here who loved his belt sander. The saws would sometimes last a while (please note that this wasn’t his only piece of shoddy work on a saw) but side loading of the piston from the base being off would eventually cause a failure.

You may get lucky, but I’d let someone clean the base up on a lathe for you.

I’ve never done a 200, so maybe someone will come along and give you some tips. Personally, shooting from the hip, I’d go 105/125/128/75. The 125 would be the primary transfers, the ones closest to the exhaust port.
 

NorcalFlyingsquirrel

Well-Known OPE Member
Local time
11:40 AM
User ID
4565
Joined
Nov 10, 2017
Messages
90
Reaction score
125
Location
Santa Cruz Mountains
Country flag
Why not pop the file out and add some adhesive based sandpaper to the piston top? That way you and sand your band flat.

The problem with the belt sander is 2 fold. First, the base may not be flat enough to seal to the case and if it’s off you can crack the base or an ear when you snug it down. Second, and most important, if you are off side to side the error will magnify as the distance from the base goes up the cylinder.

We had an infamous member here who loved his belt sander. The saws would sometimes last a while (please note that this wasn’t his only piece of shoddy work on a saw) but side loading of the piston from the base being off would eventually cause a failure.

You may get lucky, but I’d let someone clean the base up on a lathe for you.

I’ve never done a 200, so maybe someone will come along and give you some tips. Personally, shooting from the hip, I’d go 105/125/128/75. The 125 would be the primary transfers, the ones closest to the exhaust port.
with the sander I scribed the desired removal all around the base with the calipiters and got close with the belt sander sander then finished with 150 then 250 paper and wd on a flat steel plate. I do a quick steady push with the sander, then check scribe lines, then shift 90, check again, ad infinitum. I did f up with the random orbital as the soft pad rounded the edges and had to work it down again on the plate. I know the base is flat and wouldnt think its more than a scribe line thickness off side to side. I will check bore depth around the cylinder, that chould give me some idea. I was thinking of using a router table and leaving little feet at the corners which i could file off afterwards but I think a shopsmith or a table saw with a large sanding disc would be better.
On the cylinder cutting, those marks are from my sandpaper on another piston, the cutter left a clean squish, then the fresh 250 paper on the piston scored it up, I think another pass with some finer paper or just leaving it with the cutter finish will be better and then maybe my squish will be back to a .020. I like your #s as it will give me more torque, although I would have thought you wanted to open the trans intake side first to displace ex toward ex.? Is it counterintuitive in practice? Thanks for your time,
 

Attachments

  • 20210912_202200.jpg
    20210912_202200.jpg
    50.9 KB · Views: 34

drf256

Dr. Richard Cranium
GoldMember
Local time
2:40 PM
User ID
319
Joined
Dec 29, 2015
Messages
9,375
Reaction score
61,614
Location
Strong Island NY
Country flag
At least you didn’t use a sharpie. It’s still inaccurate for base cutting. I’m pretty OCD though, you’ll probably be ok, it just isn’t for me.

How can you check depth as a gauge of base symmetry when your squish is out .005 side to side? With a piston and sandpaper you shouldn’t be out that much. The squish being off won’t be as bad as a base issue, many factory saws are out on squish more than you are. I’ve even seen factory jugs with bases that were out. The worst was a strato jug (the distance from the bore to edge can be large) that was .008 out at the far edge.

The idea on the uppers is that opening the primary (ex side) first allows initial movement and then the secondaries open and lift the charge up to help the loop scavenging. In addition, moving the charge when the cranking compression is the highest helps avoid short circuiting out the exhaust. Again, YMMV, and you may stumble upon a better recipe yourself. I’ve never done a 200T, a member here will be doing one for me this fall.
 

drf256

Dr. Richard Cranium
GoldMember
Local time
2:40 PM
User ID
319
Joined
Dec 29, 2015
Messages
9,375
Reaction score
61,614
Location
Strong Island NY
Country flag
This is my repair of above past members work. A poorly cut squishband and a belt sanded base. I can’t remember how much each was out, but I do remember the piston to cylinder clearance was .008. The poor guy that paid for the shít work sent it to me to check before he ever ran it.

I think the base was out around .005 side to side. I could not clean the band up any further without having to regrind the ports.

9544A0D9-76D7-46FE-9175-773602077651.jpeg BF172F1A-6608-4261-B9B6-AE4CC73CCFC0.jpeg AA3347AE-83C0-4C4B-BD41-3FB8E98D81E2.jpeg A931B3AB-A538-47AF-909F-FCBB1BAB58EB.jpeg 65215C28-9B9A-4D7F-A945-A1E283114DDC.jpeg
 

Al Smith

Here For The Long Haul!
Local time
2:40 PM
User ID
537
Joined
Jan 14, 2016
Messages
6,140
Reaction score
13,553
Location
North western Ohio
Country flag
IMO you'll do better if you cut the base down in a lathe than with sand paper or a file .I've only done one 200 and that was with 96 degree exhaust opening .It 's quick and has oodles of power .The rest was just typical ,work on the intake ,exhaust port and gut the muffler .Forgot to mention a cut domed piston . I 'm not certain what to do with the transfers because they are huge already so I did nothing .BTW on that saw I run a 7 tooth tooth sprocket and chisel chain .I think Stihl calls it rapid super pico or something .I have no idea if any other company makes it or not .
Before you screw it up you might try a gasket delete using sealant .Might be enough for you .
 

Woodpecker

Sassy Madam
Staff member
GoldMember
Local time
2:40 PM
User ID
570
Joined
Jan 17, 2016
Messages
7,156
Reaction score
45,799
Location
The middle of the land shaped like a hand
Country flag
@NorcalFlyingsquirrel you're getting great advice from some very good builders here. Sounds like you’ve done the best you could with what you had at hand. If it were my saw I’d find a competent local machinist to deck the base of that cylinder. A 12 pack of beer goes a long way toward building relationships. My :money:
 

NorcalFlyingsquirrel

Well-Known OPE Member
Local time
11:40 AM
User ID
4565
Joined
Nov 10, 2017
Messages
90
Reaction score
125
Location
Santa Cruz Mountains
Country flag
MS200T

-.030” from squish band

.016” clearance

Ex: 102 No need to raise, just widen.
IMO you'll do better if you cut the base down in a lathe than with sand paper or a file .I've only done one 200 and that was with 96 degree exhaust opening .It 's quick and has oodles of power .The rest was just typical ,work on the intake ,exhaust port and gut the muffler .Forgot to mention a cut domed piston . I 'm not certain what to do with the transfers because they are huge already so I did nothing .BTW on that saw I run a 7 tooth tooth sprocket and chisel chain .I think Stihl calls it rapid super pico or something .I have no idea if any other company makes it or not .
Before you screw it up you might try a gasket delete using sealant .Might be enough for you .
Ive already ported a couple 200t cylinders, this is my first squish and base cut, just trying to feed the hamster a little more cocaine after running my friends pro ported 200t.
Tr: 126 = .947” from squish band.

In 81.5

Only raise mains. Widen intake and exhaust. No ignition advance.
Thanks for the squish to mains distance makes life easier. Wifes away, I best get to grinding!
At least you didn’t use a sharpie. It’s still inaccurate for base cutting. I’m pretty OCD though, you’ll probably be ok, it just isn’t for me.

How can you check depth as a gauge of base symmetry when your squish is out .005 side to side? With a piston and sandpaper you shouldn’t be out that much. The squish being off won’t be as bad as a base issue, many factory saws are out on squish more than you are. I’ve even seen factory jugs with bases that were out. The worst was a strato jug (the distance from the bore to edge can be large) that was .008 out at the far edge.

The idea on the uppers is that opening the primary (ex side) first allows initial movement and then the secondaries open and lift the charge up to help the loop scavenging. In addition, moving the charge when the cranking compression is the highest helps avoid short circuiting out the exhaust. Again, YMMV, and you may stumble upon a better recipe yourself. I’ve never done a 200T, a member here will be doing one for me this fall.
My squish varies from edge to center because my cutter has a little angle. Supposed to be good for squish flow. Ill check side to side and see if I can throw it on a friends lathe.
 

Mastermind

Chief Cat Herder
Staff member
GoldMember
Local time
1:40 PM
User ID
4
Joined
Dec 3, 2015
Messages
48,025
Reaction score
311,887
Location
Banner Springs Tennessee
Country flag
My squish varies from edge to center because my cutter has a little angle. Supposed to be good for squish flow. Ill check side to side and see if I can throw it on a friends lathe.

I'd rather have it flat. It's tough to tell how much angle you are doing like that, but over a degree or two will really take away the extra compression you worked hard to get.
 

Al Smith

Here For The Long Haul!
Local time
2:40 PM
User ID
537
Joined
Jan 14, 2016
Messages
6,140
Reaction score
13,553
Location
North western Ohio
Country flag
This is not an argument just a conversation .Firstly I've never taken a compression reading on my little hot rod but it has an elasto start cord .The dome isn't that high nor cut back that far .My thought ,right or wrong is just to change the flow over the top of the piston in order to scavenge the area above the intake better .I've got a couple of stock rotating assemblies with good pistons but I've never swapped out to find out if it improves things .I've done as much as I'm ever going to do on that saw because it runs so well .Which is not to say I might not soup up the other 200T I have which is stock .
 

NorcalFlyingsquirrel

Well-Known OPE Member
Local time
11:40 AM
User ID
4565
Joined
Nov 10, 2017
Messages
90
Reaction score
125
Location
Santa Cruz Mountains
Country flag
I'd rather have it flat. It's tough to tell how much angle you are doing like that, but over a degree or two will really take away the extra compression you worked hard to get.
I filed the cutter flat and went after it some more cause I lost some truing the base. all flat and .015ish.
 

NorcalFlyingsquirrel

Well-Known OPE Member
Local time
11:40 AM
User ID
4565
Joined
Nov 10, 2017
Messages
90
Reaction score
125
Location
Santa Cruz Mountains
Country flag
lunch break... would you use this oem piston or a ching chow hyway? I got cabers and oem clips, and the oem is tight in the bore, just has some skirt wear below the intake port? Tranfers are not pretty but I think the little radius at the back should help with flow. Ex roofs a little flat, it all could be a little prettier, but its my saw so who cares, I cant wait to see what the compression bump and the staggered transfers do, its gonna be hard for me to let the yamabond dry. I also still gotta time it and see how much i lost. Thanks everybody for all the guidance, more soon...
 

Attachments

  • 20210918_130908.jpg
    20210918_130908.jpg
    35 KB · Views: 48
  • 20210918_130648.jpg
    20210918_130648.jpg
    51.9 KB · Views: 45
  • 20210918_130804.jpg
    20210918_130804.jpg
    67.4 KB · Views: 46
  • 20210918_130900.jpg
    20210918_130900.jpg
    40 KB · Views: 48

Mastermind

Chief Cat Herder
Staff member
GoldMember
Local time
1:40 PM
User ID
4
Joined
Dec 3, 2015
Messages
48,025
Reaction score
311,887
Location
Banner Springs Tennessee
Country flag
lunch break... would you use this oem piston or a ching chow hyway? I got cabers and oem clips, and the oem is tight in the bore, just has some skirt wear below the intake port? Tranfers are not pretty but I think the little radius at the back should help with flow. Ex roofs a little flat, it all could be a little prettier, but its my saw so who cares, I cant wait to see what the compression bump and the staggered transfers do, its gonna be hard for me to let the yamabond dry. I also still gotta time it and see how much i lost. Thanks everybody for all the guidance, more soon...

If the piston still has some machine mark on it.....use it.
 
Top