High Quality Chainsaw Bars Husqvarna Toys

What to look out for on the 440 kit?

MustangMike

Mastermind Approved!
Local time
3:59 AM
User ID
338
Joined
Dec 30, 2015
Messages
11,433
Reaction score
35,921
Location
Brewster, NY
Country flag
Glad my info was of some help, best of luck with your builds, and keep us posted.

Also, WELCOME to the site!

There used to be a guy on another site known as Maine Moose, he had a real cool avatar of a Bull Moose pulling a sleigh! Unfortunately, I have not seen him post in quite a while. I know he was a big fan of Red Oak for firewood.

The 044/440s used to be my favorite saws, and I will never part with my 10 mm 044, but the new 462s are real nice ... my new favorites!
 

StihlMagnum440

Super OPE Member
Local time
3:59 AM
User ID
20740
Joined
Nov 23, 2021
Messages
215
Reaction score
643
Location
Maine
Glad my info was of some help, best of luck with your builds, and keep us posted.

Also, WELCOME to the site!

There used to be a guy on another site known as Maine Moose, he had a real cool avatar of a Bull Moose pulling a sleigh! Unfortunately, I have not seen him post in quite a while. I know he was a big fan of Red Oak for firewood.

The 044/440s used to be my favorite saws, and I will never part with my 10 mm 044, but the new 462s are real nice ... my new favorites!
We got snow last night. The complete blue saw 444 is only $40 more than the kit I bought and comes with a 6 month "warranty". I am thinking of getting one and break it in properly using good gas and oil etc and run it like crazy. If it holds up then do a bunch of upgrades. People have said Farmertec is putting the better parts in the complete saws. That would reduce the gamble of a bad bottom end. Check the FT p & c when warranty is up and go meteor or hywsy. Change the fuel, pulse, intake etc. Thinking going that route may be a good strategy...who knows. The quality of the bottom end is the key. I wonder if they clean out the cases and bearings on the complete saws. Seems like they would want to do better on the complete saws or they will be getting boatloads of them back. Thanks for the welcome. I have a stock 1994 F150 4x4 302 E4OD with AC that was mint until a few years ago. Pretty soon going to give it a make over. With the color blue I think a lot of people in this small town I moved in thought I was a policeman or warden. You ever get that reaction with your Mustang (nice car). Classic holidays...waiting for parts in the mail.
 

MustangMike

Mastermind Approved!
Local time
3:59 AM
User ID
338
Joined
Dec 30, 2015
Messages
11,433
Reaction score
35,921
Location
Brewster, NY
Country flag
Not a bad strategy, have thought of it myself, but I have too many projects I did not even touch this year!

My Mustang is just a little too loud to be mistaken for law enforcement.

The most popular law enforcement vehicles around here seem to be Chargers and Explorers.
 

StihlMagnum440

Super OPE Member
Local time
3:59 AM
User ID
20740
Joined
Nov 23, 2021
Messages
215
Reaction score
643
Location
Maine
I would also mention to recheck the flywheel nut after running/tuning a few minutes. I don’t think the flywheel is a perfect fit to the crank taper. I torqued mine to spec but it sheared the key after just a few minutes of running, like the nut had come loose. After retightening the nut it did not loosen up again. I would ditch the Chinese nut in favor of an oem flanged nut if you have a spare.
I took your advice and used OEM nut with loctited and cleaned shaft etc and torqued. I am going to check it after running it a bit. Thanks.
 

slackinoff

Pinnacle OPE Member
Local time
2:59 AM
User ID
20772
Joined
Nov 24, 2021
Messages
572
Reaction score
1,733
Location
usa
Country flag
I just received my farmertec 440 build kit this Monday. I started by cleaning the cases, at first glance they look decently clean, but as you start flushing them out ( I used kerosene in a spray bottle) all sorts of metal filings and tiny paint chips start to come out. The bearings were pre-installed and I used an entire spray bottle of kerosene flushing them out. Once I was getting smooth rotation I used my air compressor to blow them out. Even finer metal particles appeared out of the bearing ( I had a rag on the opposite side of bearing to see what was coming out). So repeated the process. The tricky thing is that they feel smooth as delivered before cleaning, it was not until I flushed some kerosene through them that I felt them hanging up a bit.

Anyways I spent way more time cleaning the main bearings out than I did getting the case halves and crank installed, lol. Right now I am cleaning up the cylinder, there was barely any chamfer on the ports, but I got that squared away.

Oh and when I went to install the crank, I installed the oil pump to hold in the main bearing. The output tube on the oil pump had to be rotated slightly and also bent ever so slightly to get the pump to index into the bearing/ sit against on the case.

Right now I am waiting for the clutch side oil seal to arrive, I inverted the farmertec one by driving it too far into the case/bearing, my mistake. Hopefully these are the only issues I run into. They are not that big of a deal, I expected there to be some fitting required.
 
Last edited:

huskihl

Muh fingers look really big
GoldMember
Local time
3:59 AM
User ID
360
Joined
Dec 31, 2015
Messages
22,536
Reaction score
143,439
Location
East Jordan, MI
Country flag
I just received my farmertec 440 build kit this Monday. I started by cleaning the cases, at first glance they look decently clean, but as you start flushing them out ( I used kerosene in a spray bottle) all sorts of metal filings and tiny paint chips start to come out. The bearings were pre-installed and I used an entire spray bottle of kerosene flushing them out. Once I was getting super smooth rotation I used my air compressor to blow them out. Even finer metal particles appeared out of the bearing ( I had a rag on the opposite side of bearing to see what was coming out). So repeated the process. The tricky thing is that they feel smooth as delivered before cleaning, it was not until I flushed some kerosene through them that I felt them hanging up a bit.

Anyways I spent way more time cleaning the main bearings out than I did getting the case halves and crank installed, lol. Right now I am cleaning up the cylinder, there was barely any chamfer on the ports, but I got that squared away.

Oh and when I went to install the crank, I installed the oil pump to hold in the main bearing. The output tube on the oil pump had to be rotated slightly and also bent ever so slightly to get the pump to index into the bearing/ sit against on the case.

Right now I am waiting for the clutch side oil seal to arrive, I inverted the farmertec one by driving it too far into the case/bearing, my mistake. Hopefully these are the only issues I run into. They are not that big of a deal, I expected there to be some fitting required.
You’ll need to use a shim to get the seal to ride up over the step in the crank. Old school film negative, thin plastic, pop can aluminum, etc. Wrap it around the crank over the lip, grease the seal, and slide it on
 

slackinoff

Pinnacle OPE Member
Local time
2:59 AM
User ID
20772
Joined
Nov 24, 2021
Messages
572
Reaction score
1,733
Location
usa
Country flag
You’ll need to use a shim to get the seal to ride up over the step in the crank. Old school film negative, thin plastic, pop can aluminum, etc. Wrap it around the crank over the lip, grease the seal, and slide it on

I hate to question a pro but I think you are talking about the 660 possibly?, the 440 the oil seal does not actually touch the crank on the clutch side, it uses a "bearing spacer" (at least that what the IPL calls it) to make the gap between the inner lip of the seal and the crankshaft. The flywheel side of the crankshaft is tapered, no ledge.
 

StihlMagnum440

Super OPE Member
Local time
3:59 AM
User ID
20740
Joined
Nov 23, 2021
Messages
215
Reaction score
643
Location
Maine
I would also mention to recheck the flywheel nut after running/tuning a few minutes. I don’t think the flywheel is a perfect fit to the crank taper. I torqued mine to spec but it sheared the key after just a few minutes of running, like the nut had come loose. After retightening the nut it did not loosen up again. I would ditch the Chinese nut in favor of an oem flanged nut if you have a spare.
Followed your advice on mine. OEM nut, torque wrenched, loctited, clean crank and inside flywheel. Ran it for awhile and took off starter and checked with torque wrench. Thank you!
 

huskihl

Muh fingers look really big
GoldMember
Local time
3:59 AM
User ID
360
Joined
Dec 31, 2015
Messages
22,536
Reaction score
143,439
Location
East Jordan, MI
Country flag
I hate to question a pro but I think you are talking about the 660 possibly?, the 440 the oil seal does not actually touch the crank on the clutch side, it uses a "bearing spacer" (at least that what the IPL calls it) to make the gap between the inner lip of the seal and the crankshaft. The flywheel side of the crankshaft is tapered, no ledge.
You’re absolutely right. I was thinking it was the 660 thread. Still need to be careful getting the bushing in though. Grease everything and twist it as you push
 

slackinoff

Pinnacle OPE Member
Local time
2:59 AM
User ID
20772
Joined
Nov 24, 2021
Messages
572
Reaction score
1,733
Location
usa
Country flag
You’re absolutely right. I was thinking it was the 660 thread. Still need to be careful getting the bushing in though. Grease everything and twist it as you push

Thanks for the bushing tip, I will do that! I am not used to working on power saws, every other crank seal I have messed with (non saw), gets driven in until it stops....even the 440 service manual says something like "drive the seal until it's proper" or something. I took that as drive it in until it stops. Lesson learned, hopefully.
 

huskihl

Muh fingers look really big
GoldMember
Local time
3:59 AM
User ID
360
Joined
Dec 31, 2015
Messages
22,536
Reaction score
143,439
Location
East Jordan, MI
Country flag
Thanks for the bushing tip, I will do that! I am not used to working on power saws, every other crank seal I have messed with (non saw), gets driven in until it stops....even the 440 service manual says something like "drive the seal until it's proper" or something. I took that as drive it in until it stops. Lesson learned, hopefully.
Usually (usually), they get seated flush. If there’s a taper, they get seated to the bottom of that taper. But the main thing is that they are riding on top of the flat that they seal against on the crank and that they aren’t touching the bearing or the flywheel
 

slackinoff

Pinnacle OPE Member
Local time
2:59 AM
User ID
20772
Joined
Nov 24, 2021
Messages
572
Reaction score
1,733
Location
usa
Country flag
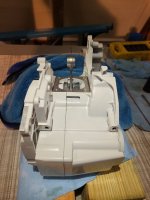
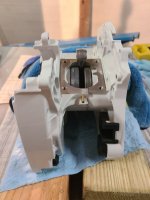
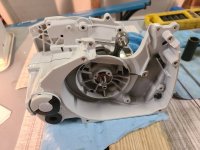
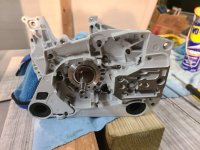
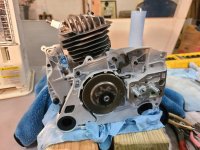
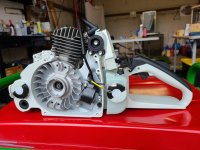
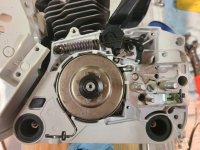
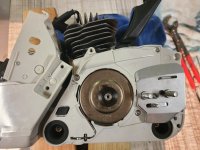
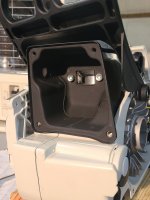
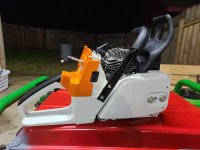
Here are some pictures for no particular reason other than show and tell. The original oil seals are barely installed to keep junk out of the bearings. New seals should be here today. The only work I got done on the kit last night was the chain adjuster, bar studs and AV bushings. The chain adjuster seems to work very well, everything fit perfectly and moves smoothly. On the smallest AV bushing that goes into the flywheel side, that little bugger was not going in. Instead of fighting with it, I used a chainsaw file to open that hole up just a touch. No big deal, even then it was a bear to get in.

These pics were before the chain adjuster was installed. I think the goal for tonight will be oil seals and piston/cylinder.

20211201_183837.jpg 20211201_183910.jpg 20211201_184019.jpg 20211201_184255.jpg
 

StihlMagnum440

Super OPE Member
Local time
3:59 AM
User ID
20740
Joined
Nov 23, 2021
Messages
215
Reaction score
643
Location
Maine
I just received my farmertec 440 build kit this Monday. I started by cleaning the cases, at first glance they look decently clean, but as you start flushing them out ( I used kerosene in a spray bottle) all sorts of metal filings and tiny paint chips start to come out. The bearings were pre-installed and I used an entire spray bottle of kerosene flushing them out. Once I was getting smooth rotation I used my air compressor to blow them out. Even finer metal particles appeared out of the bearing ( I had a rag on the opposite side of bearing to see what was coming out). So repeated the process. The tricky thing is that they feel smooth as delivered before cleaning, it was not until I flushed some kerosene through them that I felt them hanging up a bit.

Anyways I spent way more time cleaning the main bearings out than I did getting the case halves and crank installed, lol. Right now I am cleaning up the cylinder, there was barely any chamfer on the ports, but I got that squared away.

Oh and when I went to install the crank, I installed the oil pump to hold in the main bearing. The output tube on the oil pump had to be rotated slightly and also bent ever so slightly to get the pump to index into the bearing/ sit against on the case.

Right now I am waiting for the clutch side oil seal to arrive, I inverted the farmertec one by driving it too far into the case/bearing, my mistake. Hopefully these are the only issues I run into. They are not that big of a deal, I expected there to be some fitting required.
Here are some pictures for no particular reason other than show and tell. The original oil seals are barely installed to keep junk out of the bearings. New seals should be here today. The only work I got done on the kit last night was the chain adjuster, bar studs and AV bushings. The chain adjuster seems to work very well, everything fit perfectly and moves smoothly. On the smallest AV bushing that goes into the flywheel side, that little bugger was not going in. Instead of fighting with it, I used a chainsaw file to open that hole up just a touch. No big deal, even then it was a bear to get in.

These pics were before the chain adjuster was installed. I think the goal for tonight will be oil seals and piston/cylinder.

View attachment 318266 View attachment 318268 View attachment 318269 View attachment 318270
I just replaced that same AV on my stock 440 with a stock AV and it did not go in. I was going to check on that.
 

slackinoff

Pinnacle OPE Member
Local time
2:59 AM
User ID
20772
Joined
Nov 24, 2021
Messages
572
Reaction score
1,733
Location
usa
Country flag
I just replaced that same AV on my stock 440 with a stock AV and it did not go in. I was going to check on that.

That's pretty interesting the stock ones are like that. I guess Stihl has a reason, but anyway I filed for about 5 min and it was still very very tight, but at least it was actually possible to get it in there.
 

StihlMagnum440

Super OPE Member
Local time
3:59 AM
User ID
20740
Joined
Nov 23, 2021
Messages
215
Reaction score
643
Location
Maine
That's pretty interesting the stock ones are like that. I guess Stihl has a reason, but anyway I filed for about 5 min and it was still very very tight, but at least it was actually possible to get it in there.
Good! It is strange you mentioned the AV and I noticed it. I replaced the handle and all AV and thought I had messed up but did not want to force it. Thanks.
 

StihlMagnum440

Super OPE Member
Local time
3:59 AM
User ID
20740
Joined
Nov 23, 2021
Messages
215
Reaction score
643
Location
Maine
It's alive! Cranked it today with a few pulls and started tuning. It quit and kicked back a little. Then I notice it's broke the starter rope at the handle knot. I'm not sure how that happened.
After taking the starter off and rewinding/fighting with it 4 times I got it working and cut some cookies.
The starter handle had some really sharp edges inside, that may have caused the rope breakage. I hand turned a drill bit to deburr it.
View attachment 100049
Did you happen to heat the knot with a torch? I did not on mine but I have seen ropes break right at the knot because some melting weakened rope on bottom of knot. Sometimes the recoil spring can be up in it's mount near rope inlet and that might run on rope.
 

slackinoff

Pinnacle OPE Member
Local time
2:59 AM
User ID
20772
Joined
Nov 24, 2021
Messages
572
Reaction score
1,733
Location
usa
Country flag
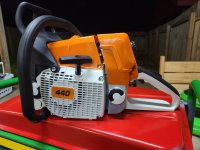
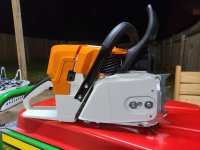
Finished! And she fired off in only 6 pulls. Fires up one pull every time warm. I reset the carb to 1 and 1/4 for both H&L before I even pulled on the rope.

Notes on final stage of build. I filed one barb off the brass impulse needle. When I test fitted the hose, as others have mentioned, the brass barb seemed too long. Better to take 1/8 inch off of it to be safe. There was still plenty of meat left for hose to grab on mine.

Other than me installing things in the wrong order and having to back track, everything went smooth.

So far I am really impressed. The saw went together really well and now that it's built feels really good. I haven't cut yet, waiting on my new bar.

20211203_000713.jpg 20211203_122500.jpg 20211203_190530.jpg 20211203_191452.jpg 20211203_200216.jpg
 

MustangMike

Mastermind Approved!
Local time
3:59 AM
User ID
338
Joined
Dec 30, 2015
Messages
11,433
Reaction score
35,921
Location
Brewster, NY
Country flag
Grease works great on rubber parts, but is real messy. I like to use Vaseline on the seals and rubber vibration mounts.

Works great and is a lot easier to clean up!
 
Top