High Quality Chainsaw Bars Husqvarna Toys Hockfire Saws

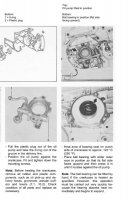
Setting Bearing Depth

Mattyo

Youtube speciawist
GoldMember
Local time
4:52 AM
User ID
441
Joined
Jan 8, 2016
Messages
4,285
Reaction score
10,915
Location
Farmington, CT
Country flag
It really seems like the reference point for the PTO bearing is the oiler... at least on most stihl models. How ya get the bearing there you can do multiple ways. Heat / cold works, heat the case, chill the bearing, drop it in and it'll drop to the point of hitting the oiler.

I've moved the bearing with threaded rods and washers without too much trouble. ... if moving it towards the oiler. I've moved it further into the case by using a punch on the outer race....and then checking with the depth gauge.

The question I have is, why does it need to be up against the oiler? doesn't this potentially push it too far out?

The reason I ask is that the china 440 I just built, the crank did not stick out far enough on the PTO side to get the washer/eclip on. it was 20-30 thow shy.... The bearing WAS seated against the oiler properly, and the crank WAS centered. So, if I did the install properly (or I did it to the best of my ability to the letter of the law properly) and it was still off, I'll chalk it up to something being up with the kit.

I had no trouble with the 660 or the 360 kit...and did those the same way.... bearing against the oiler...center the crank in the bosses. So, i'd love another go at it hehe. one day. ...

I'm still not done editing the 440 video. But my father is using it and he says it cuts like crazy.

My 372 china saw has better power now, but has a stalling issue... so thats a continual issue I think I gotta work on.

With regards to seating bearings... the 372 and 394 both have bearing pockets. I've never had an issue with either ...simply seat the bearings fully in the pockets and pull the crank on through. no issue centering or length.

the 200t has defined pockets as well.. AND pockets for seals. making it foolproof... whereas the 372 and the 394 you can drive the seals in too far.

all interesting little fiddly issues between saws
 

Mattyo

Youtube speciawist
GoldMember
Local time
4:52 AM
User ID
441
Joined
Jan 8, 2016
Messages
4,285
Reaction score
10,915
Location
Farmington, CT
Country flag
yep, thats what I figured ... thanks!
 

BuckthornBonnie

Pinnacle OPE Member
Local time
4:52 AM
User ID
1725
Joined
Aug 22, 2016
Messages
956
Reaction score
1,640
Location
Penn Yan, NY
Country flag
A bearing against the oiler should guarantee that the race/seal won't interfere with the oiler drive. Stihl says to do this thinking that the crank puller will seat the crank perfectly for alignment with the washer/eclip and even the flywheel on the other side. The problem is when we use hammers to center the crank lol. Like we said before, maybe "center" isn't perfectly center?

I made the mistake before on a 460; never again. That's after using the pump and removing it too soon while freeing the crank (case still hot). Screwed me all up.
 

Mastermind

Chief Cat Herder
Staff member
Yearly GoldMember
Local time
3:52 AM
User ID
4
Joined
Dec 3, 2015
Messages
51,444
Reaction score
341,821
Location
Banner Springs Tennessee
Country flag
The problem is when we use hammers to center the crank lol. Like we said before, maybe "center" isn't perfectly center?

When following the shop manual, and using the correct tools, I've never needed to touch the crank with a brass hammer.
 

Mattyo

Youtube speciawist
GoldMember
Local time
4:52 AM
User ID
441
Joined
Jan 8, 2016
Messages
4,285
Reaction score
10,915
Location
Farmington, CT
Country flag
In this case, I measured between the bosses, and used a shim on the PTO side to "center" the crank between the bosses. it was .048" iirc. seemed like a bit much to me. but it WAS centered. so again, either there is a flaw in the kit ... case too wide? whatever OR for this particular kit, the crank should have been pulled through the PTO bearing as far as the bearing would allow.... which would likely yield proper fitment of the eclip. ...but in my case... not be centered.
 

angelo c

Coal Member
Local time
4:52 AM
User ID
362
Joined
Dec 31, 2015
Messages
2,919
Reaction score
11,553
Location
Peoples Republic of North Jersey
Country flag
In this case, I measured between the bosses, and used a shim on the PTO side to "center" the crank between the bosses. it was .048" iirc. seemed like a bit much to me. but it WAS centered. so again, either there is a flaw in the kit ... case too wide? whatever OR for this particular kit, the crank should have been pulled through the PTO bearing as far as the bearing would allow.... which would likely yield proper fitment of the eclip. ...but in my case... not be centered.
I know it would drive me nuts until I measured the crank (end to end) and the case (bearing pocket to pocket) and the...ocd stinks..
 

Stump Shot

Disciple of Monkey's
GoldMember
Local time
3:52 AM
User ID
1377
Joined
Jun 5, 2016
Messages
32,335
Reaction score
204,548
Location
Northwoods of Wisconsin
Country flag
This is why I prefer to put the bearings on the crank first, warm 'em up and drop 'em on. After it cools a bit heat the mag side case up and drop the crank/bearing in, put on the gasket and warm up the other half drop it on fast like couple taps on the case with a plastic mallet and it's home. Put the screws on and done. Crankshaft is centered in the cases and the bearings are where they need to be. No fuss, no muss. This is the easiest way in my mind it could be worked out. Then again maybe I'm just a simple SOB.
 

Mattyo

Youtube speciawist
GoldMember
Local time
4:52 AM
User ID
441
Joined
Jan 8, 2016
Messages
4,285
Reaction score
10,915
Location
Farmington, CT
Country flag
This is why I prefer to put the bearings on the crank first, warm 'em up and drop 'em on. After it cools a bit heat the mag side case up and drop the crank/bearing in, put on the gasket and warm up the other half drop it on fast like couple taps on the case with a plastic mallet and it's home. Put the screws on and done. Crankshaft is centered in the cases and the bearings are where they need to be. No fuss, no muss. This is the easiest way in my mind it could be worked out. Then again maybe I'm just a simple SOB.

Thats worked for me with 372s ... as long as you put the PTO side in first, the crank ends up fairly centered.

But, if the reference point on an 044 is the oiler, then the bearing has to get driven in there first... no? if the bearing is already on the crank, ... and you drop it in, the crank lobe may hit the boss... no? for SURE on the one I just did the crank would have been way off center, if not all the way against the boss

I totally get it that centered is over rated... but maybe thats Angelo's OCD hehe
 

huskihl

Muh fingers look really big
GoldMember
Local time
4:52 AM
User ID
360
Joined
Dec 31, 2015
Messages
22,965
Reaction score
146,581
Location
East Jordan, MI
Country flag
Thats worked for me with 372s ... as long as you put the PTO side in first, the crank ends up fairly centered.

But, if the reference point on an 044 is the oiler, then the bearing has to get driven in there first... no? if the bearing is already on the crank, ... and you drop it in, the crank lobe may hit the boss... no? for SURE on the one I just did the crank would have been way off center, if not all the way against the boss

I totally get it that centered is over rated... but maybe thats Angelo's OCD hehe
Unless you've somehow found that the exact center of the bore is the exact center of the case once the cylinder is bolted on, the whole thing is moot. I highly doubt that if you centered the crank between the case halves with, say, .025" gap on each side of the crank weights, that that would put the rod dead center of the bore while the big end was centered on its bearing. Thats why the rod is narrower than the rod bearing, so it has some play to line up.
In your 440, I'd pull the crank toward the pto side enough to comfortably install the e clip and be done with it
 

Mattyo

Youtube speciawist
GoldMember
Local time
4:52 AM
User ID
441
Joined
Jan 8, 2016
Messages
4,285
Reaction score
10,915
Location
Farmington, CT
Country flag
Well, I stupidly came up with a different solution, but that would probably have been the best way to deal with it.

Seems to me the easiest way to check it is to install the crank on the PTO side, and put the bushing, clutch, drum etc on and make sure the whole shoot fits BEFORE installing the flywheel side half.

again, its a good point. the whole thing might be moot because of poor china quality, and the whole centering thing may be moot too
 

Mattyo

Youtube speciawist
GoldMember
Local time
4:52 AM
User ID
441
Joined
Jan 8, 2016
Messages
4,285
Reaction score
10,915
Location
Farmington, CT
Country flag
i want a do-over on my 440 build lol.... oh well. every other freakin saw i've put together didn't have this issue. i know i know, humble pie is fine one in a while lol
 

Stump Shot

Disciple of Monkey's
GoldMember
Local time
3:52 AM
User ID
1377
Joined
Jun 5, 2016
Messages
32,335
Reaction score
204,548
Location
Northwoods of Wisconsin
Country flag
@Mattyo I just put 'em together the same way I did for old Husqvarna's and Jonsered's, been working so far on Stihl's, who knows the next one I go and do might be all whacked. Not saying I'm good, maybe just lucky. So far ignorance is bliss.

Here's a vidja I did for my 660 clone saw build thread. Assembled exactly as I described in above post.


Mattyo

Youtube speciawist
GoldMember
Local time
4:52 AM
User ID
441
Joined
Jan 8, 2016
Messages
4,285
Reaction score
10,915
Location
Farmington, CT
Country flag
Stump, clearly thats just fine. Maybe I've been the one thats lucky up until this point! lol!

I've seen Treemonkey do the install on a 288 case same as you describe... and for him it works fine too.

I just am having trouble figuring where my bottleneck in my education is on this one ... or maybe it was a sucky kit. USUALLY its me screwing something up!
 

Stump Shot

Disciple of Monkey's
GoldMember
Local time
3:52 AM
User ID
1377
Joined
Jun 5, 2016
Messages
32,335
Reaction score
204,548
Location
Northwoods of Wisconsin
Country flag
Stump, clearly thats just fine. Maybe I've been the one thats lucky up until this point! lol!

I've seen Treemonkey do the install on a 288 case same as you describe... and for him it works fine too.

I just am having trouble figuring where my bottleneck in my education is on this one ... or maybe it was a sucky kit. USUALLY its me screwing something up!


My money is on the kit, but hope you can sort it out...
 

Mattyo

Youtube speciawist
GoldMember
Local time
4:52 AM
User ID
441
Joined
Jan 8, 2016
Messages
4,285
Reaction score
10,915
Location
Farmington, CT
Country flag
It runs and cuts good..... you guys are gonna crucify me when you see how I solved it.

The saw is out of my hands for a bit, and until something bad happens, I ain't going back into it.

But, maybe I'll get another kit just for giggles and see where I went wrong
 

BuckthornBonnie

Pinnacle OPE Member
Local time
4:52 AM
User ID
1725
Joined
Aug 22, 2016
Messages
956
Reaction score
1,640
Location
Penn Yan, NY
Country flag
It runs and cuts good..... you guys are gonna crucify me when you see how I solved it.

The saw is out of my hands for a bit, and until something bad happens, I ain't going back into it.

But, maybe I'll get another kit just for giggles and see where I went wrong
Too bad I just buttoned up a 440, I could see where the crank set for ya after "centering." I do have an 036 bottom end around, but I may have already split the case.
 

Tor R

Novice
GoldMember
Local time
10:52 AM
User ID
439
Joined
Jan 8, 2016
Messages
5,817
Reaction score
38,944
Location
Mandal
Country flag
When following the shop manual, and using the correct tools, I've never needed to touch the crank with a brass hammer.
+1,
I read the shop manual and following the instruction, + proper service tool, can't remember where I placed my brass hammer, long time since I used the hammer.
If you ask me service tools are under rated!

Huskies 234/238/242/246 (if my memory is correct) is a bit backward, flywheel side has a pocket while PTO is free, but its not the flywheel side we center the crank against but PTO bearing according the shop manual, one of the model where its nice to have oem crank mounting tool
 
Top