High Quality Chainsaw Bars Husqvarna Toys Hockfire Saws

Most common air leak areas on a 372?

BuckthornBonnie

Pinnacle OPE Member
Local time
2:21 PM
User ID
1725
Joined
Aug 22, 2016
Messages
956
Reaction score
1,641
Location
Penn Yan, NY
Country flag
K. Did you grab a pic of the old seal location ? No worries if ya didn’t, you’ll see where it goes.

Get that case hot w no rubber, knock out the bearings. Get it hotter yet, then drop in new bearings. Have sockets and hammer ready for potential stuck bearings. Make sure they are both seated (one is set deep into the case as you saw).
 

kneedeepinsaws

Pinnacle OPE Member
GoldMember
Local time
12:21 PM
User ID
12933
Joined
Jun 21, 2020
Messages
805
Reaction score
1,713
Location
Oil Country
Country flag
K. Did you grab a pic of the old seal location ? No worries if ya didn’t, you’ll see where it goes.

Get that case hot w no rubber, knock out the bearings. Get it hotter yet, then drop in new bearings. Have sockets and hammer ready for potential stuck bearings. Make sure they are both seated (one is set deep into the case as you saw).
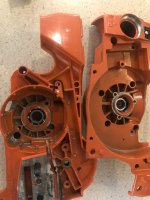
I followed the FSM to 200 degrees, used a heat gun to get the bearings out and it worked. New bearings went into freezer and cases in oven for 200. Had to drive the bearings home with a driver, they did not just flop in like afleetcommands video ;) maybe i didnt get them hot enough?

yes i saw the one side is quite deep, they are in there. well i had to hit the inner race unfortunatley to get them in... hopefully there was no damage. Yes i know bad practice but i was in partial panic mode and thats when stupid kicks in, every time. When I put the halves together i will be able to tell.
If theres any play ill split em apart and get some new bearings locally...

E19097DD-E7AA-4E62-B5B6-6E0C8E904170.jpeg

and no i didnt get a pic of old position but according to the marks on flywheel side it looks like edge of paint as the other gentleman said. Right where the taper ends
 

BuckthornBonnie

Pinnacle OPE Member
Local time
2:21 PM
User ID
1725
Joined
Aug 22, 2016
Messages
956
Reaction score
1,641
Location
Penn Yan, NY
Country flag
No worries. Since the cases were hot, the actual stress on the bearings while tapping them in was probably minimal.
For future builds- get them (the cases) very hot before install. Have everything ready and no need to panic. Husky bearings drop in easily unless there’s a steel sleeve (not found in 372s). Equally distribute the heat to avoid paint issues, but get it hotter than you think and they’ll fall right in. I use a thin glove and put the bearing on my finger, then pop it right in.

For assembly, get the locating pins and screws ready, degrease em. Get the gasket on with the sealant of your choice. Follow Matt’s directions on the tools and go slow.
 

NPKenny

Super OPE Member
Local time
11:21 AM
User ID
5030
Joined
Jan 12, 2018
Messages
292
Reaction score
748
Location
Lehi, AZ
Country flag
On the case half mounting surfaces, you can ensure better sealing and contact pressure by flat sanding them on a glass surface. I like to get to shiny magnesium before sticking a gasket to it. I usually rub 518 into the gasket and skim it on the cleaned case mounting surface.
 

Mattyo

Youtube speciawist
GoldMember
Local time
2:21 PM
User ID
441
Joined
Jan 8, 2016
Messages
4,287
Reaction score
10,943
Location
Farmington, CT
Country flag
I like to push the pto bushing into the seal and then install the seal. That way you know you didn't pucker the seal. Just started doing this and I like it.

Pto seal goes flush.

Flywheel seal is set so the 45 degree crankcase part ends where the seal begins.

Its in my vids :)
 

kneedeepinsaws

Pinnacle OPE Member
GoldMember
Local time
12:21 PM
User ID
12933
Joined
Jun 21, 2020
Messages
805
Reaction score
1,713
Location
Oil Country
Country flag
I like to push the pto bushing into the seal and then install the seal. That way you know you didn't pucker the seal. Just started doing this and I like it.

Pto seal goes flush.

Flywheel seal is set so the 45 degree crankcase part ends where the seal begins.

Its in my vids :)
No worries. Since the cases were hot, the actual stress on the bearings while tapping them in was probably minimal.
For future builds- get them (the cases) very hot before install. Have everything ready and no need to panic. Husky bearings drop in easily unless there’s a steel sleeve (not found in 372s). Equally distribute the heat to avoid paint issues, but get it hotter than you think and they’ll fall right in. I use a thin glove and put the bearing on my finger, then pop it right in.

For assembly, get the locating pins and screws ready, degrease em. Get the gasket on with the sealant of your choice. Follow Matt’s directions on the tools and go slow.
Thanks guys.

Cases are pressed together with a very light skim of motoseal on both halves with a green gasket. Cases bolts torqued equally and tight.
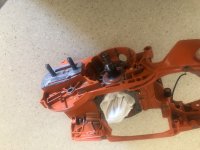
Put in flywheel seal using matts tool, if you flip it over it is the perfect driver. Unfortunately the holding bolt that sticks out the side cannot be used as the sleeve does not allow it at this distance. If i were to drill another hole on the threaded rod you could use the holding lever bolt. In turn you could press the seal in, maybe a mod for the tool next time? This time i just used a block of wood and the washer on the good end with a socket to lightly tap it in.

clutch side next
 

kneedeepinsaws

Pinnacle OPE Member
GoldMember
Local time
12:21 PM
User ID
12933
Joined
Jun 21, 2020
Messages
805
Reaction score
1,713
Location
Oil Country
Country flag
E5178F8B-7D06-4852-8957-1A15D395E5C6.jpeg

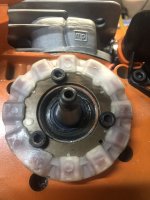
Looks and feels good. I had to massage the new bushing in and out a bit to get the lip of the seal uniform around the bushing. I did not forget the o-ring and used the bushing to seal it evenly. Bearings feel nice and smooth. gonna let the motoseal dry and then proceed with the tank handle assembly...
gonna watch some videos to get this spring back into the trigger, other than that from here on out is familiar territory!!

thanks guys, should have her back together in a couple days.
 

BuckthornBonnie

Pinnacle OPE Member
Local time
2:21 PM
User ID
1725
Joined
Aug 22, 2016
Messages
956
Reaction score
1,641
Location
Penn Yan, NY
Country flag
The tricky part of that spring/trigger is finding the spot where it engages with the lower plastic throttle trigger. Watch those vids a few times. Punch out the pins and clean that area.
 

kneedeepinsaws

Pinnacle OPE Member
GoldMember
Local time
12:21 PM
User ID
12933
Joined
Jun 21, 2020
Messages
805
Reaction score
1,713
Location
Oil Country
Country flag
Did a pressure test at 7psi. Slow slow leak somewhere... checked the clutch side seals 5-6 times now. With pressure applied to the bushing no leaks with leak detector.. removed pump and put in grommets with the screws to act as seals for the pump seals.. tightened those down no leaks...
pulled the tank off soaped the underside case seal, no leaks..
soaped the base gasket area, no leaks where i can see...
Leak tested spart plug and decomp plug, no leaks..


Even tested the vacuum pump itself with the nipple i was using, plugged the end with my finger and no leaks...

Its midnight now and im bushed.. another day tomorrow. Probably pull the jug off and put some motoseal on the base gasket i guess. Maybe ill re-inspect the rubbers to seal the intake and exhaust...
also tried to listen for the leak but nope

At 7psi it leaks out in 10 minutes.
 

kneedeepinsaws

Pinnacle OPE Member
GoldMember
Local time
12:21 PM
User ID
12933
Joined
Jun 21, 2020
Messages
805
Reaction score
1,713
Location
Oil Country
Country flag
Dunk it in water. You'll find the leak fast
Great idea!!!
Did so and found it instantly, flywheel side...
Looks like i marred the surface to where the flywheel seal rests... its leaking through there. I have one more seal, i can either pull this seal out ruining it and try and repair the damage to the case with JB weld and push in a new seal. Or split the cases again, keeping the old seal, use and inside bearing puller and pull the bearing, then knock out the seal keeping it intact and repair the case....
gonna eat breakfast and clean up my disaster work bench in the garage then decide what im gonna do.
Shouldn't have been so aggressive on the flywheel side seal Removal... luckily the clutch side i didnt damage.

*edit*
So what a hackjob!!!!
but hopefully this will solve the issue. I pulled the old seal and ruined it, but i used carb clean and cleaned the race really good with q tips. Then put a light coating on ultra black RTV. I chose this only because once hardened if there is a little Piece left it will not ruin a bearing or anything else if it breaks off.
I smeared with a qtip over the gouges and then cleaned the outer edge of the seal and put a thin coating on. I set the seal into the race and then applied a thin coat around the edge. So there is sealant in the gouge of the race and on top, it should hold. Gonna let it cure before i do another test.
 

Attachments

  • 0EECED9D-E050-4ED3-8320-ECF0A2FC3E71.jpeg
    0EECED9D-E050-4ED3-8320-ECF0A2FC3E71.jpeg
    123.3 KB · Views: 11
Last edited:

BuckthornBonnie

Pinnacle OPE Member
Local time
2:21 PM
User ID
1725
Joined
Aug 22, 2016
Messages
956
Reaction score
1,641
Location
Penn Yan, NY
Country flag
Hmmm, I would try this order of repairs-
1. Gently tap the seal a whisker more into the case. You may clear the scratch.
2. Place Hondabond or a sealant of your choice around the seal, apply a vacuum, and leave it.
3. Carefully remove the seal, degrease the area and post pics on here. Then, use Hondabond/threebond liberally around the OD of a new oem seal and drive it in. Wait 12hrs and see if the leak is within spec.
4. Replace case
 

kneedeepinsaws

Pinnacle OPE Member
GoldMember
Local time
12:21 PM
User ID
12933
Joined
Jun 21, 2020
Messages
805
Reaction score
1,713
Location
Oil Country
Country flag
Hmmm, I would try this order of repairs-
1. Gently tap the seal a whisker more into the case. You may clear the scratch.
2. Place Hondabond or a sealant of your choice around the seal, apply a vacuum, and leave it.
3. Carefully remove the seal, degrease the area and post pics on here. Then, use Hondabond/threebond liberally around the OD of a new oem seal and drive it in. Wait 12hrs and see if the leak is within spec.
4. Replace case
I just finished before you posted this, but a similar method was used. I like the vacuum idea for the sealant, what a good idea.

edit

i added a little bit of vacuum and applied a little more on the surface. I removed the pump to keep the inside of the case at the same pressure as the outside so while it dries there are no surprises.

gonna let this sit 24 hours, dont want to take any More chances!
 
Last edited:

kneedeepinsaws

Pinnacle OPE Member
GoldMember
Local time
12:21 PM
User ID
12933
Joined
Jun 21, 2020
Messages
805
Reaction score
1,713
Location
Oil Country
Country flag
Well last night i put an air test on it before bed, it held positive and negative. Today after dinner i filled it up and pulled the crap out of it.

nothin...

Nice managed to switch fuel and impulse around... switched that back right quick
I set the carb to factory 1 turn on L and 1.25 on high. Left the idle alone cause i dont know what the factory is on that.

try again and she fired right up, high idle off and shes idling at like 3800 from my previous idle screw setting.
Turned idle down to 2700 or so, just felt a little lean on the L so gave that 1/4 turn out.
Nice steady idle, didnt smoke after letting it idle and then blipping the throttle anymore. Also it sounded like it was firing more, kinda like when you hear a truck/car engine missing, that same kind of lack of noise was gone now.

throttle response was great, took it to the wood pile and layed into it. Was 4 stroking on and off in the cut, just perfect, didnt even have to touch the H screw, at least for now.

so far she seems fixed.

couple things i want to get before i bring it out in the bush

New tank vent insert, gut it and put a stihl/echo vent in the airbox

mine is cracked from pulling on it. I didnt trust the husky vent cause it was incredibly hard to pass air through it so i removed the check and kept one puck which felt much better. It will leak for now but slow.

new fuel line
Im using the yellow line that is slightly smaller, i managed to put some shrink wrap on it to make a tight fit on the tank and it holds gas back. However the bent is a little aggressive and the line kinks easily, i dont want to lean out in the bush so id rather get a new line and have the factory bends that prevent kinking.

Thats it, after that its a full out test. What do you guys think?
 

BuckthornBonnie

Pinnacle OPE Member
Local time
2:21 PM
User ID
1725
Joined
Aug 22, 2016
Messages
956
Reaction score
1,641
Location
Penn Yan, NY
Country flag
Good stuff. Get the OEM Husky pigtail line if you’re not well versed in fuel line options. The Echo or smaller Stihl fuel line works ok but can be too long/short in the tank. I have used both OEM and Echo.

Those Echo-style tank vents work well if you have the airbox space for them.
 

kneedeepinsaws

Pinnacle OPE Member
GoldMember
Local time
12:21 PM
User ID
12933
Joined
Jun 21, 2020
Messages
805
Reaction score
1,713
Location
Oil Country
Country flag
Good stuff. Get the OEM Husky pigtail line if you’re not well versed in fuel line options. The Echo or smaller Stihl fuel line works ok but can be too long/short in the tank. I have used both OEM and Echo.

Those Echo-style tank vents work well if you have the airbox space for them.
Thanks for the feedback.
Im gonna make it work somehow.
 
Top