High Quality Chainsaw Bars Husqvarna Toys

Husqvarna 357/359 Repair Thread.

XP_Slinger

They’re Just Saws
Local time
9:05 AM
User ID
845
Joined
Feb 9, 2016
Messages
6,089
Reaction score
27,524
Location
Central NY
Country flag
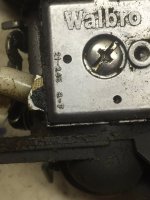
@M2theB , to see if your carb hasn’t been updated remove it, flip it upside down so you’re looking at the metering cover that says Walbro on it. You will see 2 gaskets tabs sticking out from under the cover near one of the corners, if you see a blue tab it hasn’t been updated. You’ll also want to drill a hole in the pump diaphragm cover to vent it. I’ve never watched Scott’s video on updating them but I’m sure that step is in there.
 

M2theB

Pinnacle OPE Member
Local time
9:05 AM
User ID
5789
Joined
Apr 2, 2018
Messages
401
Reaction score
1,398
Location
Central Mass
Country flag
IMG_6592.JPG
@M2theB , to see if your carb hasn’t been updated remove it, flip it upside down so you’re looking at the metering cover that says Walbro on it. You will see 2 gaskets tabs sticking out from under the cover near one of the corners, if you see a blue tab it hasn’t been updated. You’ll also want to drill a hole in the pump diaphragm cover to vent it. I’ve never watched Scott’s video on updating them but I’m sure that step is in there.

What do you think?
I don't see blue.

Pull the cover and drill a hole like the Zama's have?
 

M2theB

Pinnacle OPE Member
Local time
9:05 AM
User ID
5789
Joined
Apr 2, 2018
Messages
401
Reaction score
1,398
Location
Central Mass
Country flag
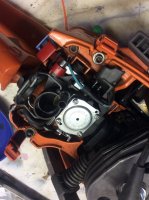
IMG_6656.JPG IMG_1027.JPG IMG_1028.JPG
View attachment 131764

What do you think?
I don't see blue.

Pull the cover and drill a hole like the Zama's have?

I had another 199 on the bench from the previous saw, and it's easy to notice the blue.
Popped the cover and put the hole in it.
Saw starts really well.
I liked the idle at first, but it crept up. Chains not spinning, so its not that bad.
But it still has a case of the bog at 1/4 throttle. But it'll push right through it when fully goosed.
Not sure a was supposed to see wet though on that side of the diaphragm.
 

XP_Slinger

They’re Just Saws
Local time
9:05 AM
User ID
845
Joined
Feb 9, 2016
Messages
6,089
Reaction score
27,524
Location
Central NY
Country flag
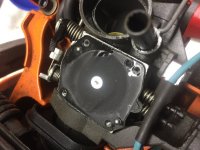
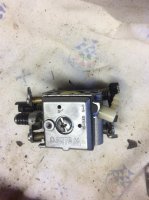
View attachment 131776 View attachment 131771 View attachment 131772

I had another 199 on the bench from the previous saw, and it's easy to notice the blue.
Popped the cover and put the hole in it.
Saw starts really well.
I liked the idle at first, but it crept up. Chains not spinning, so its not that bad.
But it still has a case of the bog at 1/4 throttle. But it'll push right through it when fully goosed.
Not sure a was supposed to see wet though on that side of the diaphragm.
Did you check the metering lever height? It should be level with the carb body, too low and it will not get enough fuel, too high and it will flood.
 

M2theB

Pinnacle OPE Member
Local time
9:05 AM
User ID
5789
Joined
Apr 2, 2018
Messages
401
Reaction score
1,398
Location
Central Mass
Country flag
Did you check the metering lever height? It should be level with the carb body, too low and it will not get enough fuel, too high and it will flood.

I didn't check that. Although the video said I should.
If I had checked it and it was too low or too high, what the next step be? New lever?

A little more information; when I put the saw back together I noticed the left carb through bolt was stripped, but still gave some torque resistance. So this afternoon I gave the assembly a carb cleaner spray test at the joints. I was able to stall it at the carb to flange joint. That's a known item that won't get any better with time and is on the parts list.

Compression is low, 125ish, and if a new flange doesn't fix that I think I'm heading into a full leak check, possibly replacing the shaft seals.

The saw isn't a virgin. It's a project.

Thanks for the help.
 

XP_Slinger

They’re Just Saws
Local time
9:05 AM
User ID
845
Joined
Feb 9, 2016
Messages
6,089
Reaction score
27,524
Location
Central NY
Country flag
I didn't check that. Although the video said I should.
If I had checked it and it was too low or too high, what the next step be? New lever?

A little more information; when I put the saw back together I noticed the left carb through bolt was stripped, but still gave some torque resistance. So this afternoon I gave the assembly a carb cleaner spray test at the joints. I was able to stall it at the carb to flange joint. That's a known item that won't get any better with time and is on the parts list.

Compression is low, 125ish, and if a new flange doesn't fix that I think I'm heading into a full leak check, possibly replacing the shaft seals.

The saw isn't a virgin. It's a project.

Thanks for the help.
No need to buy a new lever if the adjustment is off, simply bend it to the correct setting.

A bad carb mount is certainly an issue and I would definitely replace the flange collar, good catch.

125psi is a little on the low side in my opinion...did you already put a new ring on it?? If not I would if it were my saw, Caber rings are good quality and inexpensive. A new ring would bring you up to about 150psi. Delete the base gasket and you’ll see about 175psi:)

Sounds like you’re nailing down all the little things adding up to why the saw isn’t running 100%. You’ll be very happy when you get it dialed in, love me some 359.
 

XP_Slinger

They’re Just Saws
Local time
9:05 AM
User ID
845
Joined
Feb 9, 2016
Messages
6,089
Reaction score
27,524
Location
Central NY
Country flag
That plastic “coller” was striped out on mine on one side. If a guy gets too torque happy they strip easily. I bought a new one and was careful tightening it up.
Yes sir they sure do strip if one were to “white knuckle” tighten them. Very good point that I neglected to bring up...

:beer-toast1:
 

M2theB

Pinnacle OPE Member
Local time
9:05 AM
User ID
5789
Joined
Apr 2, 2018
Messages
401
Reaction score
1,398
Location
Central Mass
Country flag
No need to buy a new lever if the adjustment is off, simply bend it to the correct setting.

A bad carb mount is certainly an issue and I would definitely replace the flange collar, good catch.

125psi is a little on the low side in my opinion...did you already put a new ring on it?? If not I would if it were my saw, Caber rings are good quality and inexpensive. A new ring would bring you up to about 150psi. Delete the base gasket and you’ll see about 175psi:)

Sounds like you’re nailing down all the little things adding up to why the saw isn’t running 100%. You’ll be very happy when you get it dialed in, love me some 359.

I'm heading down the road with this saw. I ordered the caber ring and I got two in a pretty cool little box. Are they being generous or am I supposed to do something with two rings and one saw?
 

M2theB

Pinnacle OPE Member
Local time
9:05 AM
User ID
5789
Joined
Apr 2, 2018
Messages
401
Reaction score
1,398
Location
Central Mass
Country flag
And I found out why they send two caber rings.
They go on easier than they come. I leave there.
 

BlacknTan

Super OPE Member
Local time
9:05 AM
User ID
10910
Joined
Nov 8, 2019
Messages
204
Reaction score
761
Location
New York
OK, I realize this is an old thread. I recently acquired a box of 357xp parts, thanks to a good gentleman here.
I've been through this thread numerous times, and learned alot from it, but nothing teaches like actually doing it. I'm putting together needed parts, but I've found a few issues, and have a few, maybe stupid questions.
I found a slightly torn and pinched diaphragm in the Walbro 199 carburetor. That will be fixed when I get the kit and go through the entire carb.
I found pieces of the old base gasket in the crankcase. Measured at .020. Is that the stock gasket thickness? If it is fine, but if stock is .030, I'd like a gasket at ,020. Is this available, or do I have to cut my own?
Next. the fuel line comes up from the tank to the carb, but in the photos, I see two lines coming up near the carb, and I see an unused orange nipple nearby. This nipple appears to go nowhere. Was it a vent for the tank that was superceded?

Thanks in advance..
 

PogoInTheWoods

Pinnacle OPE Member
Local time
9:05 AM
User ID
1190
Joined
Apr 23, 2016
Messages
1,943
Reaction score
3,850
Location
Ohio
Country flag
The tank vent should be one of the common plastic tube types that is installed horizontally inside the tank from the PTO side just in front of the fuel line entrance. Should be a sintered bronze cap/filter covering it if it has one of those vents. There were a couple variants.

The base gasket is typically .020. Not using a base gasket at all should get you pretty close to an .020 squish if I'm not mistaken. Been awhile since I've measured one, though I do have one on the bench right now that I'm rebuilding stock with a base gasket.

The most important thing to be aware of aside from the notorious HDA 199 issue (and the auto-decomp setup if it has one) is whether the intake boot clamp is the plastic clamp type or has been upgraded to a metal clamp. Even with a metal clamp they can be prone to air leaks where the boot sits in the bulkhead at the carburetor end.

If it has the plastic clamp, the assembly can be easily modified to use a metal clamp without buying the kit. I personally wouldn't use one of the metal snap clips they include in the kit anyway. I opt for crimp style cv boot clamps instead.
 

BlacknTan

Super OPE Member
Local time
9:05 AM
User ID
10910
Joined
Nov 8, 2019
Messages
204
Reaction score
761
Location
New York
Thanks for the help, Pogo. I've tgot the vent issue worked out (I should have looked again,) and you're right, I have the white nipple on top of the tank pointing to the clutch side, and an orange nipple pointing up near the carb.
OK, base gasket ,o20.. I'd like to find .015 gasket material.
I'm into the HDA199 now. I drilled a hole in the cover, and will clean and replace gaskets. It already had the softer tan colored piece under the diaphragm. Already had the metal clamp on the boot.

Thanks again.. you've been a major help!
 

BlacknTan

Super OPE Member
Local time
9:05 AM
User ID
10910
Joined
Nov 8, 2019
Messages
204
Reaction score
761
Location
New York
That's a great idea... can you tell me more about those clamps?

And, can you tell me more about the foam seal that stands between the carb and the gray piece of the boot that the carb adjustments pass through?

Thanks again, Bill
 

PogoInTheWoods

Pinnacle OPE Member
Local time
9:05 AM
User ID
1190
Joined
Apr 23, 2016
Messages
1,943
Reaction score
3,850
Location
Ohio
Country flag
The clamps are Oetiker clamps. Common for irrigation/sprinkler systems and all kinds of other similar applications..., mostly smaller diameter use. Once crimped they are very strong and form a 360 degree seal with no gap. Cheap in bulk, but still only a couple bucks as CV boot clamps from NAPA where I get em. 6865833 is the part number for their smaller ones. Not reusable, btw.
https://www.napaonline.com/en/p/CTD6865833
https://www.usplastic.com/catalog/item.aspx?itemid=117584

Not sure what you mean about the "foam seal". The plastic divider/manifold that secures the boot maybe? Need a little clarification there.
 
Top