High Quality Chainsaw Bars Husqvarna Toys Hockfire Saws

Husqvarna 357/359 Repair Thread.

BlacknTan

Super OPE Member
Local time
9:18 AM
User ID
10910
Joined
Nov 8, 2019
Messages
204
Reaction score
761
Location
New York
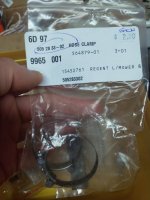
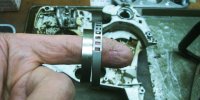
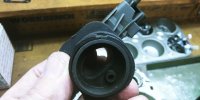
This is how I re-do the intake clamp...

I've since gotten a pair of special crimpers for these clamps, but side cutters work fine, too. Just not as pretty.

Hi Pogo,

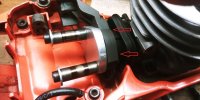
In your third and fourth photos from the top, it looks like a piece of foam squished between the metallic carb, and the next plastic piece toward the cylinder..
Some type of gasket that stands high a bit?
 

PogoInTheWoods

Pinnacle OPE Member
Local time
9:18 AM
User ID
1190
Joined
Apr 23, 2016
Messages
1,957
Reaction score
3,899
Location
Ohio
Country flag
Good eye, Duane. That's exactly what it is. It's also a reminder of how I needed to block off the intake to get a good seal there. A blockoff plate alone kept bleeding down even with a wedge and plate large enough to cover the impulse passage. Using the carb seals it -- maybe due to the actual mating surfaces of the carb body and boot opening being an actual matched fit? Dunno for sure. All I do know is I pulled my hair out chasing that down the first time around and was about to do it again if you guys wouldn't have brought it up!
 

I Know Something

Super OPE Member
Local time
8:18 AM
User ID
8191
Joined
Dec 23, 2018
Messages
443
Reaction score
761
Location
Fairmont, Minnesota
Country flag
Funny. I came home from a buddies house today. His sister in law gave me a saw she don't need. She has 5 Stihl saws already. She drops it off. It's a 357 XP. My jaw dropped after she drove away. I never ever received a free thing I didn't have to put a bunch of money into. I'm shocked and confused. This this thing has barely ran.

Matrix glitch?
 

BlacknTan

Super OPE Member
Local time
9:18 AM
User ID
10910
Joined
Nov 8, 2019
Messages
204
Reaction score
761
Location
New York
That metal clamp on the intake is giving me fits. I ordered three new ones, and if I have to modify my water pump pliers, I will, but that clamp will go on!

The old one could have been misshaped.. I don't know what the saw had been through before...

Hope to get this saw running before I'm takin' my dirt nap....
 

PogoInTheWoods

Pinnacle OPE Member
Local time
9:18 AM
User ID
1190
Joined
Apr 23, 2016
Messages
1,957
Reaction score
3,899
Location
Ohio
Country flag
Are you installing it with the cylinder on or off the saw? Nearly impossible with the cylinder on the saw. Should be able to install the entire intake assembly at once with the cylinder in your hand or on the bench. I also find it easier with the crimp on the left side of the intake (flywheel side). Also, don't try to snug it up like a zip tie before crimping. Not necessary to get it that tight for the crimp to make a good seal.

This, of course, assumes you're using an Oetiker style clamp! The ones in the Husky kit are junk if you're trying those. They'll deform just as easily as they may snap together like they're supposed to. Even if they do snap together, they're still prone to slipping and leaking. Never try re-using one of those.

As for conventional threaded intake boot clamps, they'll certainly work if they're the right size and you can find them locally. Need to be a larger than typical diameter to accommodate the plastic collar -- and they can be pricey if shipping is also involved.

Oetiker clamps are the way to go for this. Cheap, effective, available.
 

BlacknTan

Super OPE Member
Local time
9:18 AM
User ID
10910
Joined
Nov 8, 2019
Messages
204
Reaction score
761
Location
New York
Thanks again Pogo..

The cylinder is off the saw, completely stripped, and I've been attempting install from the left side, the old clamp btw... I don't trust the threaded screw type clamps... had too many leak on cars as a kid..

I'll try to find Oetiker clamps..but will the width be correct to fit in the grooved area of the partition wall?

Thanks again.
 

PogoInTheWoods

Pinnacle OPE Member
Local time
9:18 AM
User ID
1190
Joined
Apr 23, 2016
Messages
1,957
Reaction score
3,899
Location
Ohio
Country flag
but will the width be correct to fit in the grooved area of the partition wall?
The Oetiker clamps from NAPA won't be quite as wide and fit fine as previously pictured. As for the threaded clamps, I was referring specifically to commonly used chainsaw intake manifold clamps vs. other screw type clamps. I've heard 372 clamps fit, but can't personally vouch for that.

clamps.jpg
Another important consideration I neglected to mention, (at least for a modified collar that originally had the integrated plastic clamp), is the alignment of the collar seam needs to be correct to minimize the possibility of pinching or deformity of the boot itself when the clamp is tightened to fit. One end of the seam slides under the other when installed correctly. Easy to overlook if you aren't aware of it and can be a hair puller if it's overlapped -- resulting in an air leak. Even when aligned correctly, the Oetiker clamps can be over-crimped to the point of distorting the boot enough for an air leak, but that's a caveman crimp and not anywhere near what's required for a solid seal. If you can't rotate or move the clamp, it should be fine. That said, still do a leak check before committing to further assembly. This is when you want to find and correct any leaks -- not after the saw is already back together and not running right.

Collar Seam.jpg
It's subtle in the pic, but you can see the diagonal fit between the left and right sides of the collar seam with the right beneath the left. As mentioned, this is a modified collar from an original plastic snap clamp version. I'm not familiar with the updated version to know if it requires similar consideration. Ensure the rubber boot is drawn into the collar completely and sits flush against the bulkhead. Also make sure the impulse hose has a radius and not a flat spot where it curves around from the flange to the nipple. Gotta wonder how many weak impulse situations were actually caused by restrictions at that bend instead of the infamous blue diaphragms.
 

PogoInTheWoods

Pinnacle OPE Member
Local time
9:18 AM
User ID
1190
Joined
Apr 23, 2016
Messages
1,957
Reaction score
3,899
Location
Ohio
Country flag
Yep. 588775502 is a superseding and current number. 395 clamp would likely also work at 39mm -- 505283303. Probably a couple others as well.

Bottom line, stay the hell away from the snap and click junk.
 

PogoInTheWoods

Pinnacle OPE Member
Local time
9:18 AM
User ID
1190
Joined
Apr 23, 2016
Messages
1,957
Reaction score
3,899
Location
Ohio
Country flag
Just re-read this whole thread and hafta hand it to Joe again. Excellent presentation as are all his tutorials!

Was reviewing to see if the subject below may have been covered, but didn't see it specifically addressed. So here goes in hope of helping someone else avoid unnecessary frustration chasing yet another pesky intake leak on these things -- or any of the saws with the similar bellows/flange collar intake setup.

So I have a 359 here that I rebuilt for a guy a couple years ago. Needed a top end then and another one now. First time was the intake air leak issue. This time the muffler came loose. Guy got a new bolt and slapped it back together with a cracked gasket. Crap got into the cylinder. Big gouge.

Anyway, new top end installed and leak check time. Small leak at the intake area which had previously been modified/updated with a metal clamp, etc. I've had problems with these intakes leaking in the past that I attributed to my blockoff setup which seemed to be corrected when using the carb itself for the blockoff -- for whatever reason. No dice on this one.

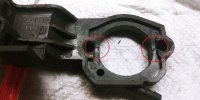
Traced this leak to the location indicated below and it really had me scratching my head. I had inspected the bellows (boot) and flange collar and thought everything was cool with both. Couldn't figure out how it could physically be leaking from the back of the collar. Had it apart a couple times and simply missed the cracks until the last desperate inspection this morning. They're nearly all the way through the collar lengthwise. You obviously don't see this area with the bellows in place and would figure there's no way it could leak there anyway -- unless the collar is cracked at the threads, of course. LOL

I'm guessing there are a lot more of these flange cracks out there than we think and they'll probably just get worse over time. Definitely something worth checking if it's not already part of your routine when working on one of these saws.

359 Intake - A.jpg

359 Intake - B.jpg
 
Last edited:

M2theB

Pinnacle OPE Member
Local time
9:18 AM
User ID
5789
Joined
Apr 2, 2018
Messages
402
Reaction score
1,399
Location
Central Mass
Country flag
Just re-read this whole thread and hafta hand it to Joe again. Excellent presentation as are all his tutorials!

Was reviewing to see if the subject below may have been covered, but didn't see it specifically addressed. So here goes in hope of helping someone else avoid unnecessary frustration chasing yet another pesky intake leak on these things -- or any of the saws with the similar bellows/collar intake setup.

So I have a 359 here that I rebuilt for a guy a couple years ago. Needed a top end then and another one now. First time was the intake air leak issue. This time the muffler came loose. Guy got a new bolt and slapped it back together with a cracked gasket. Crap got into the cylinder. Big gouge.

Anyway, new top end installed and leak check time. Small leak at the intake area which had previously been modified/updated with a metal clamp, etc. I've had problems with these intakes leaking in the past that I attributed to my blockoff setup which seemed to be corrected when using the carb itself for the blockoff -- for whatever reason. No dice on this one.

Traced this leak to the location indicated below and it really had me scratching my head. I had inspected the bellows and collar and thought everything was cool with both. Couldn't figure out how it could physically be leaking from the back of the collar. Had it apart a couple times and simply missed the cracks until the last desperate inspection this morning. They're nearly all the way through the collar lengthwise. You obviously don't see this area with the bellows in place and would figure there's no way it could leak there anyway -- unless the collar is cracked at the threads, of course. LOL

I'm guessing there are a lot more of these cracks out there than we think and they'll probably just get worse over time. Definitely something to check on these intakes if it's not already part of your routine.


I like the wrist pin spacers!
 
Top