High Quality Chainsaw Bars Husqvarna Toys Hockfire Saws

Hopping Up an 036 Pro...

Cmarti

Old Poulans make me smile
Local time
3:12 PM
User ID
14584
Joined
Nov 17, 2020
Messages
16
Reaction score
58
Location
Ohiya
Country flag
This is just from memory so no guarantees here.
Without lathe work or a RA hand piece I’d just try and set the squish around .018-.020. Leave the intake port and transfers alone. You can likely widen the exhaust port to within .050” of the exhaust side piston skirt edges. Don’t raise it and be sure to keep a nice curve to the top of the port. Port match the exhaust gasket and the muffler. Add a second outlet to the muffler on the FW side.
.025-.030 off the FW key for an ignition advance.
If the saw has a flocked air filter I would swap it out for a nylon filter.

I followed this advice on a 036, but for ignition advance, and was relieved to avoid timing changes. I am a rube with a timing wheel/numbers.Well I am a rube at alot of things.....but Squish to .022, widened exhaust port, flywheel muffler port with deflector and compression at 165.

Has been a strong and dependable runner with a 20 inch bar. Have run 24 skip when needed.

036.jpg 036-2.jpg
 

bulletpruf

Pinnacle OPE Member
GoldMember
Local time
9:12 PM
User ID
3634
Joined
Jul 22, 2017
Messages
835
Reaction score
2,841
Location
San Antonio, TX
Country flag
I followed this advice on a 036, but for ignition advance, and was relieved to avoid timing changes. I am a rube with a timing wheel/numbers.Well I am a rube at alot of things.....but Squish to .022, widened exhaust port, flywheel muffler port with deflector and compression at 165.

Has been a strong and dependable runner with a 20 inch bar. Have run 24 skip when needed.
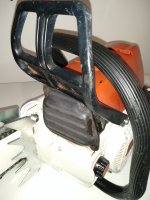
View attachment 274643 View attachment 274642

I hear you on the timing; I didn't want to break out the degree wheel on this one.
 

Wonkydonkey

Plastic member
Local time
8:12 PM
User ID
3189
Joined
May 14, 2017
Messages
5,287
Reaction score
23,932
Location
Sussex, UK.
Country flag
I think it’s a good call getting new rings, looking at your intake side they defo look past there best.. top ring looks chipped by the pin also as said the lower looks iffy and worn around the near the pin.

I guess it would be a good idea to check the bevels in the ports. And massage them a little
 

cuinrearview

Handy dood
Local time
3:12 PM
User ID
9248
Joined
Apr 16, 2019
Messages
11,181
Reaction score
77,707
Location
Dowling, MI
Country flag
What I see there does not look like aluminum transfer. I bet a quick whirl with some scotchbrite makes all of those lines disappear. I would have a hard time doing rings on a saw blowing 178 but now that it's apart you might as well. A little farmer jonesin' should make that a real nice runner for you.
 

drf256

Dr. Richard Cranium
GoldMember
Local time
3:12 PM
User ID
319
Joined
Dec 29, 2015
Messages
9,600
Reaction score
63,219
Location
Strong Island NY
Country flag
Mike @Canadian farm boy gave you good advice. They are one of the best Stihl’s to make gains with porting.

I do believe your squish without a base gasket will be too tight if memory serves me right. If you can, use some stick backed sandpaper on an old piston, or a cheap AM one, and sand band till you get yourself to 18-20.

Like Mike and Jerry both said, advance timing, widen ex port a bit but blend into existing factory roof arch and make sure you bevel the edges. Open the muffler body with a deflector, I prefer the Flywheel side. Generally, opening the out exhaust port isn’t necessary, not is opening the muffler entry. The 036 shares the same exhaust gasket with Stihl’s up to the 066-it’s the same opening from 62cc all the way through 92cc. Plenty of area to breath there, especially without a full port job.

You might be able to find someone to machine and port that jug out for you for a reasonable price here. That’s your call. As long as you don’t mess with too much in that jug, someone might be able to help you out if you’re not happy with what your results are.

They make an AM metal mesh filter for those. You can also use an OEM 036 metal filter on it with an old style back, or just deal with the fact that the AF cover won’t lock onto it.
 

drf256

Dr. Richard Cranium
GoldMember
Local time
3:12 PM
User ID
319
Joined
Dec 29, 2015
Messages
9,600
Reaction score
63,219
Location
Strong Island NY
Country flag
That’s high compression for a stock saw. Is your comp tester tip the same approximate size as the spark plug end? If it’s longer, it’s gonna make compression seem higher than it is.

Like Tim said above, that’s good compression and those rings are already matched to your cylinder. I’d pull the top ring, check your gap, and not tough the bore with anything personally. Especially if ring gap is under 15 thou or so.
 

redline4

I'm huge in Japan
Local time
2:12 PM
User ID
5593
Joined
Mar 12, 2018
Messages
13,273
Reaction score
112,286
Location
Rosholt Wisconsin
Country flag
Mike @Canadian farm boy

They make an AM metal mesh filter for those. You can also use an OEM 036 metal filter on it with an old style back, or just deal with the fact that the AF cover won’t lock onto it.

It takes a small amount of fitting to the carb box with a file and razor blade, but and old style 034 filter cover can be used to lock onto the metal filter. I have one for mine.

Edited for pic. Original on saw, 034 cover on right.

20201229_071437.jpg
 
Last edited:

Canadian farm boy

“Normal” people scare me.
GoldMember
Local time
3:12 PM
User ID
309
Joined
Dec 29, 2015
Messages
7,954
Reaction score
50,446
Location
Ontario, Canada
Country flag
What's the best way to do that? Please tell me there's something better than freehand Dremel!
Gently bolt just the gasket to the cylinder. Grind the gasket to match the exhaust port. Then bolt the gasket gently to the muffler and grind the muffler to match the gasket. If the saw has a heat shield you can match the heat shield to the gasket as well.
Be sure to deburr the edges of everything after grinding.
 

59billy

Unknown OPE Member
Yearly GoldMember
Local time
2:12 PM
User ID
14743
Joined
Nov 29, 2020
Messages
293
Reaction score
1,437
Location
MS
Country flag
Gently bolt just the gasket to the cylinder. Grind the gasket to match the exhaust port. Then bolt the gasket gently to the muffler and grind the muffler to match the gasket. If the saw has a heat shield you can match the heat shield to the gasket as well.
Be sure to deburr the edges of everything after grinding.

Thanks. The mismatch between stock mufflers and cylinders makes me want to say bad words.
 

5000+

Super OPE Member
Local time
3:12 PM
User ID
612
Joined
Jan 19, 2016
Messages
250
Reaction score
563
Location
pa
Country flag
That’s high compression for a stock saw. Is your comp tester tip the same approximate size as the spark plug end? If it’s longer, it’s gonna make compression seem higher than it is.

Like Tim said above, that’s good compression and those rings are already matched to your cylinder. I’d pull the top ring, check your gap, and not tough the bore with anything personally. Especially if ring gap is under 15 thou or so.

Take a good look at those ring pics.
 

cuinrearview

Handy dood
Local time
3:12 PM
User ID
9248
Joined
Apr 16, 2019
Messages
11,181
Reaction score
77,707
Location
Dowling, MI
Country flag
Take a good look at those ring pics.
I see what you're saying but a lot of times I struggle to get all of the nooks and crannies with these pics of round things with shadows and what not. I'd be surprised if what you think you're seeing is actually what's there.
 

bulletpruf

Pinnacle OPE Member
GoldMember
Local time
9:12 PM
User ID
3634
Joined
Jul 22, 2017
Messages
835
Reaction score
2,841
Location
San Antonio, TX
Country flag
Take a good look at those ring pics.

Yep. The rings are a little beat up.

FYI - I actually did test the compression a while back and came up with 160 (scribbled that on the tag that was on the saw; just looked at it again today); that's quite a discrepancy between 160 and the last test I did at 178. Pretty sure I know what happened -- when I disassembled the saw, it had some oil in it. Not mix, just straight oil. When I put a saw up for a while, I often dribble a bit of Stihl oil in the cylinder. If ring seal is compromised, the oil will give you higher compression.

Bottom line -- I will change the rings. I have a pair of Cabers on the way.
 

bulletpruf

Pinnacle OPE Member
GoldMember
Local time
9:12 PM
User ID
3634
Joined
Jul 22, 2017
Messages
835
Reaction score
2,841
Location
San Antonio, TX
Country flag
Have a few questions and comments.

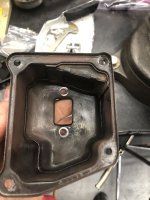
-The muffler doesn't have a baffle and doesn't look like it's ever had one. Just an open can with a spark arrestor screen and a single port. I plan to remove the screen, add a second port on the flywheel side, and gasket match it.

IMG_4473.jpg

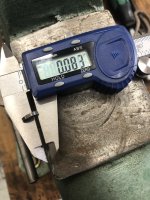
-The crank key is .083", so I need to get it to about .058" -- is it going to take me forever with sandpaper? If so, should I just file it?

IMG_4472.jpg

-Should I keep the rings on when I check the squish? I'd prefer to leave them off but I'm worried that the piston may cock one way or the other in the jug and throw off my measurements.

-What are you using to check squish? I normally raid my daughter's Playdoh supply, but she's outgrown it, so not sure we have any here.

-Are you checking the entire perimeter of the piston for squish or just one spot?

-Any recommendations on pencil grinders for infrequent use? I see a few on Amazon for $35 or so. Figure I need a straight one and a right angle one.

thanks!

Scott
 

cuinrearview

Handy dood
Local time
3:12 PM
User ID
9248
Joined
Apr 16, 2019
Messages
11,181
Reaction score
77,707
Location
Dowling, MI
Country flag
Have a few questions and comments.

-The muffler doesn't have a baffle and doesn't look like it's ever had one. Just an open can with a spark arrestor screen and a single port. I plan to remove the screen, add a second port on the flywheel side, and gasket match it.

View attachment 274740

-The crank key is .083", so I need to get it to about .058" -- is it going to take me forever with sandpaper? If so, should I just file it?

View attachment 274741 I put the key in vice grips in a vice and file it

-Should I keep the rings on when I check the squish? I'd prefer to leave them off but I'm worried that the piston may cock one way or the other in the jug and throw off my measurements. Rings off

-What are you using to check squish? I normally raid my daughter's Playdoh supply, but she's outgrown it, so not sure we have any here. Small diameter solder. Twist two or three strands together if needbe.

-Are you checking the entire perimeter of the piston for squish or just one spot? Some folks dab grease in four corners with the solder. I like to check the the left and right since the piston pin ends aren't moving. A drill or small impact on the crank for a lot of spins should be accurate.

-Any recommendations on pencil grinders for infrequent use? I see a few on Amazon for $35 or so. Figure I need a straight one and a right angle one. Contact shaun carr.

thanks!

Scott

Normally I'd multi-quote, but my answers are in the quote tonight.
 

bulletpruf

Pinnacle OPE Member
GoldMember
Local time
9:12 PM
User ID
3634
Joined
Jul 22, 2017
Messages
835
Reaction score
2,841
Location
San Antonio, TX
Country flag
Well now we need more pics of the ring damage!

I pulled the rings off and wiped them down. They have a few very minor imperfections, but not bad at all. What you see in the earlier picture appears to be a combination of lighting/glare and some oil on the rings.

Having said that, I'm still swapping them out.
 

huskyboy

Sorta a husqvarna guy...
Local time
3:12 PM
User ID
1352
Joined
May 30, 2016
Messages
10,025
Reaction score
43,475
Location
Ct
Country flag
You only file the part of the key way that sits above the crank stub. Flat file works fine, I just put the key in a vise. If you file the whole side of the key it will rock in the slot and give you more timing advance than you filed off.. you don’t want to do that.
 

cuinrearview

Handy dood
Local time
3:12 PM
User ID
9248
Joined
Apr 16, 2019
Messages
11,181
Reaction score
77,707
Location
Dowling, MI
Country flag
I pulled the rings off and wiped them down. They have a few very minor imperfections, but not bad at all. What you see in the earlier picture appears to be a combination of lighting/glare and some oil on the rings.
That was my thought. Pics would still be helpful of that intake side of them for guys reading this down the line.
 
Top