High Quality Chainsaw Bars Husqvarna Toys

Poulan/Craftsman 3000 build (see PP 330 build for raffle saw)

Cut4fun

Redneck Chainsaw Repair
Local time
1:02 PM
User ID
117
Joined
Dec 23, 2015
Messages
3,725
Reaction score
13,172
Location
Ohio
Just undo the carb bolts and take out. Push or break the old lines off. The choke lifts out of the mount area on saw. The throttle just turn carb at angle on way out.

2 styles. It has the bolts that come all the way out right? If not 2 nuts come off then push bolts toward cyl and slide carb off.
 

Sleeper

Super OPE Member
Local time
1:02 PM
User ID
2099
Joined
Nov 8, 2016
Messages
441
Reaction score
1,196
Location
United States
Country flag
Just undo the carb bolts and take out. Push or break the old lines off. The choke lifts out of the mount area on saw. The throttle just turn carb at angle on way out.

2 styles. It has the bolts that come all the way out right? If not 2 nuts come off then push bolts toward cyl and slide carb off.

It is the long bolts type, they thread into the nuts on the back of the air box.

I will see if I can cut the fuel and impulse lines with a pair of small wire cutters. That might make it easier to get it out.

Been working on the Suburban... it stopped starting about a week and a half ago. Replaced TPS, and checked fuses and stuff. Have the battery charger on it since cranking over the engine a lot lately has brought it to less than 9.5 volts during cranking. It reads 11.5 or so not being cranked over.
 

Sleeper

Super OPE Member
Local time
1:02 PM
User ID
2099
Joined
Nov 8, 2016
Messages
441
Reaction score
1,196
Location
United States
Country flag
Does anyone know of a different muffler that fits these or are we stuck with these?

Just wondering... would a 55 Husky muffler fit? 024/026? Anything?

Doesn't have to be a direct fit as in third support bolt hole or whatever... just need the two main bolts that hold the muffler on to be the same, and the general dimensions to be the same. Will make a bracket to support muffler if it isn't a two piece item.
 

Sleeper

Super OPE Member
Local time
1:02 PM
User ID
2099
Joined
Nov 8, 2016
Messages
441
Reaction score
1,196
Location
United States
Country flag
Minor hiccup here... I don't have a #0 tip for my Harris torch yet. So... going to order one of those along with some other stuff.

If anyone was wondering, it's an 85, using the D-85 mixer. I have #3, #5, and #7 tips on hand, plus the cutting attachment. Tip I am looking for is the 23A90-0

I want to get a rosebud tip, #1 to be specific, (Harris J-63-1) but those cost a pinky toe and big toe, along with part of a liver.

I'd be happy with a used one that works well (not all beat to hell, but still flows and has a proper flame) if anyone knows where to find one.

Edit: Stuff will be ordered tomorrow, hopefully. Have to get approval from the mother ship.
 
Last edited:

Sleeper

Super OPE Member
Local time
1:02 PM
User ID
2099
Joined
Nov 8, 2016
Messages
441
Reaction score
1,196
Location
United States
Country flag
Mother ship approved the order... parts and brazing tip on the way. Should be here soon. In the meantime, I will be getting fuel, vent, and impulse lines and filters and caps and stuff...
 

Sleeper

Super OPE Member
Local time
1:02 PM
User ID
2099
Joined
Nov 8, 2016
Messages
441
Reaction score
1,196
Location
United States
Country flag
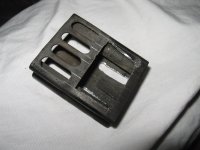
Here's what the muffler baffle looks like now... much better. Opened to more than the surface area of the exhaust port. Used a drill press and a Dremel with a cut off wheel. I tried to drill the holes for slots towards the bottom edge of this baffle and somehow it is like martensite... so it wouldn't let the drill bit bite and cut. You can see the marks from the bit wandering in the upper right corner of the big hole I cut.

craftsman 11.jpg

Make sure to deburr the baffle well after modifying it... it will have sharp shavings on the inside edge of the holes and if one were to find its way into the cylinder, it will be death to the piston and cylinder. Doesn't need to be perfect in the hole or slot shapes... it is inside the muffler and will only be seen when it is removed.

Is that a problem for the baffle to be so open? You might think so, but the 3/4" pipe outlet is what is going to regulate the exhaust flow out of the muffler. Will it be loud? Yes. Will it destroy your eardrums? No, it's nothing like a PM700 without a muffler outlet cover. I may or may not be proven wrong later.

craftsman 10.jpg

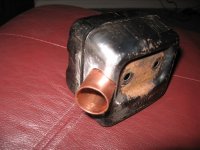
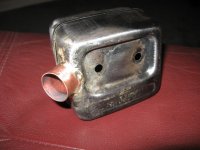
The original fish gill louver will be brazed shut. I flattened it with pliers and then lightly worked it flatter with a small hammer. Then I cleaned the area, inside and out, with a Dremel. You can see it above in the picture with the muffler casings, the shiny area to the left (behind) the pipe is where the gill was.

#0 torch tip on the way soon... hopefully this brazing attempt goes better than my first one with a #3 tip, bronze brazing rod, and 372 muffler... another problem with the first attempt was lack of flux... wow did that make a mess out of that muffler... this brazing rod for the 3000 muffler mod will be Safety Silv 45, with flux coating on the rods. Should go much better... knock on wood.
 

Sleeper

Super OPE Member
Local time
1:02 PM
User ID
2099
Joined
Nov 8, 2016
Messages
441
Reaction score
1,196
Location
United States
Country flag
Almost done brazing... will finish it tomorrow. Mom had cataract surgery yesterday, so I have to stay home to give eye drops. Also have to bring her to the doctor in the morning.

The other item I received for this saw is the carb kit. That will go in tomorrow as well.

As for the surprise, it will be here in a week or so. Going to put that in the raffle, and probably take the 3000 out as it may not be as desirable due to smaller 49cc and aluminum bore. Saw on its way is supposed to be a decent looking saw and needs little to be a runner again. A couple parts here and there.

3000 will be kept mostly original. Some small mods like base gasket delete and the exhaust port matching to muffler inlet. Maybe add a louver or two to the muffler and mod the center insert/baffle tube. Baffle plate will be left out.
 

Dub11

Saw R skeery
GoldMember
Local time
12:02 PM
User ID
2014
Joined
Oct 21, 2016
Messages
34,438
Reaction score
146,043
Location
Kansas
Country flag
Almost done brazing... will finish it tomorrow. Mom had cataract surgery yesterday, so I have to stay home to give eye drops. Also have to bring her to the doctor in the morning.

The other item I received for this saw is the carb kit. That will go in tomorrow as well.

As for the surprise, it will be here in a week or so. Going to put that in the raffle, and probably take the 3000 out as it may not be as desirable due to smaller 49cc and aluminum bore. Saw on its way is supposed to be a decent looking saw and needs little to be a runner again. A couple parts here and there.

3000 will be kept mostly original. Some small mods like base gasket delete and the exhaust port matching to muffler inlet. Maybe add a louver or two to the muffler and mod the center insert/baffle tube. Baffle plate will be left out.

Hopefully your mom has a full recovery and then some.
 

Sleeper

Super OPE Member
Local time
1:02 PM
User ID
2099
Joined
Nov 8, 2016
Messages
441
Reaction score
1,196
Location
United States
Country flag
Mom is doing okay so far. She can see much better now.

As for the Suburban, I was right that the fuel pump was bad... the other problems were the sending unit/fuel pump housing that rusted out on the top, and the rusty fuel lines. No, it wasn't cheap. Yes, it was worth it. (about 1000 clams) That fuel pump lasted 11 years, from about 70-80,000 miles to 260,000 miles.

So, she is back on the road again.

As for the saw, it is going to be worked on today. Also going to check squish and stuff and see where we are with that.
 

Dub11

Saw R skeery
GoldMember
Local time
12:02 PM
User ID
2014
Joined
Oct 21, 2016
Messages
34,438
Reaction score
146,043
Location
Kansas
Country flag
Mom is doing okay so far. She can see much better now.

As for the Suburban, I was right that the fuel pump was bad... the other problems were the sending unit/fuel pump housing that rusted out on the top, and the rusty fuel lines. No, it wasn't cheap. Yes, it was worth it. (about 1000 clams) That fuel pump lasted 11 years, from about 70-80,000 miles to 260,000 miles.

So, she is back on the road again.

As for the saw, it is going to be worked on today. Also going to check squish and stuff and see where we are with that.

Good to hear? And what year suburban?
 

Dub11

Saw R skeery
GoldMember
Local time
12:02 PM
User ID
2014
Joined
Oct 21, 2016
Messages
34,438
Reaction score
146,043
Location
Kansas
Country flag
1997 2wd

Even now, she'll peel the rear tires if you floor it in first.

Nice I got a 91 I put a fuel pump in a while back. I just went through the top. Other wise I would had to pull the bumper to drop the skid plate to get to the tank on that rusty pos lol.
 

Sleeper

Super OPE Member
Local time
1:02 PM
User ID
2099
Joined
Nov 8, 2016
Messages
441
Reaction score
1,196
Location
United States
Country flag
Nice I got a 91 I put a fuel pump in a while back. I just went through the top. Other wise I would had to pull the bumper to drop the skid plate to get to the tank on that rusty pos lol.

Yes... I understand the reason for going through the top... rust is our worst enemy... breaking bolts and stuff is not fun. Cause then you have to fix it...

Just happy I didn't have to do it in the driveway...

If I had a lift, I'd be more inclined to drop the tank on these things and fix them. Funny thing is I could have fixed it at work, but I didn't want to tie up a bay at work. We use every bay every day. Very rare to have a bay empty all day, even if it's the slowest month like this one.
 

Sleeper

Super OPE Member
Local time
1:02 PM
User ID
2099
Joined
Nov 8, 2016
Messages
441
Reaction score
1,196
Location
United States
Country flag
Worked on the saw a little tonight. May go back out if I end up getting some gasket material. Why gasket material? Well, without a gasket, squish is at .003" at the most. Other three locations were less than that.

There is a lip around the edge of the combustion squish zone at the top of the cylinder... it helps force the mixture towards the D shaped chamber, and then it improves efficiency by doing so.

So, checked the gasket in the gasket kit... well only .003" thick... okay, guess that means I have to find some material that is the right thickness and cut a gasket out. .006" squish is going to be a problem if it were assembled. Only paper/card type material I have is .001" thick... and I am not stacking this stuff up to have it blow out...

Will visit Napa tonight or tomorrow to get the correct stuff. I looked closer at the lower transfers and decided I will not match it to the gasket... case is tight, only way to make it tighter is a full circle crankshaft. Don't want to change the way the saw runs too much, just looking for a few little tweaks that help without making it fall on its face.

Instead, I will match the gasket to the cylinder as close to perfect as possible and see if that helps with transfer flow since there wouldn't be a .020" or so open space for the mix to get snagged in. I will show the difference in gaskets when I make the new one.

Muffler is done being brazed... going to clean it up, and paint it tomorrow and then post a picture of it. Not perfect, but is functional. No, it does not look like Homelite410's work... but rest assured that it will hold together and will look and sound awesome compared to one little fish gill. Keep in mind, it's my first muffler mod, and it is on a used muffler... hard to get perfect results on something that has oil and carbon and crap built up on it.
 

Sleeper

Super OPE Member
Local time
1:02 PM
User ID
2099
Joined
Nov 8, 2016
Messages
441
Reaction score
1,196
Location
United States
Country flag
For the gasket material, I have to see if I can find it locally, if not, it will be ordered. What I need to get the squish I want is .018" to .020"

Not sure where to find it, but it will be found somewhere. Found .020" on fleabay but they want an arm and leg for more of it than I need.
 

Sleeper

Super OPE Member
Local time
1:02 PM
User ID
2099
Joined
Nov 8, 2016
Messages
441
Reaction score
1,196
Location
United States
Country flag
Brazed the muffler. Missed one tiny spot that I will touch up later.

Still need to prep it completely for paint. It will be up to the winner of the saw as to whether the the pipe will be polished or not. The rest of the muffler, however, will be repainted.

raffle saw muffler 1.jpg
 

Sleeper

Super OPE Member
Local time
1:02 PM
User ID
2099
Joined
Nov 8, 2016
Messages
441
Reaction score
1,196
Location
United States
Country flag
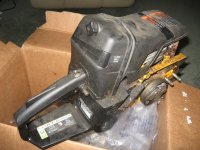
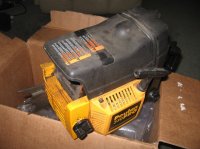
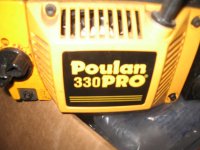
The surprise arrived... Poulan Pro 330... needs a few parts here and there, but otherwise in decent shape. Need mainly the piston, front handle, and muffler cover. Maybe clutch cover if I don't have one on hand that will fit.

Here's some pictures.

poulan pro 330 1.jpg poulan pro 330 2.jpg poulan pro 330 3.jpg


Thanks again! (if you want to be recognized as the sender, let me know) From another member on here that continues to prove he's one of the best at paying things forward. Even if it might cost him some time and money.

She will be made a runner again with a few little mods. Might take some time, but it will take priority over my other personal projects as it is a raffle saw.

Should spice up the raffle a little compared to an aluminum bore 3.0 Craftsman.
 
Top