High Quality Chainsaw Bars Husqvarna Toys

TreeMonkey Red Light 066 Build

markds2

Here For The Long Haul!
Local time
3:13 AM
User ID
6804
Joined
Jul 22, 2018
Messages
995
Reaction score
5,825
Location
Nelson, New Zealand
Country flag
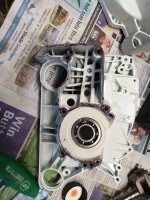
I've never done a build thread before but I thought this might be a good candidate. I picked up what looked like a low hour early 066 from our local auction site:
IMG-20200716-WA0007.jpg IMG-20200716-WA0008.jpg
When it arrived I found it low on compression:
20200724_124208.jpg
Nice KS cylinder with the plating stripped off from a cheap no name piston and rings :mad:
Kevin @huskihl found me a nice early non-decomp Mahle cylinder which he kindly sent to Scott @tree monkey for him to monkey about on
IMG-20200725-WA0001.jpg
IMG-20200725-WA0003.jpg
 

markds2

Here For The Long Haul!
Local time
3:13 AM
User ID
6804
Joined
Jul 22, 2018
Messages
995
Reaction score
5,825
Location
Nelson, New Zealand
Country flag
While waiting on the cylinder I've stripped the saw right down and have found that its actually very original with the original metal shielded bearings. Scott advised that it would be best to swap these out for the newer ones so I've got a full rebuild with OEM parts underway. I also recoated the cases with a Valspar industrial enamel which I baked on in the oven.
Old bearings out, crank cleaned and new bearings ready to go:
20201011_113127.jpg
Flywheel side in and the new high output oiler installed ready for a location reference for the PTO side:
20201011_113848.jpg
PTO side in
20201011_114628.jpg
I use this little Arbour press for pushing the bearings in, after heating the case side with the heat gun
20201011_120205.jpg
 

Wonkydonkey

Plastic member
Local time
4:13 PM
User ID
3189
Joined
May 14, 2017
Messages
4,609
Reaction score
18,458
Location
Sussex, UK.
Country flag
Nice thread,

the cylinder. Looks like an air leak to me, I would have thought it would be all the way round if it was a non compatible set of rings. but I’m no expert.

did you get the timing numbers from the oem cylinder

look fwd to it eating wood in a vid.
cheers
 

markds2

Here For The Long Haul!
Local time
3:13 AM
User ID
6804
Joined
Jul 22, 2018
Messages
995
Reaction score
5,825
Location
Nelson, New Zealand
Country flag
Nice thread,

the cylinder. Looks like an air leak to me, I would have thought it would be all the way round if it was a non compatible set of rings. but I’m no expert.

did you get the timing numbers from the oem cylinder

look fwd to it eating wood in a vid.
cheers
Definitely not an air leak, there was plenty of oil about and there's deep gouges all around, the piston looks like this:
20201011_163245.jpg
No timing numbers sorry, it was off the saw in a jiffy!
 

markds2

Here For The Long Haul!
Local time
3:13 AM
User ID
6804
Joined
Jul 22, 2018
Messages
995
Reaction score
5,825
Location
Nelson, New Zealand
Country flag
Next is the crank seals, new OEM:
20201011_164720.jpg
PTO side sitting in place, be careful to not dislodge the spring when getting it over the step in the shaft. Edit: Always put a smear of light oil on the seal lips before installing the seals
20201011_164842.jpg
I use a large deep socket to tap it into place making sure its flush with the surface of the bearing
20201011_165003.jpg
 
Last edited:

markds2

Here For The Long Haul!
Local time
3:13 AM
User ID
6804
Joined
Jul 22, 2018
Messages
995
Reaction score
5,825
Location
Nelson, New Zealand
Country flag
Next I trim the excess case gasket off flush with the cylinder mating surface:
20201011_170033.jpg
New OEM piston and crank pin bearing:
20201011_170213.jpg
Randy @Mastermind is this oil suitable for assembly lube or will it cause premature scuffing?
20201011_170342.jpg
Piston on and clip in, making sure that the ring gap is at the 12o'clock position
20201011_170623.jpg
 

markds2

Here For The Long Haul!
Local time
3:13 AM
User ID
6804
Joined
Jul 22, 2018
Messages
995
Reaction score
5,825
Location
Nelson, New Zealand
Country flag
Before mounting the oil pump make sure this little rubber seal on the output side is in place:
20201011_165556.jpg
Oil pump, chain adjuster and chainbrake assembly all in place, everything greased with Stihl grease
20201011_171506.jpg
And the original cover screwed in place
20201011_171802.jpg
 
Top