MedicineMan
Super OPE Member
- Local time
- 8:00 AM
- User ID
- 2693
- Joined
- Feb 25, 2017
- Messages
- 143
- Reaction score
- 757
- Location
- Juliette, GA
I misspoke. My toaster oven only goes up to 450F. So I offgass at 450 for an hour.


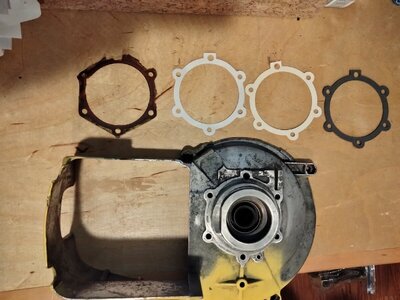
That's how I started, then I went to a Brother Scan N' Cut cause I monopolized the Cricut. The accuracy was off to much then went to a laser. Good luck with the cork stuffI ordered a knife blade for my wife's Cricut so I could cut gasket material. It finally showed up! The original gasket on the flywheel side of my 200 did not fare too well when taking it apart - after 62 years I think it is due for a new one! Using the original gasket (one the left) and calipers on the metal surface I drew up the gasket shape in Adobe Fusion 360, saved the drawing as an .svg (scalable vector graphic - lets you resize without losing any dimensions or sharpness on the drawing). I imported the .svg file into the Cricut and cut out the shape on plain computer paper (2nd from left). This allowed me to place the template on the metal and make sure everything fit and lined up. Any minor changes can be made in Fusion 360 and a new .svg outputted. When I was happy with the computer paper version, then I made one out of card stock (2nd from right) on the Cricut. Card stock is not as flimsy as computer paper and would lay more like gasket material and the edges will not roll as easy when fitting it around the metal. When I was happy with the cardstock, then I fit the knife blade into the Cricut and loaded the gasket material. After about 2 minutes of cutting (the blade makes several passes cutting deeper each time), the Cricut was done and I peeled the final gasket (1st from the right) from the mat. I didn't have to pop out the little holes as they remained on the sticky mat.
Gaskets (L-R) Original, Computer Paper, Cardstock, and Yamakato Gasket Material
View attachment 449361
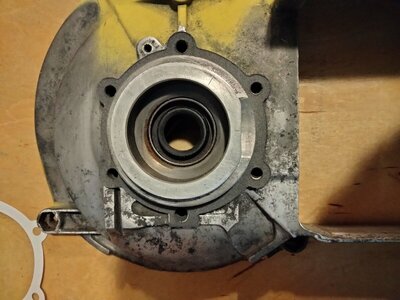
The final gasket resting in place, a couple of the holes are slightly off, but I can compensate later if I want to by slightly sizing them up slightly and cutting another gasket.
View attachment 449362
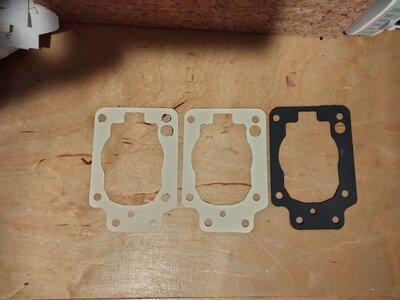
My gasket that goes between the fuel tank and the cylinder disintegrated, it stuck both parts as I was taking it off, so I didn't have anything to work with in creating a new one. I went on-line and found a picture of one and was able to trace in in Fusion 360 as opposed to freehanding the previous one from measurements I took. Below are my cuts, the first one on the left was my initial cut (went straight to card stock). I laid this on my part and the black marks on the card stock are the adjustments I needed to make. Once I made the adjustments in 360, I then loaded the new .svg file into the Cricut and cut out the second card stock gasket (middle one). It lined up much better and then decided to cut one out of gasket material (right). It laid on well, no slop and all of the screw holes and the oiler hole lined up.
View attachment 449363
Once I get these dialed in, I just need to save the file and can pull it up when I want and cut what gaskets I need. I have some cork gasket material that I will give a try and see how that turns out too.
I figure a laser will be the next step, luckily my wife has three Cricuts and for most of what she makes, she does not need to use the Maker. I am looking at getting a 3D printer too...quickly running out of space on my workbench!! The Maker says it will cut cork...shall see how well!That's how I started, then I went to a Brother Scan N' Cut cause I monopolized the Cricut. The accuracy was off to much then went to a laser. Good luck with the cork stuff.
Most of if not all the cork gaskets are neoprene infused and very, very tough. I have a hard if not impossible time cutting it with my laser cleanly. They are mostly 1/16 thick. I can do it on my CNC mill but again the cork doesn't cut cleanly. Brian G. Has more experience with that material, I gave up.I figure a laser will be the next step, luckily my wife has three Cricuts and for most of what she makes, she does not need to use the Maker. I am looking at getting a 3D printer too...quickly running out of space on my workbench!! The Maker says it will cut cork...shall see how well!
I have two sheets of cork gasket material, so if it doesn't work so well, I won't be out much. Luckily I don't need many gaskets made of cork, so far just the fuel cap and fuel tank on my 10-10s. I did order a kit for my 10-10 and it came with a rubber gasket instead for the fuel tank, but the original one that was on it that fell apart was cork.Most of if not all the cork gaskets are neoprene infused and very, very tough. I have a hard if not impossible time cutting it with my laser cleanly. They are mostly 1/16 thick. I can do it on my CNC mill but again the cork doesn't cut cleanly. Brian G. Has more experience with that material, I gave up.
That's how I started, then I went to a Brother Scan N' Cut cause I monopolized the Cricut. The accuracy was off to much then went to a laser. Good luck with the cork stuff.
Take a look on YouTube to see if anyone is using the same laser engraver to cut gaskets....you might be able to learn a few things and have less trial and errors in the process!I have a laser engraver, and always wondered about using it to cut gaskets. Sounds like you are having success with it?
Take a look on YouTube to see if anyone is using the same laser engraver to cut gaskets....you might be able to learn a few things and have less trial and errors in the process!
I was supposed top have a "simple" repair today - replace a switch on another PM659.That "simple" job turned into a nightmare.I couldn't get 3 of the 4 screws out of the fan housing to save my life.I ended up heating those 3 screws for anywhere between 7-10 minutes at 1500* with a heat gun.One of the bosses was so wallowed out that a helicoil won't even fix it.I figure I might fill the boss with JB Weld & just set the screw in it while still wet.Of course the 2 screws that hold the switch plate onto the cylinder were missing.The saw needed to be seriously cleaned as well.I did get the saw back together minus a few screws that can be added on later.
LaserGRBL is not very accurate also.My engraver is pretty old, which isn't an issue by itself, but the software that runs it is pretty terrible. It does a great job of engraving and cutting, if you are OK with "ballparking" the size. I need to change the firmware on the microcontroller and switch to something like LaserGRBL.
I have a laser engraver, and always wondered about using it to cut gaskets. Sounds like you are having success with it?
Here's my eBay store you can see the things I've done.Security Measure | eBay
www.ebay.com
I did the same thing, that is why I moved to using a Cricut to cut mine out, much cleaner lines!! A laser cutter would be nice to have too!!I just did an intake gasket with a ball peen hammer, a leather punch, and a razor knife, and it looks like a squirrel made it for nesting material.
I meant to tell you Lightburn has a trial period if you want to try it.Nice work!
I just did an intake gasket with a ball peen hammer, a leather punch, and a razor knife, and it looks like a squirrel made it for nesting material.
What I'm trying to say is does it matter which end of the band goes onto the dowel pin or the brake leverI'm not sure I understand your question Ed, there is only one way for the brake band to fit in the cover...
View attachment 449956
Mark


