High Quality Chainsaw Bars Husqvarna Toys

Stihl West German O24 AVS / Upgrade to 44.7 Bore

drf256

Dr. Richard Cranium
GoldMember
Local time
4:22 PM
User ID
319
Joined
Dec 29, 2015
Messages
9,371
Reaction score
61,581
Location
Strong Island NY
Country flag
You have to go through your saw and figure out why it’s ruining top ends before you do anything else, or you’ll be in the same boat with the new top end.

That NWP looks like worn through plating. Seems to not be uncommon with AM top ends.

I’ll take a look at the PM now.
 

Paul Fithian

Super OPE Member
GoldMember
Local time
3:22 PM
User ID
25442
Joined
Nov 16, 2022
Messages
257
Reaction score
923
Location
Long Beach, IN
Country flag
I trimmed the ragged melted front edge of the top cover and cleaned it up a bit.
024 AVS Top Cover Trimming.jpg 024 AVS Top Cover1.jpg 024 AVS Top Cover2.jpg

Instead of trimming the two rear top cylinder fins, anyone else try trimming the inside of the top cover like this guy did?
024 AVS Top Cover Clearance.jpg
 
Last edited:

drf256

Dr. Richard Cranium
GoldMember
Local time
4:22 PM
User ID
319
Joined
Dec 29, 2015
Messages
9,371
Reaction score
61,581
Location
Strong Island NY
Country flag
I trimmed the ragged melted front edge of the top cover and cleaned it up a bit.
View attachment 355635 View attachment 355636 View attachment 355637

Instead of trimming the two rear top cylinder fins, anyone else try trimming the inside of the top cover like this guy did?
View attachment 355638
Looks great.

Don’t ruin that cover. If you’re gonna go that way, I can swap you out a good set of oem 026 covers. The 024 covers look much better IMHO. 026 covers allow for the larger airfilter as well, but unless you’re porting the saw you won’t need it.

In the above video that guy wasted a lot of time on that jug. As they say, can’t make a silk purse out of a sow’s ear. Nothing beats an oem jug.
 

Paul Fithian

Super OPE Member
GoldMember
Local time
3:22 PM
User ID
25442
Joined
Nov 16, 2022
Messages
257
Reaction score
923
Location
Long Beach, IN
Country flag
Brief update, Meteor kit has been returned. Following Doc’s prescription for this upgrade, more info in a week or so.

I greatly appreciate everyone’s help, adhering to one of my beliefs:

Understand what you don’t know, get assistance from those that do.
 
Last edited:

Paul Fithian

Super OPE Member
GoldMember
Local time
3:22 PM
User ID
25442
Joined
Nov 16, 2022
Messages
257
Reaction score
923
Location
Long Beach, IN
Country flag
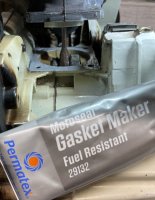
I had planned to share a compression test picture in this post, hoping for 200 PSI +. I was feeling pretty good about the assembly and how the Motoseal went on, thin coat painted with an acid brush.
Motoseal Gasket.jpg

Discovered a new problem after the cylinder was torqued down and I rotated the flywheel, could not get to BDC.

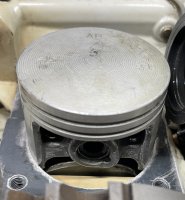
It appears the 44.7 mm piston OD interferes with the crankcase ID. This may be unique to my saw, however not sure if anyone else has tried to fit a 44.7 P/C on an 024 AVS.
44-7 Piston OD Interference.jpg

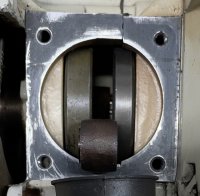
There is some mismatch at the bore ID in my crankcase halves:
Case Mismatch.jpg

After some consultation with Doc, plan is to relieve case a bit with a die grinder and burr at the 11-1 and 5-7 o'clock positions to enable piston/crankcase clearance. Any other suggestions?
 

redline4

I'm huge in Japan
Local time
3:22 PM
User ID
5593
Joined
Mar 12, 2018
Messages
11,595
Reaction score
95,121
Location
Rosholt Wisconsin
Country flag
I had planned to share a compression test picture in this post, hoping for 200 PSI +. I was feeling pretty good about the assembly and how the Motoseal went on, thin coat painted with an acid brush.
View attachment 357540

Discovered a new problem after the cylinder was torqued down and I rotated the flywheel, could not get to BDC.

It appears the 44.7 mm piston OD interferes with the crankcase ID. This may be unique to my saw, however not sure if anyone else has tried to fit a 44.7 P/C on an 024 AVS.
View attachment 357541

There is some mismatch at the bore ID in my crankcase halves:
View attachment 357542

After some consultation with Doc, plan is to relieve case a bit with a die grinder and burr at the 11-1 and 5-7 o'clock positions to enable piston/crankcase clearance. Any other suggestions?

I've seen that on a couple of my Stihls.

I'd take a burr to it too.
 

Paul Fithian

Super OPE Member
GoldMember
Local time
3:22 PM
User ID
25442
Joined
Nov 16, 2022
Messages
257
Reaction score
923
Location
Long Beach, IN
Country flag
Thinking a bit more on how to attack the crankcase with a die grinder/burr and not mess it up.

Planning to remove the fuel tank and brake bail arm to enable better access.

I can make up a steel plate with 3 holes:
- Two small ones to bolt it to the crankcase flange
- One large 1 .875" diameter (47.62 mm) as a guide for the burr. This would give ~ 1.5 mm/side clearance between the bottom of the piston OD and the case ID

I can mount the plate and put a depth stop on the mill to prevent going below the desired depth. The plate will prevent the burr moving beyond the desired circumference.

Would 1.5 mm/side clearance be enough to prevent piston contact at high revs? Or should I go more? A 2" (50.8 mm) hole in the center of the plate would provide ~ 3 mm (0.125") clearance per side.
 

Shane¹

Pinnacle OPE Member
Local time
4:22 PM
User ID
15023
Joined
Dec 21, 2020
Messages
1,001
Reaction score
2,498
Location
Kentucky
Country flag
Thinking a bit more on how to attack the crankcase with a die grinder/burr and not mess it up.

Planning to remove the fuel tank and brake bail arm to enable better access.

I can make up a steel plate with 3 holes:
- Two small ones to bolt it to the crankcase flange
- One large 1 .875" diameter (47.62 mm) as a guide for the burr. This would give ~ 1.5 mm/side clearance between the bottom of the piston OD and the case ID

I can mount the plate and put a depth stop on the mill to prevent going below the desired depth. The plate will prevent the burr moving beyond the desired circumference.

Would 1.5 mm/side clearance be enough to prevent piston contact at high revs? Or should I go more? A 2" (50.8 mm) hole in the center of the plate would provide ~ 3 mm (0.125") clearance per side.
What was the clearance with the other piston? Check that and make it similar it didn't hit anything with that one
 

Paul Fithian

Super OPE Member
GoldMember
Local time
3:22 PM
User ID
25442
Joined
Nov 16, 2022
Messages
257
Reaction score
923
Location
Long Beach, IN
Country flag
Good point, Shane. We can do that without measuring, assuming the 44.7 mm piston just barely contacts the ID of the crankcase now:

44.7 - 42 = 2.7 mm/2 :: 1.35 mm per side clearance with the OEM 42 mm jug to the crankcase.​

So using a 1.875" metal plate template would be the right size, enabling 1.5 mm (0.060") clearance per side.

Common belief that at least 0.020" squish is needed to ensure the top of the piston does not contact the squish band, right?

So 0.060" clearance per side should be more than enough, right?
 
Top