redlinefever
Super OPE Member
Well guys sorry for the delay been busy with the holidays and work both on house and job itself so hopefully I’ll get it rolling again soon going to order a new clutch and air filter only remaining parts I need I think
Well guys sorry for the delay been busy with the holidays and work both on house and job itself so hopefully I’ll get it rolling again soon going to order a new clutch and air filter only remaining parts I need I think
This is one instance where the AM clutches work well.
OEM only on the HD filter, but you can get them for $25 on eBay.
This is one instance where the AM clutches work well.
OEM only on the HD filter, but you can get them for $25 on eBay.


How much of a angle then couple degrees?
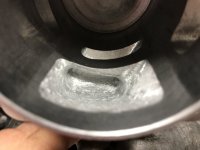
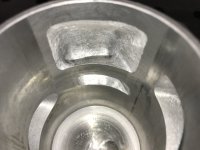
You get those pictures from JMS? LmaoI like to make the lowers pretty wide to take advantage of the flow through the piston windows; widening under the bridge primarily on the exhaust side and then making the transfer outlet a little wider on the exhaust side. Thus the new charge doesn't have to do the back bend to get to the exhaust (primary) side of the transfer port opening. Making sure the exhaust side entrance collides with the opposite at 1/5-1/4 the distance from the center of the bore to the intake side. Lay back the intake side opening till it's close the the ring locating pins (394 piston) or until you like the entrance angle (395 piston with central locating pins).
For the roof I like to make the exhaust side pretty flat, the intake side I like to angle up a bit. I'll open the exhaust side 2 deg before the intake. This is pretty much opposite of how they came from the stock, but I've been noticing more newer designed saws to come closer to this configuration.
I can't find any pictures of a 394 right now. I'll try to snap some as I'm porting two right now. For now here is a 2100, pretty similar transfer design.
View attachment 108277 View attachment 108278
I like to make the lowers pretty wide to take advantage of the flow through the piston windows; widening under the bridge primarily on the exhaust side and then making the transfer outlet a little wider on the exhaust side. Thus the new charge doesn't have to do the back bend to get to the exhaust (primary) side of the transfer port opening. Making sure the exhaust side entrance collides with the opposite at 1/5-1/4 the distance from the center of the bore to the intake side. Lay back the intake side opening till it's close the the ring locating pins (394 piston) or until you like the entrance angle (395 piston with central locating pins).
For the roof I like to make the exhaust side pretty flat, the intake side I like to angle up a bit. I'll open the exhaust side 2 deg before the intake. This is pretty much opposite of how they came from the stock, but I've been noticing more newer designed saws to come closer to this configuration.
I can't find any pictures of a 394 right now. I'll try to snap some as I'm porting two right now. For now here is a 2100, pretty similar transfer design.
View attachment 108277 View attachment 108278
You get those pictures from JMS? Lmao
I apologize friend. that was uncalled for. We all know the reasoning he wanted your 066 and 395 for "testing". That way he could take his time and copy/duplicate everything.
Please forgive me @srcarr52
Can't like that one [emoji20]Your saw just got bumped off my priority list!
Suck up...I apologize friend. that was uncalled for. We all know the reasoning he wanted your 066 and 395 for "testing". That way he could take his time and copy/duplicate everything.
Please forgive me @srcarr52
Suck up...
I couldn't see it...was too far up Shaun's butt..[emoji38]You're supposed to tell me when I have something on my nose. that was embarrassing!
I couldn't see it...was too far up Shaun's butt..[emoji38]


