You are using an out of date browser. It may not display this or other websites correctly.
You should upgrade or use an alternative browser.
You should upgrade or use an alternative browser.
MS362 toasted piston
- Thread starter MAF143
- Start date
Ronie
Here For The Long Haul!
Thanks, if you leave some overhang it will clean up the combustion chamber.Cool idea Ronie.
MAF143
Super OPE Member
- Local time
- 10:16 AM
- User ID
- 16099
- Joined
- Mar 30, 2021
- Messages
- 187
- Reaction score
- 679
- Location
- North Central Ohio
You guys are just full of it... I mean good ideas... yea, yea, that's it...
MAF143
Super OPE Member
- Local time
- 10:16 AM
- User ID
- 16099
- Joined
- Mar 30, 2021
- Messages
- 187
- Reaction score
- 679
- Location
- North Central Ohio
MAF143
Super OPE Member
- Local time
- 10:16 AM
- User ID
- 16099
- Joined
- Mar 30, 2021
- Messages
- 187
- Reaction score
- 679
- Location
- North Central Ohio
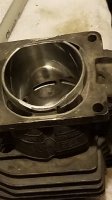
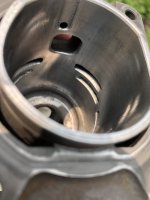
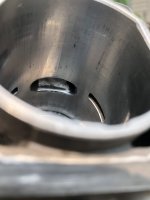
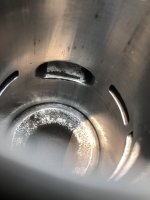
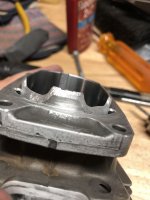
Finally got back to this thing. These pix are after cleaning up the cylinder. There looks to be some marks in the plating and I can feel some very slight dents. I can't catch a nail on anything in there and it all feels smooth.
Hoping this is good enough to last a few more years of firewood making. Hoping for your expert opinions on this.
would more 320 flapper in there smooth it down some more? Or do those look like they are through the plating?
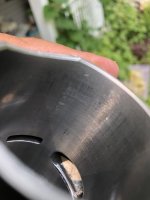
Hoping this is good enough to last a few more years of firewood making. Hoping for your expert opinions on this.
would more 320 flapper in there smooth it down some more? Or do those look like they are through the plating?


Lightning Performance
Here For The Long Haul!
- Local time
- 10:16 AM
- User ID
- 677
- Joined
- Jan 26, 2016
- Messages
- 10,991
- Reaction score
- 28,059
- Location
- East of Philly
Run it.Finally got back to this thing. These pix are after cleaning up the cylinder. There looks to be some marks in the plating and I can feel some very slight dents. I can't catch a nail on anything in there and it all feels smooth.
Hoping this is good enough to last a few more years of firewood making. Hoping for your expert opinions on this.
would more 320 flapper in there smooth it down some more? Or do those look like they are through the plating?
View attachment 302643
View attachment 302644
View attachment 302645
View attachment 302648
Scrape that black carbon off the ports and bevel. Sanding those buy hand is never a bad idea or use scotch pads. Loose carbon bits damage the piston sometimes.
MAF143
Super OPE Member
- Local time
- 10:16 AM
- User ID
- 16099
- Joined
- Mar 30, 2021
- Messages
- 187
- Reaction score
- 679
- Location
- North Central Ohio
Run it.
Scrape that black carbon off the ports and bevel. Sanding those buy hand is never a bad idea or use scotch pads. Loose carbon bits damage the piston sometimes.
I'll clean the ports and chanmfers. Once the piston gets here and I get the bottom end done I'll map the ports, check the squish, and probably do some exhaust work anyway.
I had cleaned a little of the carbon out of the exhaust port with the sanding mandrel but I'll hit it with the cutters later. I'm thinking the top of the exhaust port has a little aluminum ridge on it that was once part of the piston... I'll get that later when I'm grinding.
Lightning Performance
Here For The Long Haul!
- Local time
- 10:16 AM
- User ID
- 677
- Joined
- Jan 26, 2016
- Messages
- 10,991
- Reaction score
- 28,059
- Location
- East of Philly
No cutters no grinding.I'll clean the ports and chanmfers. Once the piston gets here and I get the bottom end done I'll map the ports, check the squish, and probably do some exhaust work anyway.
I had cleaned a little of the carbon out of the exhaust port with the sanding mandrel but I'll hit it with the cutters later. I'm thinking the top of the exhaust port has a little aluminum ridge on it that was once part of the piston... I'll get that later when I'm grinding.
Easier to clean a bevel with a sharp tool imo but not too sharp.
Don't take anything off the top of the exhaust port but aluminum transfer. You don't want to break an edge loose there on the plating. No grinding unless you think you can widen a port without doing anything else. Leave a margin for the piston to cover it completely. Your best not to remove the plating from the roof of your exhaust because it's not needed. Your already too high in timing.
MAF143
Super OPE Member
- Local time
- 10:16 AM
- User ID
- 16099
- Joined
- Mar 30, 2021
- Messages
- 187
- Reaction score
- 679
- Location
- North Central Ohio
I was able to clean the exhaust port out and match the gasket to the muffler and cylinder output. The exhaust port will get some more sanding but not full polish. I widened it just a little, but I haven't put the timing wheel on it yet to really see what's going on. I don't really want to raise the exhaust anyway unless the numbers show otherwise. This will not get a base gasket when it goes back together. I will cut the squish band if needed.
This is a strato saw and I was wondering if removing some of the jug extension would help on the exhaust side lower xfer. The lower xfer openings are pretty well hidden up in there and I was curious if there was anything to be done there that could increase flow. The exhaust side xfer ports open first and the piston on that side doesn't come down all the way as shown in the picture. I would hate to remove that jug extension on the intake side because the piston skirt rides on it all the way down. I want to enhance performance for him but not at the expense of longevity.
1. Would removing that exhaust side extension allow better flow? Or does the jug extension assist flow by reducing turbulance at the entrance of the xfer port?
2. Is there a way to increase the flow without removing the extension? Slight bell taper at the bottom?
3. Would increased flow in just the ehaust side xfer ports upset the strato flow pattern?
lower xfer opeing exhuast side piston skirt at BDC
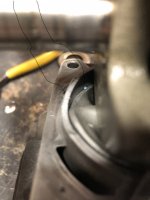
Stihl needs some sanding in there. Mostly just got rid of the carbon and matched the gasket, just a touch wider in at the port.
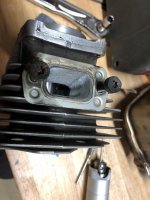
This is a strato saw and I was wondering if removing some of the jug extension would help on the exhaust side lower xfer. The lower xfer openings are pretty well hidden up in there and I was curious if there was anything to be done there that could increase flow. The exhaust side xfer ports open first and the piston on that side doesn't come down all the way as shown in the picture. I would hate to remove that jug extension on the intake side because the piston skirt rides on it all the way down. I want to enhance performance for him but not at the expense of longevity.
1. Would removing that exhaust side extension allow better flow? Or does the jug extension assist flow by reducing turbulance at the entrance of the xfer port?
2. Is there a way to increase the flow without removing the extension? Slight bell taper at the bottom?
3. Would increased flow in just the ehaust side xfer ports upset the strato flow pattern?
lower xfer opeing exhuast side piston skirt at BDC

Stihl needs some sanding in there. Mostly just got rid of the carbon and matched the gasket, just a touch wider in at the port.

- Local time
- 10:16 AM
- User ID
- 319
- Joined
- Dec 29, 2015
- Messages
- 9,643
- Reaction score
- 63,590
- Location
- Strong Island NY
Don’t remove it. It’s there for piston support.
You can match it to the gasket though, and widen it a bit into the extension.
You can match it to the gasket though, and widen it a bit into the extension.
Ford3000
Super OPE Member
Agree, a dull chain a smile on their face and the rpms rising, then nothing.Usually its the inexperienced cutter that is burning through cuts in 2-3 minutes that should take 30 seconds with a sharp chain. Its like just piss revving the saw for hours during use .
I appreciate your responses ,but I have seen many examples of poorly maintained saws with roached pistons that ran flawlessly after the p/c were changed and passed a pressure check.
The dull chain doesn't just slam the upper rpms it also introduces super fine particles into the air filter and wears the operator out which leads to more bad decisions.
MAF143
Super OPE Member
- Local time
- 10:16 AM
- User ID
- 16099
- Joined
- Mar 30, 2021
- Messages
- 187
- Reaction score
- 679
- Location
- North Central Ohio
I'm curious to know more about why. The exhaust side of the piston skirt doesn't come down any further on that extension. The piston in that picture is at bottom center and how would it offer any support to the piston other than making it easier to put the cylinder on over the rings when installing it.Don’t remove it. It’s there for piston support.
I'm not trying to be contrary, just trying to learn more about this and seems like that xfer port would flow a little better if that cylinder extension was out of the way. But what seems clear to a novice like me can be wickedly decieving sometimes.
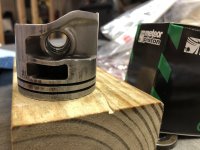
The piston skirt on the right (intake side) is just barely peeking out from behind the cylinder extention on that side so it is being supported there, but the left side (exhaust) skirt doesn't come up (or down) far enough for the skirt to ride up on the extension at all.
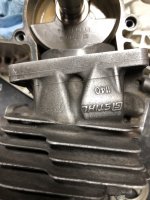
This is the original piston and the meteor replacement is exactly the same and the exhaust side skirt is much shorter than on the intake
- Local time
- 10:16 AM
- User ID
- 360
- Joined
- Dec 31, 2015
- Messages
- 23,517
- Reaction score
- 150,393
- Location
- East Jordan, MI
The skirt is there to help get the rings to slide in easier. I don’t remove it all, but I do remove it in the vicinity of the transfers up to the bottom of the pistonI'm curious to know more about why. The exhaust side of the piston skirt doesn't come down any further on that extension. The piston in that picture is at bottom center and how would it offer any support to the piston other than making it easier to put the cylinder on over the rings when installing it.
I'm not trying to be contrary, just trying to learn more about this and seems like that xfer port would flow a little better if that cylinder extension was out of the way. But what seems clear to a novice like me can be wickedly decieving sometimes.
The piston skirt on the right (intake side) is just barely peeking out from behind the cylinder extention on that side so it is being supported there, but the left side (exhaust) skirt doesn't come up (or down) far enough for the skirt to ride up on the extension at all.
View attachment 303778
This is the original piston and the meteor replacement is exactly the same and the exhaust side skirt is much shorter than on the intake
View attachment 303781
- Local time
- 9:16 AM
- User ID
- 10539
- Joined
- Sep 23, 2019
- Messages
- 74
- Reaction score
- 335
- Location
- Wisconsin
This is how I deal with them... Right or wrong I've had good luck thus far.

Sent from my Pixel 4a using Tapatalk

Sent from my Pixel 4a using Tapatalk
- Local time
- 10:16 AM
- User ID
- 360
- Joined
- Dec 31, 2015
- Messages
- 23,517
- Reaction score
- 150,393
- Location
- East Jordan, MI
Pretty much what I doThis is how I deal with them... Right or wrong I've had good luck thus far.
Sent from my Pixel 4a using Tapatalk
Maintenance Chief
Disrupting the peace with an old chainsaw
- Local time
- 10:16 AM
- User ID
- 11378
- Joined
- Jan 4, 2020
- Messages
- 4,207
- Reaction score
- 13,763
- Location
- South Carolina
MAF143
Super OPE Member
- Local time
- 10:16 AM
- User ID
- 16099
- Joined
- Mar 30, 2021
- Messages
- 187
- Reaction score
- 679
- Location
- North Central Ohio
Thanks guys, I was thinking there had to be some flow gains to be had there. That area from the factory looks like a MACK truck front end. I figured some work could be done there to improve things, but not having any experience inside a saw, I didn't want to pull a Bozo NoNo and turn his saw into a turd... I already told him that the main reason I'm fixing his saw for him is that I want to open up my 362 and play with it and his is the guinea pig... I've been making case splitters, bearing pullers and any other specialty tools I need while working on his so I can be ready to tear mine apart someday.
My Blaster is needing a refresh on its top end also and I'll probably go a little more radical in there this time. Last time was just some basic flow improvements, widening of the ports, and opening up of the lower xfers. This time I'll match the port timing up to the pipe I have for it. I'll have to dig into the math a little more on that one.
When I was in the Army back in the early 80's, 10 gigahertz microwave equipment using shrouded parabolic antennas and digital equipment using 10 megahertz clock speeds were cutting edge stuff and fiber optics and cell phones were just being developed. Today's broadband strip and fractile antennas for crazy high frequency bands that make our smartphones possible have me wondering when chainsaws will be 30cc, 50,000 RPM monsters with 6" tuned pipes pulling 36" bars... WAKE UP dummie... Dreaming again... Turbines???
Thanks again for the help, I'll probably have many more stupid questions along the way, but that's how I learn. You guys are great!
Last edited:
MAF143
Super OPE Member
- Local time
- 10:16 AM
- User ID
- 16099
- Joined
- Mar 30, 2021
- Messages
- 187
- Reaction score
- 679
- Location
- North Central Ohio
I got adventurous. I lowered the cylinder skirt on the exhaust side and opened it up a tad while matching them to the case. Still a work in progress as the matching isn't perfect but this has to flow better than before. My grinding may be crude, but this has to reduce turbulence from square corners and mismatched casting openings.
The port is much more open now and the piston skirt is still fully supported as much as before.
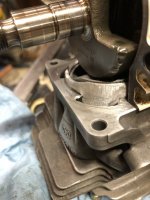
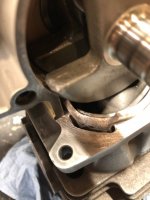
The matching of the castings isn't perfect but this has to flow way better than the stock set up with the gasket that wasn't even close to matching either side. I'm trying to ensure all soft corners with no sharp edges that would create turbulence.
I see some places that could be more even side to side so I'll look at this again after I sleep on it.

The port is much more open now and the piston skirt is still fully supported as much as before.


The matching of the castings isn't perfect but this has to flow way better than the stock set up with the gasket that wasn't even close to matching either side. I'm trying to ensure all soft corners with no sharp edges that would create turbulence.
I see some places that could be more even side to side so I'll look at this again after I sleep on it.
Last edited:
MAF143
Super OPE Member
- Local time
- 10:16 AM
- User ID
- 16099
- Joined
- Mar 30, 2021
- Messages
- 187
- Reaction score
- 679
- Location
- North Central Ohio
Finally got some time today to finish making my crank pusher and bearing presser outers... I had made the case splitter a couple weeks ago. I'm not very good at making them look pretty, but I'm ok with that as long as they work well. So far so good. I'm self taught on a stick welder. Again, not pretty, but I can get it to stick together pretty well.
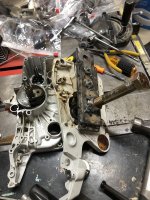
While I was making it and checking for fit.
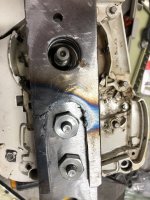
Crank pusher
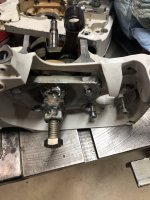
Bearing puller
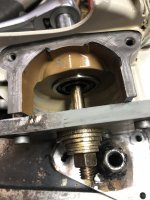
If I was gonna get into doing this a bunch, more versitile tools would be needed, but this stuff fits my saw also and that's the whole goal of this exercise, to end up porting my saw just to say I was able to do it myself... I'm learning a bunch and having fun doing it.

While I was making it and checking for fit.

Crank pusher

Bearing puller

If I was gonna get into doing this a bunch, more versitile tools would be needed, but this stuff fits my saw also and that's the whole goal of this exercise, to end up porting my saw just to say I was able to do it myself... I'm learning a bunch and having fun doing it.


