High Quality Chainsaw Bars Husqvarna Toys Hockfire Saws

Hybrid clonesaw 365 with a 390 topend - aka the "86'r from youtube"

Woodwackr

Here For The Long Haul!
GoldMember
Local time
5:33 PM
User ID
28333
Joined
Jan 18, 2024
Messages
3,511
Reaction score
16,232
Location
ID
Country flag
So I got things running yesterday afternoon and initially it was solid, then fell apart. Went from strong steady idle holding steady cut. After a few cuts it went to poor idle / high revving in the cut. When that happened (more than once) I stopped but even so I think I may have taken some damage. (just not sure yet how much yet.)

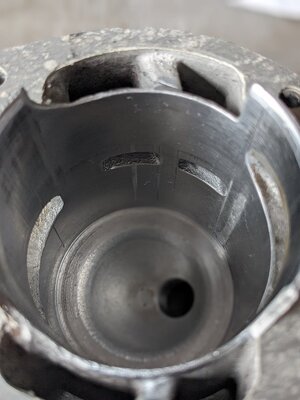
Over lunch today I pulled things down to see what I could see. On the exhaust side, the piston looks good (well as good as my machining is I suppose) but I do see a mark on the intake side cylinder wall (looking in through the exhaust) I'll have to pull the cylinder to see how bad things are.

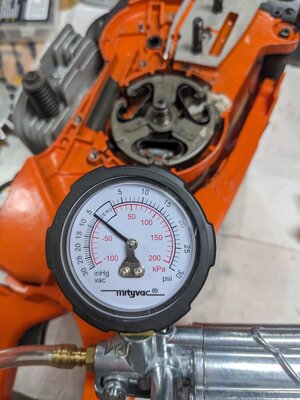
pulled the flywheel/clutch and blocked off the exhaust/intake to do a pressure test (won't hold vacuum at this point) and was able to confirm there's an air leak around the clutch side crank sleeve (from what I could see with the oil pump still on). Then ran out of time, hopefully I'll be able to dig into things a bit more tonight to see how extensive the damage is.

But I think I'm on the right track with the custom crank sleeve and once I pull the oil pump I'll be able to see where exactly the leaks are occurring & figure out some next steps.

And because I'm a glutton for punishment I have started ordering parts for prototype #3 (with a 390 crank bottom end)
Pressure test without the clutch tightened? I’m pretty sure that won’t work on the 365/372 with that sleeve and tiny O-ring. At least, mine didn’t. :p
 

moparnut88

Here For The Long Haul!
Local time
7:33 PM
User ID
1286
Joined
May 13, 2016
Messages
2,318
Reaction score
12,026
Location
US
Country flag
So I got things running yesterday afternoon and initially it was solid, then fell apart. Went from strong steady idle holding steady cut. After a few cuts it went to poor idle / high revving in the cut. When that happened (more than once) I stopped but even so I think I may have taken some damage. (just not sure yet how much yet.)

Over lunch today I pulled things down to see what I could see. On the exhaust side, the piston looks good (well as good as my machining is I suppose) but I do see a mark on the intake side cylinder wall (looking in through the exhaust) I'll have to pull the cylinder to see how bad things are.

pulled the flywheel/clutch and blocked off the exhaust/intake to do a pressure test (won't hold vacuum at this point) and was able to confirm there's an air leak around the clutch side crank sleeve (from what I could see with the oil pump still on). Then ran out of time, hopefully I'll be able to dig into things a bit more tonight to see how extensive the damage is.

But I think I'm on the right track with the custom crank sleeve and once I pull the oil pump I'll be able to see where exactly the leaks are occurring & figure out some next steps.

And because I'm a glutton for punishment I have started ordering parts for prototype #3 (with a 390 crank bottom end)
years ago me and AWOL started a build like this but i never got it finished. our plan involved a 2171 case with 390 crank and cylinder with an rwj carb and boot we were planning on machining the crank weights down to fit into the cases and turning the bearing area on the crank to fit the 2171 bearing sizes. at least theory. glad to see someone building something like that idea.
 

upstateamish

Super OPE Member
Local time
7:33 PM
User ID
17558
Joined
Jul 13, 2021
Messages
95
Reaction score
322
Location
upstate new york
Country flag
After tearing into things, I think the seal is sightly binding on my crank sleeve bushing. So I've pulled things back apart and will work on reducing the diameter of the crank sleeve bearing surface a bit more. (and ordered a new seal)

Pressure test without the clutch tightened? I’m pretty sure that won’t work on the 365/372 with that sleeve and tiny O-ring. At least, mine didn’t. :p
maybe. I will see if I can find a cheap source for that little o-ring (the ones I have found are not cheap... but potentially it's key for sealing the sleeve (short term I could put down some gasket sealer to set up where the crank and bearing match at the base.)

years ago me and AWOL started a build like this but i never got it finished. our plan involved a 2171 case with 390 crank and cylinder with an rwj carb and boot we were planning on machining the crank weights down to fit into the cases and turning the bearing area on the crank to fit the 2171 bearing sizes. at least theory. glad to see someone building something like that idea.

Nice! looks like I've done a portion of that approach with turning down the (and if I can get the crank sleeve figured out I think almost have a working saw.) I elected to go with the clone saw appoach as it's a cheaper barrier to proof of concept
 

Outback

Super OPE Member
Local time
4:33 PM
User ID
2046
Joined
Oct 28, 2016
Messages
150
Reaction score
354
Location
Oregon
Country flag
I've stretched generic 4mmx1mm o rings on to the crank before in a pinch and when they stretch they are approximately the same diameter as the husqvarna one. The oem more or less disintegrate into to the bushing over time as I've never found one on a tear down of an old saw. You can get a whole box for a couple dollars at the hardware store of your choosing. might have been a 5mm.
 

Maintenance Chief

Disrupting the peace with an old chainsaw
Local time
7:33 PM
User ID
11378
Joined
Jan 4, 2020
Messages
3,974
Reaction score
12,848
Location
South Carolina
Country flag
After tearing into things, I think the seal is sightly binding on my crank sleeve bushing. So I've pulled things back apart and will work on reducing the diameter of the crank sleeve bearing surface a bit more. (and ordered a new seal)


maybe. I will see if I can find a cheap source for that little o-ring (the ones I have found are not cheap... but potentially it's key for sealing the sleeve (short term I could put down some gasket sealer to set up where the crank and bearing match at the base.)


Nice! looks like I've done a portion of that approach with turning down the (and if I can get the crank sleeve figured out I think almost have a working saw.) I elected to go with the clone saw appoach as it's a cheaper barrier to proof of concept
A thick lithium based grease will seal without the o-ring for a while.
 

Woodwackr

Here For The Long Haul!
GoldMember
Local time
5:33 PM
User ID
28333
Joined
Jan 18, 2024
Messages
3,511
Reaction score
16,232
Location
ID
Country flag
After tearing into things, I think the seal is sightly binding on my crank sleeve bushing. So I've pulled things back apart and will work on reducing the diameter of the crank sleeve bearing surface a bit more. (and ordered a new seal)


maybe. I will see if I can find a cheap source for that little o-ring (the ones I have found are not cheap... but potentially it's key for sealing the sleeve (short term I could put down some gasket sealer to set up where the crank and bearing match at the base.)


Nice! looks like I've done a portion of that approach with turning down the (and if I can get the crank sleeve figured out I think almost have a working saw.) I elected to go with the clone saw appoach as it's a cheaper barrier to proof of concept
I got a batch of them cheap...will try to find te source.
 

upstateamish

Super OPE Member
Local time
7:33 PM
User ID
17558
Joined
Jul 13, 2021
Messages
95
Reaction score
322
Location
upstate new york
Country flag
Dug into the saw a bit tonight. I'll break this into a couple posts to add a few pics. Turned the seal surface of the bushing down a bit more & the new clutch side seal should be here tomorrow.

I've stretched generic 4mmx1mm o rings on to the crank before in a pinch and when they stretch they are approximately the same diameter as the husqvarna one. The oem more or less disintegrate into to the bushing over time as I've never found one on a tear down of an old saw. You can get a whole box for a couple dollars at the hardware store of your choosing. might have been a 5mm.
Thanks for the idea, dug around through some junk and found a small o-ring that I think might work for testing.


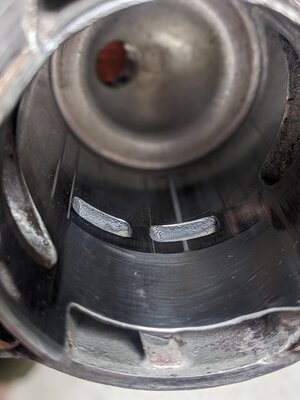
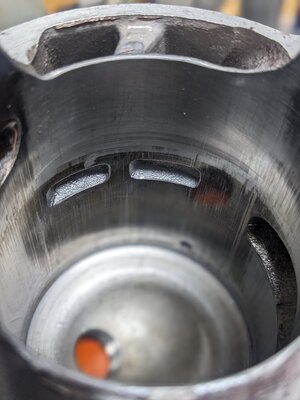
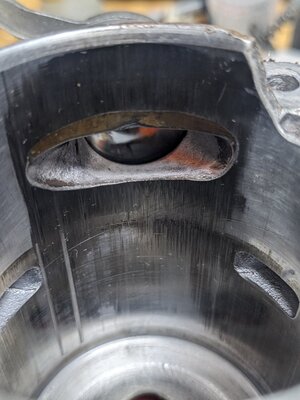
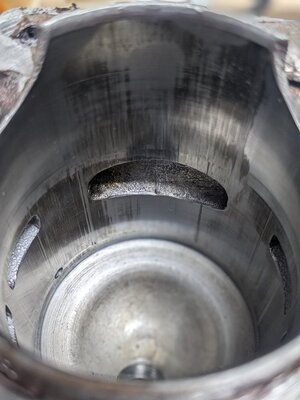
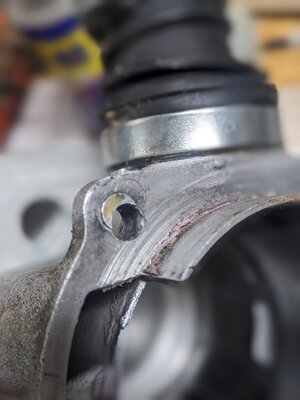
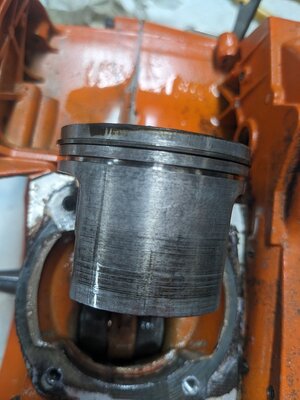
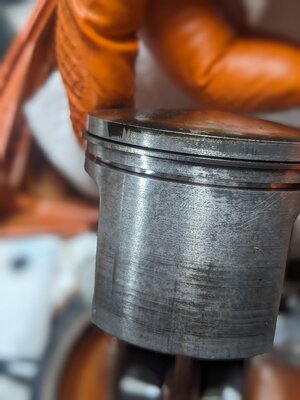
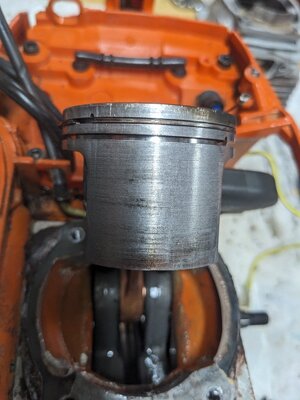
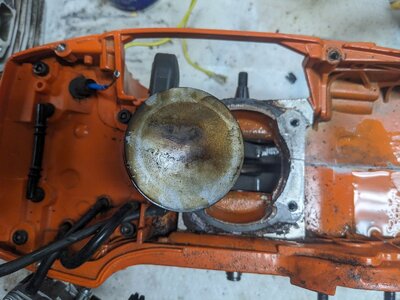
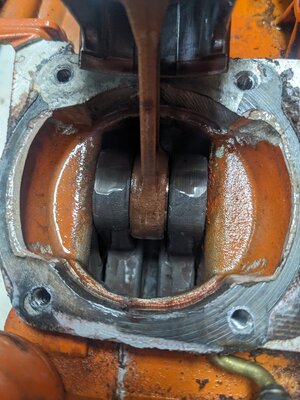
Then I pulled the jug to see how bad things are in the cylinder (that mark on the rear wall was pretty apparent) There's some pretty ugly gouges I can def feel with my fingernail. But looking at the cylinder wall damage (and the piston) I'm not convinced it's due to heat /air leak damage verses having ingested something (or having something come loose after assembly?)

While I believed I had gotten all the debris out of the cylinder / bottom end, it's quite possible I missed something. The crank bearings still feel super smooth and the piston is *mostly* unscathed. I'll have to dig in a bit more to see if I can find any obvious metal bits floating around.
PXL_20250320_225858450.PORTRAIT.jpg

PXL_20250320_225903953.PORTRAIT.jpg

Postive note: JB Weld seems to be holding up on the intake (you can see where I fat fingered my grind)
PXL_20250320_225915254.PORTRAIT.ORIGINAL.jpg

PXL_20250320_225921452.PORTRAIT.jpg

Maybe I didn't turn the piston down far enough. I think at this point I'll try and to clean cylinder up as best as I can (maybe throw a ball hone in it) once I smooth things out and send it.

I also noticed that two of the aluminum plugs I made were standing slightly proud (which could induce an air leak) so I'll address those as well.

PXL_20250320_230654829.PORTRAIT.jpg
 

upstateamish

Super OPE Member
Local time
7:33 PM
User ID
17558
Joined
Jul 13, 2021
Messages
95
Reaction score
322
Location
upstate new york
Country flag
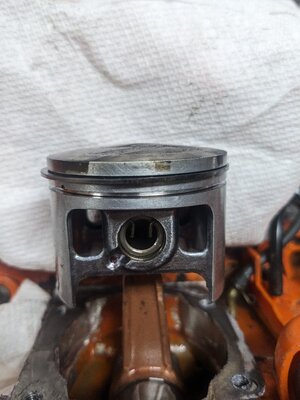
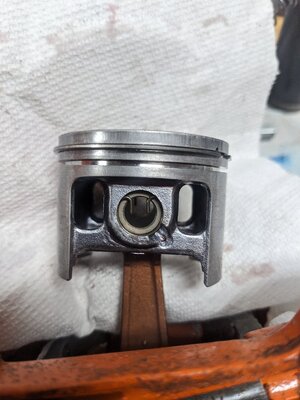
The sides of the piston appear to be fine and c-clips haven't moved.
PXL_20250320_230302714.MP.jpgPXL_20250320_230331856.MP.jpg
We'll see how much ambition I have tomorrow, but the amazon deliveries usually occur closer to the early evening so this is most likely a "to be continued over the weekend."
 

upstateamish

Super OPE Member
Local time
7:33 PM
User ID
17558
Joined
Jul 13, 2021
Messages
95
Reaction score
322
Location
upstate new york
Country flag
Not sure if this is useful but I took a shot at trying to create a freecad / stl model of the crank sleeve. I haven't 3d printed it yet but figured it might be useful. in the interested of sharing my intial (unconfirmed) STL/FCStd files are attached.
 

Attachments

Woodwackr

Here For The Long Haul!
GoldMember
Local time
5:33 PM
User ID
28333
Joined
Jan 18, 2024
Messages
3,511
Reaction score
16,232
Location
ID
Country flag
Dug into the saw a bit tonight. I'll break this into a couple posts to add a few pics. Turned the seal surface of the bushing down a bit more & the new clutch side seal should be here tomorrow.


Thanks for the idea, dug around through some junk and found a small o-ring that I think might work for testing.


Then I pulled the jug to see how bad things are in the cylinder (that mark on the rear wall was pretty apparent) There's some pretty ugly gouges I can def feel with my fingernail. But looking at the cylinder wall damage (and the piston) I'm not convinced it's due to heat /air leak damage verses having ingested something (or having something come loose after assembly?)

While I believed I had gotten all the debris out of the cylinder / bottom end, it's quite possible I missed something. The crank bearings still feel super smooth and the piston is *mostly* unscathed. I'll have to dig in a bit more to see if I can find any obvious metal bits floating around.
View attachment 454418

View attachment 454419

Postive note: JB Weld seems to be holding up on the intake (you can see where I fat fingered my grind)
View attachment 454420

View attachment 454421

Maybe I didn't turn the piston down far enough. I think at this point I'll try and to clean cylinder up as best as I can (maybe throw a ball hone in it) once I smooth things out and send it.

I also noticed that two of the aluminum plugs I made were standing slightly proud (which could induce an air leak) so I'll address those as well.

View attachment 454422
Ouch…
No scoring to the rings? Look for any flaking of the plating, like, little slivers that broke loose.
 

Ketchup

Epoxy member
Local time
5:33 PM
User ID
5594
Joined
Mar 12, 2018
Messages
2,229
Reaction score
7,218
Location
Colorado
Country flag
Considering what you have done, that’s not too much carnage at all.
Looks like debris from grinding or maybe interference between piston and case where you clearanced it. Maybe even from re-pressing the crank. Just clean everything really well and hope more doesn’t show up. Since you’re doing one seal anyway, I would pull them both and flush the bearings like crazy. Also flush the big end on the rod.
Be careful using a ball hone. They tend to wreck the plating around the ports. Try making a straight mandrel for a flag of 180grit and clean the jug with that. If you do use the hone, only do it for 3-4 seconds.
I’d probably do new rings.
 

upstateamish

Super OPE Member
Local time
7:33 PM
User ID
17558
Joined
Jul 13, 2021
Messages
95
Reaction score
322
Location
upstate new york
Country flag
Ouch…
No scoring to the rings? Look for any flaking of the plating, like, little slivers that broke loose.
I was running a single ring and the only scratch I've found doesn't appear to be near where the various gouges in the cylinder near the transfers. I'll dig into starting to clean up the cylinder a bit later today and see what I find on the plating side

Considering what you have done, that’s not too much carnage at all.
Looks like debris from grinding or maybe interference between piston and case where you clearanced it. Maybe even from re-pressing the crank. Just clean everything really well and hope more doesn’t show up. Since you’re doing one seal anyway, I would pull them both and flush the bearings like crazy. Also flush the big end on the rod.
Be careful using a ball hone. They tend to wreck the plating around the ports. Try making a straight mandrel for a flag of 180grit and clean the jug with that. If you do use the hone, only do it for 3-4 seconds.
I’d probably do new rings.

yup, the fact that I've gotten this far is impressive. After what I've done to get this working, I expected the various areas of failure to be in other spots. Good idea on flushing the bottom end, I'll definately do that & have another ring I'll put in as well.

Good info about the ball hone (especially with this cylinder.) Assuming the plating isn't flaking, I'll work on getting things smoothed out and see where things sit.

But even with this set back I feel pretty good about the progress.
 
Last edited:

upstateamish

Super OPE Member
Local time
7:33 PM
User ID
17558
Joined
Jul 13, 2021
Messages
95
Reaction score
322
Location
upstate new york
Country flag
Worked on refreshing the cylinder bore tonight. It's not as nice as it was factory, but we're going to run it with a new ring and see how it goes.

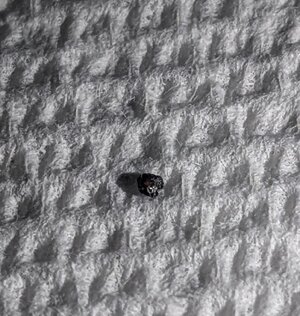
The only thing I found while flushing the bottom end was one very small spec (which as far as I can tell / my best guess might be casting sand?)
PXL_20250322_010947347.PORTRAIT.jpg
checked in the muffler and it appears to be clean, so I think if there was more in there... hopefully it's no longer in the mix.

going to try this o-ring I found to seal the crank sleeve bushing

PXL_20250322_020123521.jpg

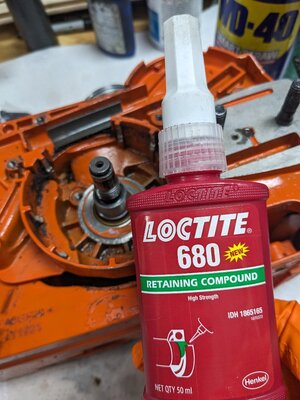
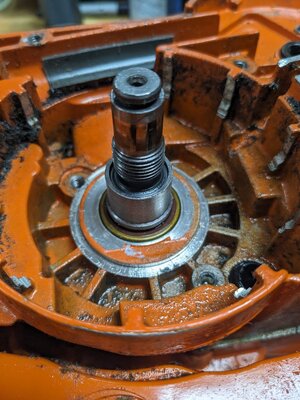
For some reason the new seal wasn't a tight press fit in the case (there was space for it to move) not sure if it was because where the crank sleeve bushing goes into the seal over sized and the other seal spun when the saw was running... in the interest of science I added some green retaining compound and we'll see if it works...

PXL_20250322_022908150.jpg
PXL_20250322_022925632.MP.jpg
 

moparnut88

Here For The Long Haul!
Local time
7:33 PM
User ID
1286
Joined
May 13, 2016
Messages
2,318
Reaction score
12,026
Location
US
Country flag
After tearing into things, I think the seal is sightly binding on my crank sleeve bushing. So I've pulled things back apart and will work on reducing the diameter of the crank sleeve bearing surface a bit more. (and ordered a new seal)


maybe. I will see if I can find a cheap source for that little o-ring (the ones I have found are not cheap... but potentially it's key for sealing the sleeve (short term I could put down some gasket sealer to set up where the crank and bearing match at the base.)


Nice! looks like I've done a portion of that approach with turning down the (and if I can get the crank sleeve figured out I think almost have a working saw.) I elected to go with the clone saw appoach as it's a cheaper barrier to proof of concept
We had discussed turning the crank with regular tooling but came to the conclusion of it being hardened and the finish needed we were gonna od grind it with a tool post grinder or a surface grinder.
 

Ketchup

Epoxy member
Local time
5:33 PM
User ID
5594
Joined
Mar 12, 2018
Messages
2,229
Reaction score
7,218
Location
Colorado
Country flag
Looking back at your pics of the piston damage, it looks like something came through the intake. There’s a streak in the center of the intake port (lower skirt), then another at the edge (full length FW side). No marks on either transfer side, then a streak at the corner of the exhaust. So maybe the case is good and something was gummed up in the intake track.
The first streak does appear to correspond to the case gasket though, so maybe a tad more clearance is needed there.
 

upstateamish

Super OPE Member
Local time
7:33 PM
User ID
17558
Joined
Jul 13, 2021
Messages
95
Reaction score
322
Location
upstate new york
Country flag
We had discussed turning the crank with regular tooling but came to the conclusion of it being hardened and the finish needed we were gonna od grind it with a tool post grinder or a surface grinder.
gotcha, makes sense.
Looking back at your pics of the piston damage, it looks like something came through the intake. There’s a streak in the center of the intake port (lower skirt), then another at the edge (full length FW side). No marks on either transfer side, then a streak at the corner of the exhaust. So maybe the case is good and something was gummed up in the intake track.
The first streak does appear to correspond to the case gasket though, so maybe a tad more clearance is needed there.
yeah, that tracks with my thought, based on how smooth things seem to be on the bearing front I think that something got injested as well. Which is good (from the work I did on the crank/case may not have cause it) but still kinda is a bummer. Ah well, this is just the second prototype, and intended to be the proof of concept on the crank.

I checked the seal this morning and it still hadn't tightened up so I pulled it out. I did some small 'fine adjustment' on the inside of the seal to push the diameter of it out a bit and make it interface with the case and then it went in without that o-ring. Everything seems tight but the leak down test will be the true indicator. This will hopefully allow for the replacement of the seal without to split a case and using a torch to get it free.

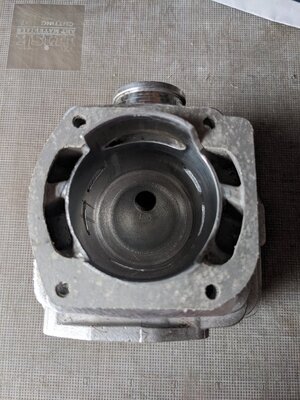
I've cleaned up the cylinder as good as I'm realistically going to be able to get it (it's not pretty, but there are no hard edges that I can easily feel) I do feel the gaps... We'll call those unintentional boost ports and see how it goes.

I've also leveled out the cylinder hole plugs so they're flush with the base surface and have cut a new gasket for it. Once I run the cylnder through the sink with soap and water it'll get stuck back together with some sealant to sit for a bit before the leak down test happens.

PXL_20250322_165426207.jpg
PXL_20250322_165431790.jpg
PXL_20250322_165448449.PORTRAIT.jpg
PXL_20250322_165502533.PORTRAIT.jpg
 

Ketchup

Epoxy member
Local time
5:33 PM
User ID
5594
Joined
Mar 12, 2018
Messages
2,229
Reaction score
7,218
Location
Colorado
Country flag
That’s worse than I thought. Can’t hurt to carry on, but that looks unrecoverable.
 

upstateamish

Super OPE Member
Local time
7:33 PM
User ID
17558
Joined
Jul 13, 2021
Messages
95
Reaction score
322
Location
upstate new york
Country flag
That’s worse than I thought. Can’t hurt to carry on, but that looks unrecoverable.

yeah, looking at it, I'm not super confident but I figure no harm in testing it out. At the very least will let me do the leak down test. If it passes see how (or if) it runs, if it doesn't a get a new top end and the current one can go on the trophy shelf of "learning experiences.."
 

upstateamish

Super OPE Member
Local time
7:33 PM
User ID
17558
Joined
Jul 13, 2021
Messages
95
Reaction score
322
Location
upstate new york
Country flag
Got things back together and pressure vacuum tested

Good news: PTO side seal now doesn't leak!
Bad news: From what I can tell, the area between the crank & the oil tank is where the leak is... so looks like splitting the case to redo the gasket may be in the cards.

So, still have a small leak but no longer at the seal crank bushing and it holds about 5* on the vacuum side for about 4-6(ish) seconds where it wouldn't hold anything prior. Letting the threebond set overnight and tomorrow see if it'll fire up. Without trying to start it, just pulling things over it seems to have fairly decent compression (but the 2 stroke oil used for assembly is still there, so I expect that)

PXL_20250322_232546862.jpg
 
Last edited:
Top