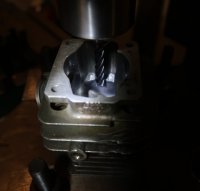
@Moparmyway that setup was for leveling transfers, not cutting base or band (photo below.) Yes, the axis of the cylinder is the primary datum and the only thing that matters. Since I had already trued the base, then grinding the fins dead parallel to the base meant I could just stick the thing upsidedown and guarantee that all of the transfers would be timed identically with respect to the base. I swept the bore up and down with an indicator in the spindle and it was true. Could have indicated it in that way, sure, but the setup would not have been as rigid. Didn't want to risk the setup moving which could cause the plating to chip or loss of accuracy. Without a surface grinder there's other ways to do it, for sure, just more work and less certainty.
And yes, as others have said "tenth" is shorthand for 0.0001" or 2.5microns. Sorry, didn't realize that wasn't common parlance.
 @Mastermind
 There is clearance in the 4 corner mounting holes of the band cutting fixture, and the posts are moveable on the faceplate. I can tap around that whole plate to adjust concentricity independently of perpendicularity, just like a four-jaw but with less hassle. Such a thing could be done in a 4-jaw instead of a faceplate, it would just take a couple of extra minutes. By design, since it locates on the spindle nose and the cylinder mounting holes it's at most 0.005-0.010" runout if you just slap it together. I thought about making a mandrel that would center on the plate, but I think that'd only get to about 0.001-0.002" with the bore tolerance and clearance figured in and it isn't much work to just indicate the thing.
As it is, since the base has already been cut true to the cylinder this guarantees that there is no wobble, only concentric runout. That means sweeping any location along the bore will true the axis of the cylinder to the axis of the lathe. If there was runout at the top different than the bottom, it would mean that the base is off and needs to be trued. Of course, you always cut or true the base first. If you didn't care about perpendicularity of the base, then it could be shimmed true.
Of course, none of this works if the fixture isn't flat and perpendicular to the axis. The plate is ground flat and parallel to better than 0.0005" over ~4" so as long as the posts are all the same height off of the faceplate, then the plane of fixture plate/base is guaranteed perpendicular to the axis of the lathe. To get the posts the same height, I just skim cut them when I install the faceplate. They're stiff enough that a light cut (only takes a thou or so) trues it up and at that point the error is no greater than the runout of the spindle bearings, which is negligible (just barely 0.0001") when measured at the opening of the fixture plate.
Honestly, with the all-thread setup you'd probably make it easier on yourself by using a ground or accurately turned bar in the cylinder to externalize the reference than running a long reach indicator up there. At least on a used cylinder that would average out the errors in the bore since they don't stay round forever. Same result, but don't take my word for it.
As you said, you've got a system that works and if it works there's no need to change it.
By the way, no need for y'all to be so sensitive! I didn't expect that from the pitchfork mob I was seeing that was my only introduction to the group.
Didn't expect "hack" to be viewed as such a pejorative in context.
Plenty of 3-chord guitar players sitting in million dollar mansions after all.
Maybe I spend too much time talking to machinists where there's lots of pride/arrogance about going for perfection. Need to code-switch over here, I suppose. I don't doubt y'all can turn out good work on a relatively crude fixture with extra care and experience, but I've seen images elsewhere that seem to defy physics. I don't understand how a person can tighten all-thread enough to get sufficient torsional stiffness to prevent chatter and movement while also doing precise adjustment, and I would expect any chatter would mean that cylinder is in a different location at the end of the cut than it was at the beginning.
I admit my experience is limited, but almost all of the cylinders that I have held in my hands that had been cut by others showed measurable perpendicularity errors cylinder to base and concentricity errors at the band. I have no idea of their provenance so I'm not trying to attack anyone. Maybe it doesn't matter, it's just a saw. I did what I did to save setup time and avoid chatter, precision is a bonus.


