High Quality Chainsaw Bars Husqvarna Toys Hockfire Saws

391 rebuild, HELP! Please?!

Brewz

Free Range Human in a Tax Farm
Local time
6:31 AM
User ID
550
Joined
Jan 16, 2016
Messages
4,217
Reaction score
14,305
Location
Hunter Valley - Australia
Country flag
Hi Michael
I am going to be a bit honest with you here and do not in any way want to upset or offend you.... That's not my intention.

I have read the thread and am going to comment that assembly of a saw will take a certain amount of mechanical knowledge and skill.
I thinking that if you need advice on how to remove the sealant, your not going to have fun getting a 2 ring piston back into a clamshell cylinder.

I have worked on machinery in heavy industry for 25 years and had all manner of fun with my 039 when I rebuilt it, and it still took me 2 goes to get right.

I think learning how to fix the tools you use is the BEST thing!
But you should start slow and build your skills with the simple tasks, digging deeper each time as you learn.

If I were you I would take it to someone to get it put back together correctly, and then play with it, reading, learning, building your skills to a point where you can pick up a bucket of bits and make a saw.

It's a journey you should take but start at the start, not the difficult end.
 

angelo c

Coal Member
Local time
2:31 PM
User ID
362
Joined
Dec 31, 2015
Messages
2,919
Reaction score
11,553
Location
Peoples Republic of North Jersey
Country flag
Brews, I'm sure your intentions are well centered but about the easiest thing on a 391 rebuild is sliding the piston and rings back in together. A gentle wiggle and they will come together without any tools.
Your points are valid but Mike has great a support group behind him cheering him on to his first rebuild. And the US Postal system is always looking for business( he can box up his mistakes and I for one will correct and remail them back)

I was "Mike" not too long ago until I made a few forum friends ....
 

Brewz

Free Range Human in a Tax Farm
Local time
6:31 AM
User ID
550
Joined
Jan 16, 2016
Messages
4,217
Reaction score
14,305
Location
Hunter Valley - Australia
Country flag
Oh me too..... these forums have taught me soooo much.
Like I said, no intention of bringing a downer on the thread, I was just concerned about the ratio of knowledge to the task at hand and do not want to see his saw have troubles or get damaged.

I guess I learnt my way around them by slowly building my skills.
I would not have considered putting one back together from scratch before I had pulled one apart to know how it got there.

But true, he will have good dupport on here and I will be happy to lend a hand as well.

I will post up some bit by bit pictures of how I rebuilt my 039's bottom end tonight after work. Hope the pictures can help.
 

michaelmj11

Well-Known OPE Member
Local time
1:31 PM
User ID
600
Joined
Jan 19, 2016
Messages
252
Reaction score
227
Location
Starkville, MS, 39759, USA
Oh me too..... these forums have taught me soooo much.
Like I said, no intention of bringing a downer on the thread, I was just concerned about the ratio of knowledge to the task at hand and do not want to see his saw have troubles or get damaged.

I guess I learnt my way around them by slowly building my skills.
I would not have considered putting one back together from scratch before I had pulled one apart to know how it got there.

But true, he will have good dupport on here and I will be happy to lend a hand as well.

I will post up some bit by bit pictures of how I rebuilt my 039's bottom end tonight after work. Hope the pictures can help.

LoL I doubt the saw can get any worse than it already is. I also have a metric tape measure for figuring out which screws go where.

I have also had a string of double shifts so I haven't had much time (or energy) to put into the saw this last week and a half
 

Brewz

Free Range Human in a Tax Farm
Local time
6:31 AM
User ID
550
Joined
Jan 16, 2016
Messages
4,217
Reaction score
14,305
Location
Hunter Valley - Australia
Country flag
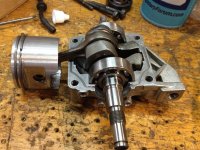
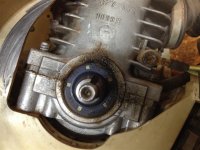
Here is my first attempt at a full bottom end rebuild

Notice I have not fitted the oil seals. I thought I should tap the oil seals in after I put it together and I was wrong.

Cylinder base with crank fitted with new bearings, piston and rings.
If you do the bearings, be wary of the bearings you get from the online saw parts shops.
I am not speaking for all of them, but in my experience, the bearings will be cheap nasty ones.
Go to a place that deals in bearings and get good quality slacker, CBC or the like. Cheap bearings wont last and the good ones are usually the same price.

IMG_1641.jpg

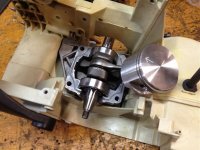
Then sitting in the chassis. Bolt the cylinder base in from the side first with the bar stud. You will need to lock the 2 bar nuts on the thread to bolt it in tight.

IMG_1642.jpg

This picture shows the cylinder base coated in sealant. It should be in the seal grooves as well.
The piston and rings are now in the cylinder (make sure you coat everything in oil....... there is always time for lubricant!
Then coat the base of the cylinder and oil seal rings with a thin coat of sealant.
I used Motoseal 2

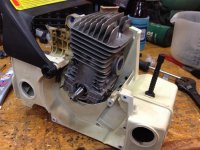
IMG_1643.jpg

Put it together and bolt it down tight
Once again, the seals should be in there.

IMG_1644.jpg

I tapped the seals in after it set and after 3 tanks of fuel, pulled it apart to check and found it had been leaking so it got stripped back down and new oil seals ordered

IMG_1681.jpg
 
Last edited:

Brewz

Free Range Human in a Tax Farm
Local time
6:31 AM
User ID
550
Joined
Jan 16, 2016
Messages
4,217
Reaction score
14,305
Location
Hunter Valley - Australia
Country flag
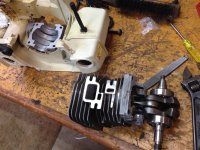
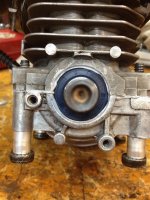
2nd attempt.
This time I fitted it all up external to the frame and as you can see, the seals were sealed in with the rest of the cylinder to stop any air leaks.
It is REALLY important that it all seals properly

IMG_1685.jpg

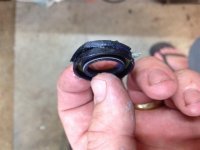
Here is what happened to the seals I pushed in....... aqn excelent ilistration of how NOT to do it!

IMG_1686.jpg

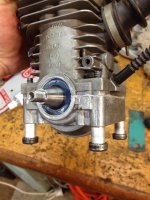
I made spacers to simulate the thickness of the cylinder base and bolted it together external to the chassis.
I used a pipe cutter to cut bits of aluminum tube for this
You could do it in the chassis like I did on my 1st attempt, and I probably would do if I built it again.

IMG_1687.jpg

Make sure all the surfaces are completly free of oil etc before you put the sealant on. Clean it with alcohol and let it air dry.
The tricky bit is getting the cylinder bore and piston with rings coated in oil together with none on the sealant surface.

Hope this helps a bit

Once you have the noisy bit together and bolted in, its just screw on bits. Getting the motor right is the most important bit
 

KcChiefs2019

Well-Known OPE Member
Local time
1:31 PM
User ID
10451
Joined
Sep 13, 2019
Messages
46
Reaction score
65
Location
Illinois
Country flag
good luck with your project
You are talking about the two black metal bands that have some spring to them, located on the top 1/3 of the piston? Right
We all had to start somewhere. Most start at internal workings of a combustion engine. Or maybe went way out ur way to troll. I take the clam shell may have found its way to the gar-bage. I bet at least 65% to75% do get the toss. Oh and out of the 65% to 75% the problem is straight gased issue. OP error.
 
Top