You are using an out of date browser. It may not display this or other websites correctly.
You should upgrade or use an alternative browser.
You should upgrade or use an alternative browser.
254XP Rebuild
- Thread starter XP_Slinger
- Start date
XP_Slinger
They’re Just Saws
- Local time
- 10:47 AM
- User ID
- 845
- Joined
- Feb 9, 2016
- Messages
- 6,089
- Reaction score
- 27,567
- Location
- Central NY
Most of my parts are in, just waiting on my piston to show up in the mail box. I need to get some vehicle maintenance done tomorrow and with any luck I’ll start assembling the 254
XP_Slinger
They’re Just Saws
- Local time
- 10:47 AM
- User ID
- 845
- Joined
- Feb 9, 2016
- Messages
- 6,089
- Reaction score
- 27,567
- Location
- Central NY
It’s 12 degrees ABOVE zero today!! Woohoo heatwave! I’ll be heading to the barn shortly to start assembling my 254
Last edited:
XP_Slinger
They’re Just Saws
- Local time
- 10:47 AM
- User ID
- 845
- Joined
- Feb 9, 2016
- Messages
- 6,089
- Reaction score
- 27,567
- Location
- Central NY
Let’s start with getting the new bearings on the crank.
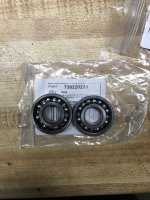
This is a press adapter I whipped up from stuff at the hardware store. I put the wrench between the crank journals to minimize flex while pushing the new bearings on. It really doesn’t take much pressure with a cold crank and heated inner races, just insurance.

Bearings on
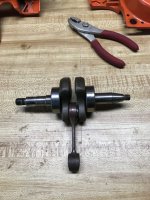

This is a press adapter I whipped up from stuff at the hardware store. I put the wrench between the crank journals to minimize flex while pushing the new bearings on. It really doesn’t take much pressure with a cold crank and heated inner races, just insurance.

Bearings on

XP_Slinger
They’re Just Saws
- Local time
- 10:47 AM
- User ID
- 845
- Joined
- Feb 9, 2016
- Messages
- 6,089
- Reaction score
- 27,567
- Location
- Central NY
Next step, install the crank in the case. I use a propane torch to heat the bearing bore. Walk the flame all over the area both inside and outside the crankcase area. If the paint starts bubbling you’re lingering in one place too long with the torch.
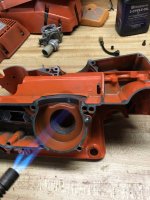
Once the case is heated the bearing should just fall into place. Make sure the connecting rod is pointing up when seating the bearing in the case.
PTO side is good, now lay your crankcase gasket on. Would suck to forget it at this point...ask me how I know lol
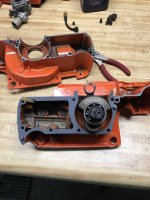
Next heat up the flywheel side case in the same manner and put the cases together.
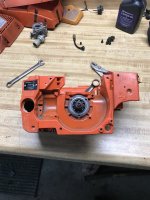
Finally, tighten 7 main crank case fasteners and don’t forget about that little one back behind the carb box. That makes a total of 8


Once the case is heated the bearing should just fall into place. Make sure the connecting rod is pointing up when seating the bearing in the case.
PTO side is good, now lay your crankcase gasket on. Would suck to forget it at this point...ask me how I know lol

Next heat up the flywheel side case in the same manner and put the cases together.

Finally, tighten 7 main crank case fasteners and don’t forget about that little one back behind the carb box. That makes a total of 8

Last edited:
XP_Slinger
They’re Just Saws
- Local time
- 10:47 AM
- User ID
- 845
- Joined
- Feb 9, 2016
- Messages
- 6,089
- Reaction score
- 27,567
- Location
- Central NY
Once the Case cools it’s time for the new crank seals. But first drop some oil on the bearings so they’re not dry on the first start.

PTO seal installed
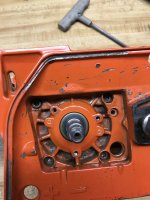
New seal AND O-ring installed on the seal carrier for the flywheel side

Carrier installed with 3 screws
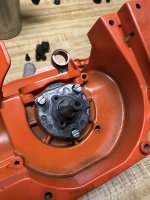
I check to make sure it seated nice and even. If not you’ll have a massive air leak. Also, if the bearing isn’t recessed about .030” the seal carrier won’t sit flush. That’s why I put the bearings on the crank then installed the crank in the case. Guarantees the bearing will be at the proper depth for the carrier to seat.
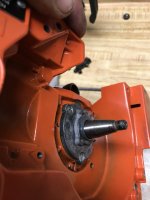

PTO seal installed

New seal AND O-ring installed on the seal carrier for the flywheel side

Carrier installed with 3 screws

I check to make sure it seated nice and even. If not you’ll have a massive air leak. Also, if the bearing isn’t recessed about .030” the seal carrier won’t sit flush. That’s why I put the bearings on the crank then installed the crank in the case. Guarantees the bearing will be at the proper depth for the carrier to seat.

Last edited:
XP_Slinger
They’re Just Saws
- Local time
- 10:47 AM
- User ID
- 845
- Joined
- Feb 9, 2016
- Messages
- 6,089
- Reaction score
- 27,567
- Location
- Central NY
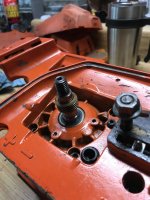
Now we’re at the oil pump. First, gently drive the brass drive gear onto the crank. Mine was seated to the shoulder on the crank. This pic is prior to driving it down to the shoulder.
Next install the oil pickup hose.

Now install what I believe is the vent grommet onto the pump housing.
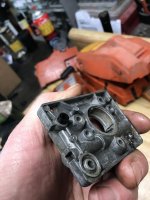
Lastly install the pump body, secure with 3 fasteners and install the washer on the crank. Pump done.


Next install the oil pickup hose.

Now install what I believe is the vent grommet onto the pump housing.

Lastly install the pump body, secure with 3 fasteners and install the washer on the crank. Pump done.

XP_Slinger
They’re Just Saws
- Local time
- 10:47 AM
- User ID
- 845
- Joined
- Feb 9, 2016
- Messages
- 6,089
- Reaction score
- 27,567
- Location
- Central NY
Now on to everything else.
Installed air injection support with 2 screws, flywheel and coil.
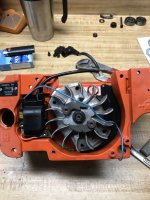
Place a business card between the flywheel magnet and the coil pick ups to set the gap at .010. With the card in place tighten the 2 coil mount fasteners.

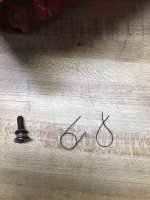
Noticed I had a busted starter dog spring. Missed that on tear down, glad I had one in my Parts bin.
Installed air injection support with 2 screws, flywheel and coil.

Place a business card between the flywheel magnet and the coil pick ups to set the gap at .010. With the card in place tighten the 2 coil mount fasteners.

Noticed I had a busted starter dog spring. Missed that on tear down, glad I had one in my Parts bin.

Last edited:
XP_Slinger
They’re Just Saws
- Local time
- 10:47 AM
- User ID
- 845
- Joined
- Feb 9, 2016
- Messages
- 6,089
- Reaction score
- 27,567
- Location
- Central NY
XP_Slinger
They’re Just Saws
- Local time
- 10:47 AM
- User ID
- 845
- Joined
- Feb 9, 2016
- Messages
- 6,089
- Reaction score
- 27,567
- Location
- Central NY
XP_Slinger
They’re Just Saws
- Local time
- 10:47 AM
- User ID
- 845
- Joined
- Feb 9, 2016
- Messages
- 6,089
- Reaction score
- 27,567
- Location
- Central NY
XP_Slinger
They’re Just Saws
- Local time
- 10:47 AM
- User ID
- 845
- Joined
- Feb 9, 2016
- Messages
- 6,089
- Reaction score
- 27,567
- Location
- Central NY
Next I install the piston;

Then the cylinder and carb as an assembly. 2 fasteners hold the carb to the cylinder, and 4 fasteners secure the cylinder to the crank case.
Once installed you can put in the 2 screws that secure the air filter elbow.

Next comes the throttle linkage. Rotate the linkage into the carb butterfly lever, clip the fuel line into the notch underneath the linkage bracket then simply drop into place. Simplest throttle ever.


Then the cylinder and carb as an assembly. 2 fasteners hold the carb to the cylinder, and 4 fasteners secure the cylinder to the crank case.
Once installed you can put in the 2 screws that secure the air filter elbow.

Next comes the throttle linkage. Rotate the linkage into the carb butterfly lever, clip the fuel line into the notch underneath the linkage bracket then simply drop into place. Simplest throttle ever.


XP_Slinger
They’re Just Saws
- Local time
- 10:47 AM
- User ID
- 845
- Joined
- Feb 9, 2016
- Messages
- 6,089
- Reaction score
- 27,567
- Location
- Central NY
XP_Slinger
They’re Just Saws
- Local time
- 10:47 AM
- User ID
- 845
- Joined
- Feb 9, 2016
- Messages
- 6,089
- Reaction score
- 27,567
- Location
- Central NY
XP_Slinger
They’re Just Saws
- Local time
- 10:47 AM
- User ID
- 845
- Joined
- Feb 9, 2016
- Messages
- 6,089
- Reaction score
- 27,567
- Location
- Central NY
The only thing I still need to get is muffler bolts which I can hopefully acquire tomorrow at fastenal.
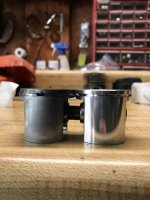
I did start it briefly with no muffler and she lives! Braaap ba bap bap bap! It’s not pretty yet but that will come in time. Sorry I missed some stuff in the assembly like the choke lever. I swore I took all the pictures I needed but I guess not. I’ve got some other stuff like rebuilding the carb and a comparison of the meteor piston to OEM that I’ll post in a little while.

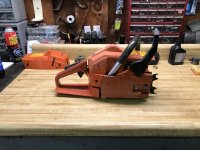
I did start it briefly with no muffler and she lives! Braaap ba bap bap bap! It’s not pretty yet but that will come in time. Sorry I missed some stuff in the assembly like the choke lever. I swore I took all the pictures I needed but I guess not. I’ve got some other stuff like rebuilding the carb and a comparison of the meteor piston to OEM that I’ll post in a little while.


- Local time
- 10:47 AM
- User ID
- 344
- Joined
- Dec 30, 2015
- Messages
- 4,561
- Reaction score
- 25,464
- Location
- Georgia
XP_Slinger
They’re Just Saws
- Local time
- 10:47 AM
- User ID
- 845
- Joined
- Feb 9, 2016
- Messages
- 6,089
- Reaction score
- 27,567
- Location
- Central NY
RIDE-RED 350r
Here For The Long Haul!
- Local time
- 10:47 AM
- User ID
- 839
- Joined
- Feb 8, 2016
- Messages
- 3,228
- Reaction score
- 12,779
- Location
- Blossvale NY
That's two 2xx saws brought back to life on your bench in 5 days time... Nice!
Similar threads
- Replies
- 50
- Views
- 10K
- Replies
- 31
- Views
- 6K
- Replies
- 20
- Views
- 4K


