High Quality Chainsaw Bars Husqvarna Toys Hockfire Saws

Troy bilt tomahawk super chipper shredder

alleyyooper

Pinnacle OPE Member
Local time
11:43 PM
User ID
8210
Joined
Dec 26, 2018
Messages
640
Reaction score
1,670
Location
Michigan.
Might just change the pulleys for flat pulleys and go with a flat belt.

:D Al
 

Littlebear15

OPE Member
Local time
11:43 PM
User ID
11428
Joined
Jan 9, 2020
Messages
2
Reaction score
0
Location
Easton MD
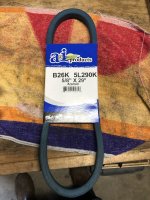
These are the belts that are working very well for me. Until I found them I was having the same issue I’d belts blowing out in about an hour. This one had lasted a month with no undue signs of wear and constant use. They have worked so well that I have shelved the idea of a centrifugal clutch for now.IMG_1511.jpg


Sent from my iPhone using Tapatalk
 

MarylandGuy

OPE Member
Local time
11:43 PM
User ID
11553
Joined
Jan 25, 2020
Messages
7
Reaction score
0
Location
Maryland
Interesting. I bought that same belt and it didn't perform well.
 

MarylandGuy

OPE Member
Local time
11:43 PM
User ID
11553
Joined
Jan 25, 2020
Messages
7
Reaction score
0
Location
Maryland
Just for future reference for anyone looking to replace the pulleys, I just pulled mine apart. I am assuming my two pulley's are the original ones installed by the factory. Both pulleys are the same by the way. Here is what I found stamped on the cast iron pulley: Browning BK40x1

I determined my Troy-Built Tomahawk machine (model 10941) is probably a 1987. The Briggs engine (190412) was made 9/05/86. I determined that by taking the code off the engine. My unit is 86090509.
1st two digits year made
2nd two digits month made
3rd two digits day made
4th two digits the plant that it came from

I searched the Browning part and found it's still being sold. Below is a website I found. I haven't looked around to see if I can find it for less yet, but this should give you an idea of the exact part in case you want to use a different manufacturer:

https://www.applied.com/c-brands/c-...HP-Cast-Iron-Finished-Bore-Sheave/p/100783283

PRODUCT DETAILS

  • 1 Groove
  • 3.95" Outside Diameter
  • A (4L) or B (5L) Belt Size
  • 1" Finished Bore
  • Made of Cast Iron
 
Last edited:

MarylandGuy

OPE Member
Local time
11:43 PM
User ID
11553
Joined
Jan 25, 2020
Messages
7
Reaction score
0
Location
Maryland
I wire wheeled the pulleys and they appear to be perfect. One thing I did notice, there was some pretty pronounced rust where the belt meets the pulley. So it's possible the protruding rust could have been cutting the belt. I was able to get that all cleaned up. At this point, I may put it all back together with the cleaned up pulleys and make sure the alignment is correct.

Oh, and I checked the bearings. The one off the engine I wasn't expecting any issues and I didn't find any play. The bearing on the shredder housing seemed perfect as well. No side to side free play. And it spun the shredder teeth quite easily spinning the shaft by hand. And no grinding noise from the bearing,

I know everyone likes pictures. If anyone would be interested in hosting a few photos of the cleaned up pulley, let me know.
 

alleyyooper

Pinnacle OPE Member
Local time
11:43 PM
User ID
8210
Joined
Dec 26, 2018
Messages
640
Reaction score
1,670
Location
Michigan.
I would be intrested in the pictures before and after the clen up.

Also wonder what/how you cleaned them up, what did you do to keep/prevent them rusting back up again?

:D Al
 

MarylandGuy

OPE Member
Local time
11:43 PM
User ID
11553
Joined
Jan 25, 2020
Messages
7
Reaction score
0
Location
Maryland
Unfortunately I didn't take a before shot. But rest assured the pulleys were totally rusted, with rust deposits laying on top, making the surface where the belt rides very rough. They now look like they just came out of the box, with no major pitting. That's why I decided to test them out instead of just replacing them.

If you private message me your email address, I'll send the four pics to you.

I used a stainless steel knotted wire wheel in my mini angle grinder to strip the rust. I was worried the wire would be too aggressive on the surface, but it actually worked perfectly. Took about ten minutes on each pulley. Of course I removed both pulleys beforehand, so if you leave your pulleys attached, it will take a little longer. Lastly, I used a fine steel wool on the 1" interior shaft. It wasn't too bad rust wise, just needed a little cleanup. Here is a link to the wire wheel:

https://www.harborfreight.com/4-inch-stainless-steel-knotted-wire-wheel-91281.html

It's funny that you mention rust proofing the cleaned up pulleys. I debated that point as well before I put everything back together. I decided to rub a thin layer of grease on the outsides and then wipe the surfaces clean, so as to not attract too much debris to the greased area. Obviously I couldn't do that where the belt rides in the pulley, so I sprayed CRC Belt dressing in that area. The dressing leaves somewhat of a sticky coating on the metal surface. Hopefully the composition deters rust buildup, until I get a chance to run the machine in a few weeks.

I figured if the belt dressing is designed to revive dried out belts, then hopefully it doesn't cause too much slippage when sprayed on the pulley. If the belt does slip, I can pretty easily take some brake cleaner to the area and then reinstall the belt.
 
Last edited:

MarylandGuy

OPE Member
Local time
11:43 PM
User ID
11553
Joined
Jan 25, 2020
Messages
7
Reaction score
0
Location
Maryland
Something I noticed the last time I had the machine running, the belt didn't seem like it had a great deal of tension. The machine worked well, with very little slippage, so maybe I was over thinking it. But if the belt never comes to the correct tension, I suppose it's possible that could shorten the life of the belt.

Since I determined that I did have the correct size belt based on Troy-Built's specs, I studied the pulley area a little closer when I put everything back together this time. I suspected the original 33 year old spring in the tensioner mechanism may have compressed a little over the years. I bought a new spring from a local hardware store that was the same width as the original, but slightly longer and slightly harder to compress.

If I matched the two springs side by side, the old one was definitely more compressed. The original spring had 19 coils. If I counted out 19 coils on the new spring, it was 1/2" longer. So I cut the new spring down to what I thought could have been the original length. I actually gave it one additional coil to to be safe.

Old Spring: 2-15/16 long (19 coils)
New Spring: 3-9/16 long (20 coils)

My new spring is now 5/8" longer. And you can tell it's putting a lot more pressure on the belt.

It will be a while before I have a chance to test out the machine. But hopefully cleaning up the pulleys and installing a new spring will fix the issue. If not, then I will move on to replacing the pulleys.
 

Mr_Leffe

OPE Member
Local time
8:43 PM
User ID
12710
Joined
May 25, 2020
Messages
4
Reaction score
0
Location
Corralitos Ca.
I wire wheeled the pulleys and they appear to be perfect. One thing I did notice, there was some pretty pronounced rust where the belt meets the pulley. So it's possible the protruding rust could have been cutting the belt. I was able to get that all cleaned up. At this point, I may put it all back together with the cleaned up pulleys and make sure the alignment is correct.

Oh, and I checked the bearings. The one off the engine I wasn't expecting any issues and I didn't find any play. The bearing on the shredder housing seemed perfect as well. No side to side free play. And it spun the shredder teeth quite easily spinning the shaft by hand. And no grinding noise from the bearing,

I know everyone likes pictures. If anyone would be interested in hosting a few photos of the cleaned up pulley, let me know.


So you never took the bearings out of the shredder body ?
 
Top