High Quality Chainsaw Bars Husqvarna Toys Hockfire Saws

Hybrid clonesaw 365 with a 390 topend - aka the "86'r from youtube"

Rich Fife

Sally slap my ass
Local time
10:06 AM
User ID
26245
Joined
Mar 4, 2023
Messages
979
Reaction score
2,139
Location
Central New York
Country flag
Good stuff man. This is a part of the reason why I joined this forum.
The other part, people aren't truly open about sharing the nitty gritty details of their port work... with that said, at least there are threads like yours that continue to peak my interests. Thank you.
Side note: if those turning tools are too thick, I can toss them in the mill and machine them to a specific thickness.
Those were for an AXA wedge style tool post
 

upstateamish

Super OPE Member
Local time
10:06 AM
User ID
17558
Joined
Jul 13, 2021
Messages
95
Reaction score
322
Location
upstate new york
Country flag
Good stuff man. This is a part of the reason why I joined this forum.
The other part, people aren't truly open about sharing the nitty gritty details of their port work... with that said, at least there are threads like yours that continue to peak my interests. Thank you.
No problem, glad to be able to contribute something worth reading!

I get why some people that sell port work want to keep specific things that work for them a bit secret (as it could cut into their margins or get leveraged by other porters.)

In my world, not everyone in my social circle is that into chainsaws (I know quite a shocker) but even those who are into chainsaws aren't into building the hybrid weird one off builds. Why hoard the info on the build process when I can share it?

I like working through challenges and solving puzzles and this is a great place to show off what I'm learning (and failing at) and who knows, may even help others who are dum...errr ambitious enough to do something similar.

The prototype 2 crank swap is interesting to me, once I get the air leak fixed on this one and dialed in a bit more. I'm excited to start another build another based on what I've learned.

I appreciate everyone that has read through the thread so far and provided insight and/or offered actionable feedback!

Side note: if those turning tools are too thick, I can toss them in the mill and machine them to a specific thickness.
Those were for an AXA wedge style tool post
Gotcha on those turning tools, the one I have is BXA I believe but I'll double check to confirm. Might be worth catching up to mill them but I may look at what an AXA quick change tool post runs and make that order. (would be a shame to mill them if that's the easier solution)
 

srcarr52

Shop rat, backyard slice cutter.
GoldMember
Local time
10:06 AM
User ID
522
Joined
Jan 12, 2016
Messages
4,126
Reaction score
27,067
Location
Iowa City
Country flag
Good stuff man. This is a part of the reason why I joined this forum.
The other part, people aren't truly open about sharing the nitty gritty details of their port work... with that said, at least there are threads like yours that continue to peak my interests. Thank you.
Side note: if those turning tools are too thick, I can toss them in the mill and machine them to a specific thickness.
Those were for an AXA wedge style tool post

They make XL tool holders that will hold 5/8" tooling in the AXA size.


Maintenance Chief

Disrupting the peace with an old chainsaw
Local time
10:06 AM
User ID
11378
Joined
Jan 4, 2020
Messages
3,974
Reaction score
12,848
Location
South Carolina
Country flag
No problem, glad to be able to contribute something worth reading!

I get why some people that sell port work want to keep specific things that work for them a bit secret (as it could cut into their margins or get leveraged by other porters.)

In my world, not everyone in my social circle is that into chainsaws (I know quite a shocker) but even those who are into chainsaws aren't into building the hybrid weird one off builds. Why hoard the info on the build process when I can share it?

I like working through challenges and solving puzzles and this is a great place to show off what I'm learning (and failing at) and who knows, may even help others who are dum...errr ambitious enough to do something similar.

The prototype 2 crank swap is interesting to me, once I get the air leak fixed on this one and dialed in a bit more. I'm excited to start another build another based on what I've learned.

I appreciate everyone that has read through the thread so far and provided insight and/or offered actionable feedback!


Gotcha on those turning tools, the one I have is BXA I believe but I'll double check to confirm. Might be worth catching up to mill them but I may look at what an AXA quick change tool post runs and make that order. (would be a shame to mill them if that's the easier solution)
I've been wondering what can be done with those cheap 58cc Chinese saws.
 

Outback

Super OPE Member
Local time
7:06 AM
User ID
2046
Joined
Oct 28, 2016
Messages
150
Reaction score
354
Location
Oregon
Country flag
This is going back to the beginning, but I was curious why you picked a 661 piston for your p1 saw. Was that what you gleaned from the tube was what ironhorse was using or was it just something you had lying around. I have a hard time watching his video's.
 

upstateamish

Super OPE Member
Local time
10:06 AM
User ID
17558
Joined
Jul 13, 2021
Messages
95
Reaction score
322
Location
upstate new york
Country flag
This is going back to the beginning, but I was curious why you picked a 661 piston for your p1 saw. Was that what you gleaned from the tube was what ironhorse was using or was it just something you had lying around. I have a hard time watching his video's.
No worries. The 390 piston has a larger wrist pin diameter which won't fit the 372 crank. The 661 is a 56mm piston with the right wrist pin diameter for the 372 crank and then can be turned down to 55 mm to fit the 390 cylinder.

The reason I used it in my 1st build was that I had one on hand & Since I wanted to see if I could replicate his build. There's some obvious improvements that could be made if one goes that route (more weight off the piston, a OEM sthil light weight wrist pin, etc.
 

upstateamish

Super OPE Member
Local time
10:06 AM
User ID
17558
Joined
Jul 13, 2021
Messages
95
Reaction score
322
Location
upstate new york
Country flag
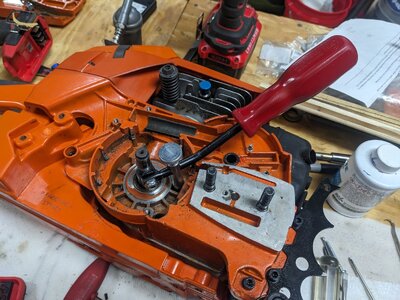
The seal removal tool showed up today and it's a good thing they sent two replaceable tips (which I say 'because I broke one trying to get it under the seal lip.) So I filed down the side profile on the 2nd and was successfully able to sneak it around the seal edge & pop things out
PXL_20250314_234010476.jpg

After I got the seal out I polished up the sleeve a bit and buttoned things back up. Added a very small amount of sealent at the base of the crank shaft (where the crank sleeve seets) and the edge of the seal where it seats into the case. In theory I've got things buttoned back up but waiting for the sealent to cure & I'll test things in the morning to see if/how it runs.
 
Last edited:

Outback

Super OPE Member
Local time
7:06 AM
User ID
2046
Joined
Oct 28, 2016
Messages
150
Reaction score
354
Location
Oregon
Country flag
Thanks, I think I'm in the same spot. I have a 661 piston and an extra xt on the shelf im not using. I have an xp and xpw so that would round out the group.
 

Rich Fife

Sally slap my ass
Local time
10:06 AM
User ID
26245
Joined
Mar 4, 2023
Messages
979
Reaction score
2,139
Location
Central New York
Country flag
The seal removal tool showed up today and it's a good thing they sent two replaceable tips (which I say 'because I broke one trying to get it under the seal lip.) So I filed down the side profile on the 2nd and was successfully able to sneak it around the seal edge & pop things out
View attachment 453883
 

Attachments

  • 20250305_082957.jpg
    20250305_082957.jpg
    113.3 KB · Views: 13
  • 20250305_083012.jpg
    20250305_083012.jpg
    82 KB · Views: 13

upstateamish

Super OPE Member
Local time
10:06 AM
User ID
17558
Joined
Jul 13, 2021
Messages
95
Reaction score
322
Location
upstate new york
Country flag
These seal removal tools make it easy and fast.

Nice, everything is much easier with the right tool and that tool would be quite handy (I'll have to think about something like that if I do a lot of these.)

I unfortunately had to attend a funeral of a good friend's father this weekend. So I wasn't able to do much prior to leaving, but I confirmed the saw started and I was messing around with the idle (Still learning where things sit with this carb) tweaked the low carb jet and flooded it out. Then I was out of time and had to leave so I pulled the spark plug and let it sit. When I got back this afternoon, reset the carb, started it up and I think I've got it tuned a bit better. I'll throw a bar and chain on it and depending on the weather this week, try and get it in the wood to continue tuning and get some cutting videos.
 

Woodwackr

Here For The Long Haul!
GoldMember
Local time
8:06 AM
User ID
28333
Joined
Jan 18, 2024
Messages
3,511
Reaction score
16,232
Location
ID
Country flag
You basically screw the body into the seal, then turn the t-handle (it should line up with the center hole on the crank) it should pull the seal out with ease.
I guess I’d have to see it work…
 

upstateamish

Super OPE Member
Local time
10:06 AM
User ID
17558
Joined
Jul 13, 2021
Messages
95
Reaction score
322
Location
upstate new york
Country flag
So I got things running yesterday afternoon and initially it was solid, then fell apart. Went from strong steady idle holding steady cut. After a few cuts it went to poor idle / high revving in the cut. When that happened (more than once) I stopped but even so I think I may have taken some damage. (just not sure yet how much yet.)

Over lunch today I pulled things down to see what I could see. On the exhaust side, the piston looks good (well as good as my machining is I suppose) but I do see a mark on the intake side cylinder wall (looking in through the exhaust) I'll have to pull the cylinder to see how bad things are.

pulled the flywheel/clutch and blocked off the exhaust/intake to do a pressure test (won't hold vacuum at this point) and was able to confirm there's an air leak around the clutch side crank sleeve (from what I could see with the oil pump still on). Then ran out of time, hopefully I'll be able to dig into things a bit more tonight to see how extensive the damage is.

But I think I'm on the right track with the custom crank sleeve and once I pull the oil pump I'll be able to see where exactly the leaks are occurring & figure out some next steps.

And because I'm a glutton for punishment I have started ordering parts for prototype #3 (with a 390 crank bottom end)
 
Top