High Quality Chainsaw Bars Husqvarna Toys Hockfire Saws

Husky 2100 - stripped hole, repair issue

drf256

Dr. Richard Cranium
GoldMember
Local time
6:18 PM
User ID
319
Joined
Dec 29, 2015
Messages
9,499
Reaction score
62,180
Location
Strong Island NY
Country flag
Jeez, that’s a headache. Annoying to weld as well as it’s near and edge and will be hard to get perfectly clean.

They often cast in thicker metal where screw holes will go. You’re getting really close to the edge there, I’d be careful not to tighten your insert up and crack the tank. A good application for Loctite.

The fact that it goes into the oil tank shouldn’t matter much. Many Husky’s have screws that enter the tank.
 

BuffaloBill

Well-Known OPE Member
Local time
5:18 PM
User ID
20843
Joined
Nov 27, 2021
Messages
26
Reaction score
100
Location
Wisconsin
Country flag
I agree with dr, about since it’s only the oil tank on the backside of this area, the risk of a leak isn’t bad at all. In fact maybe I would purposely drill through into the oil tank, to allow the insert to be greater in length, with that much more thread engagement. More threads for loctite to bond to and allows use of a standard tap.

And on the welding topic, I’m no certified welder and have zero experience welding magnesium. But have TIG welded aluminum since 1991. That’s probably a high quality cast part.(?). But if a cast part, it’s still apt to hold impurities that come out of the material in to the weld pool, trying to mess up your work. It helps cook out the years of oil absorbed in pores and cracks, by performing a bake out in an oven, and cleaning beforehand and afterwards with acetone. Do that a few times until after the previous bake out, there’s no longer any visual evidence of oil coming out. Like is done before powdercoating. Then weld it.

But to avoid all that work and risk of still ending up with an imperfect weld, I’d vote for the insert route.
 

srcarr52

Shop rat, backyard slice cutter.
GoldMember
Local time
6:18 PM
User ID
522
Joined
Jan 12, 2016
Messages
4,075
Reaction score
26,746
Location
Iowa City
Country flag
Those tank halfs are glued together. Chances are with the heat you'll need to fill in that hole you'll burn the glue out of the seam causing an oil leak. It's probably best just finding a used tank.
 

hacskaroly

Pinnacle OPE Member
Local time
3:18 PM
User ID
27954
Joined
Nov 24, 2023
Messages
895
Reaction score
2,771
Location
Northern Idaho
Country flag
n fact maybe I would purposely drill through into the oil tank, to allow the insert to be greater in length, with that much more thread engagement. More threads for loctite to bond to and allows use of a standard tap.
I like this idea, makes sense probably the route I am most likely headed at this point. As for welding, I took a college class in the mid 90s on welding and had a great time with it, except for the time I was TIG welding with a hole in my glove and picked up a hot piece of metal...I want to get back into it, just need to get a welder first.
Those tank halfs are glued together. Chances are with the heat you'll need to fill in that hole you'll burn the glue out of the seam causing an oil leak. It's probably best just finding a used tank.
Good to know about the halves glued together, looks to be welded, but with the paint on top it was just a guess. Unfortunately this is my second tank (eBay), the first one it came with had a broken rear handle, looks like someone dropped it rear end down or dropped something heavy on it. At this point, no harm in attempting a full through insert like @BuffaloBill suggests. If it works, great, if not oh well, its a learning experience and I can part out all of the little pieces off of the tank and sell them for $$$ on eBay...:D

I truly appreciate everyone's input and comments I have learned quite a bit from all this!!
 

WI_Hedgehog

Super OPE Member
Local time
5:18 PM
User ID
27428
Joined
Sep 8, 2023
Messages
355
Reaction score
917
Location
Milwaukee, Wisconsin, U.S.A.
Country flag
There is possibly another option (mind you I'm not an expert on the subject):

Grind out any cracks and rough edges in the existing holes (they lead to stress fractures). Make everything have rounded surfaces.

Metal-epoxy the tank closed, then use a tank sealer coating like discussed in other threads.

Beat a metal fender washer (on a wood block with a hammer) to conform to the curve of the frame.

Super-glue a nut to a metal fender washer (just to hold the two together), then stack a somewhat flexible plastic washer on that (but not permanently adhere it). Use a hand grinder to thin the nut enough so the nut/metal_washer/plastic_washer stack fits in the opening. (the stack will heat up while grinding so you don't want the plastic washer on the stack while grinding).

Slide the stack in with a needle-nose pliers and bolt the handle on.

The plastic washer will absorb some of the deformation between the metal washer and the metal frame and also absorb some shock. The washers in combination will spread the load over a larger area, reducing stress over-all, hopefully avoiding a future metal failure.
 

Yukon Stihl

Pinnacle OPE Member
Local time
3:18 PM
User ID
508
Joined
Jan 11, 2016
Messages
1,089
Reaction score
4,042
Location
Great White North
Country flag
You could fish a bolt in through the tank and use a nut to hold the handle to the bolt,like a bar stud.
If all else fails,glue the bolt in with "The Right Stuff" to keep it from leaking.
 

drf256

Dr. Richard Cranium
GoldMember
Local time
6:18 PM
User ID
319
Joined
Dec 29, 2015
Messages
9,499
Reaction score
62,180
Location
Strong Island NY
Country flag
Probably easier to tap for a short stud. Add sealant. Then just flex the bar over it. At least if the nut comes loose it won’t be in the tank.
 

hacskaroly

Pinnacle OPE Member
Local time
3:18 PM
User ID
27954
Joined
Nov 24, 2023
Messages
895
Reaction score
2,771
Location
Northern Idaho
Country flag
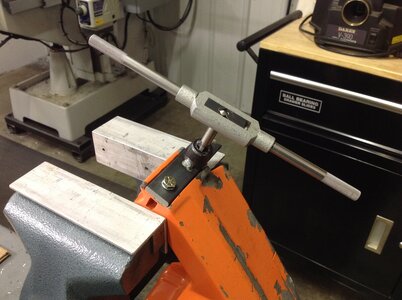
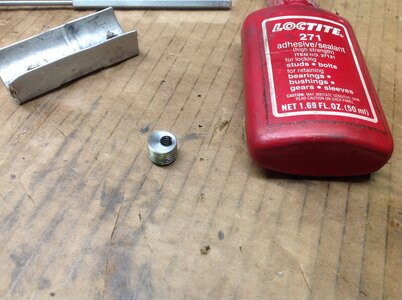
Good news, @BuffaloBill offered to help me out with this fix. I sent him the tank and he was able to clean up the threads on the hole, create a custom insert, get it lined up and sealed in!

Custom jig to ensure straight threading!

Tap Tool.jpeg

Custom replacement insert. Since the original repair offset the hole, Bill had to use math and micrometers to make sure the new bar screw hole was in the right spot!

Insert.jpeg

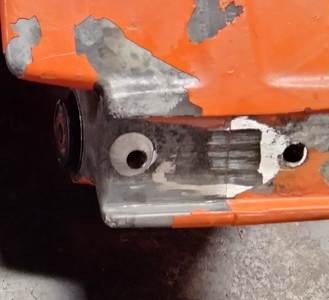
The final result was the new plug sealed in place with the handle bar hole lined up perfectly! I am VERY happy with how it turned out, Bill did a great job with this (Big thanks to @BuffaloBill)! If it was up to me to fix, I would still be sweating it out trying to figure out how I would do this without proper tools... :D

2100 Tank 01 Closeup.png

I ordered a felling dog with the AV mount and it arrived while the tank was out. I matched it up to my old tank and it fit fine, however when the repaired tank arrived back, I found that the AV mount did not fit it and then realized the one difference between the two tanks, one has a flat face at the front handle mount and the other has a lip.

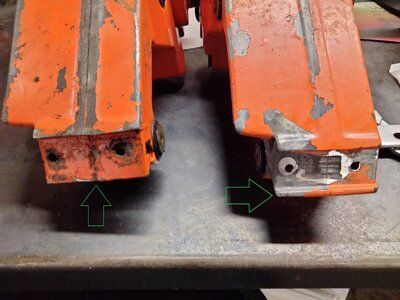
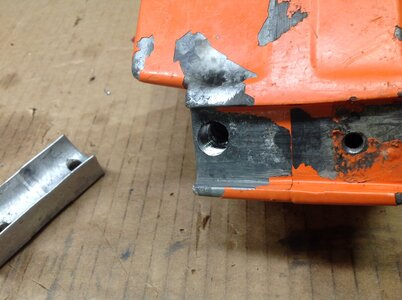
Old tank on the left with the flat face and the newer tank on the right with the lip. For those who know 2100s, did they make one type up until a certain year and change or is maybe the right on a 2101 tank? Like I said, except for that lip, the rest of the tank is identical.

2100 Tank 01a.jpg

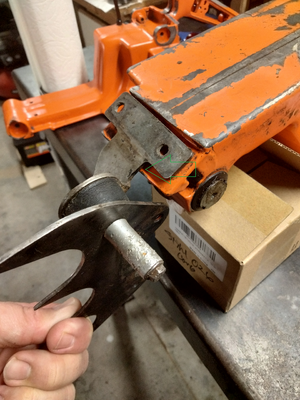
As shown with the green arrow below, the AV mount hits the lip. Do you think there would be an issue using a Dremmel to notch out a slot for the AV mount to fit or is there possibly a different mount style for this style tank?

2100 AV Mount 01.png
 

Chainmale

Super OPE Member
GoldMember
Local time
12:18 PM
User ID
14057
Joined
Oct 6, 2020
Messages
184
Reaction score
415
Location
Tasman New Zealand
Country flag
Good news, @BuffaloBill offered to help me out with this fix. I sent him the tank and he was able to clean up the threads on the hole, create a custom insert, get it lined up and sealed in!

Custom jig to ensure straight threading!

View attachment 408977

Custom replacement insert. Since the original repair offset the hole, Bill had to use math and micrometers to make sure the new bar screw hole was in the right spot!

View attachment 408978

The final result was the new plug sealed in place with the handle bar hole lined up perfectly! I am VERY happy with how it turned out, Bill did a great job with this (Big thanks to @BuffaloBill)! If it was up to me to fix, I would still be sweating it out trying to figure out how I would do this without proper tools... :D

View attachment 408979

I ordered a felling dog with the AV mount and it arrived while the tank was out. I matched it up to my old tank and it fit fine, however when the repaired tank arrived back, I found that the AV mount did not fit it and then realized the one difference between the two tanks, one has a flat face at the front handle mount and the other has a lip.

Old tank on the left with the flat face and the newer tank on the right with the lip. For those who know 2100s, did they make one type up until a certain year and change or is maybe the right on a 2101 tank? Like I said, except for that lip, the rest of the tank is identical.

View attachment 408980

As shown with the green arrow below, the AV mount hits the lip. Do you think there would be an issue using a Dremmel to notch out a slot for the AV mount to fit or is there possibly a different mount style for this style tank?

View attachment 408986
Wow. Nice work @BuffaloBill
I wonder if the one with the lip is for the rubber front av mount, and the other ones for the spring one?
 

srcarr52

Shop rat, backyard slice cutter.
GoldMember
Local time
6:18 PM
User ID
522
Joined
Jan 12, 2016
Messages
4,075
Reaction score
26,746
Location
Iowa City
Country flag
Good news, @BuffaloBill offered to help me out with this fix. I sent him the tank and he was able to clean up the threads on the hole, create a custom insert, get it lined up and sealed in!

Custom jig to ensure straight threading!

View attachment 408977

Custom replacement insert. Since the original repair offset the hole, Bill had to use math and micrometers to make sure the new bar screw hole was in the right spot!

View attachment 408978

The final result was the new plug sealed in place with the handle bar hole lined up perfectly! I am VERY happy with how it turned out, Bill did a great job with this (Big thanks to @BuffaloBill)! If it was up to me to fix, I would still be sweating it out trying to figure out how I would do this without proper tools... :D

View attachment 408979

I ordered a felling dog with the AV mount and it arrived while the tank was out. I matched it up to my old tank and it fit fine, however when the repaired tank arrived back, I found that the AV mount did not fit it and then realized the one difference between the two tanks, one has a flat face at the front handle mount and the other has a lip.

Old tank on the left with the flat face and the newer tank on the right with the lip. For those who know 2100s, did they make one type up until a certain year and change or is maybe the right on a 2101 tank? Like I said, except for that lip, the rest of the tank is identical.

View attachment 408980

As shown with the green arrow below, the AV mount hits the lip. Do you think there would be an issue using a Dremmel to notch out a slot for the AV mount to fit or is there possibly a different mount style for this style tank?

View attachment 408986

Awesome work!

You can grind that whole lip off if you'd like. This bracket was mounted below on 1/2 wrap saws with an aluminum spacer between that fit into the groove on the handle.
 

hacskaroly

Pinnacle OPE Member
Local time
3:18 PM
User ID
27954
Joined
Nov 24, 2023
Messages
895
Reaction score
2,771
Location
Northern Idaho
Country flag
You can grind that whole lip off if you'd like. This bracket was mounted below on 1/2 wrap saws with an aluminum spacer between that fit into the groove on the handle.
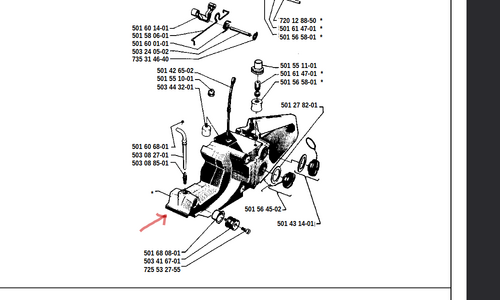
I have the aluminum spacer, luckily it came with the handle I bought. Looking through IPLs, I wonder if the tank is instead a 298 tank as the IPL shows it with the lip.
298 Fuel Tank.png
But then again now that I look at this, there isn't a manual oiler in this image, so many close variations. Either way, looks like I will be knocking off that lip.
 

BuffaloBill

Well-Known OPE Member
Local time
5:18 PM
User ID
20843
Joined
Nov 27, 2021
Messages
26
Reaction score
100
Location
Wisconsin
Country flag
Thanks, I was happy to do so. I have to admit that from the original pictures, I didn’t realize that there was an internal structure complicating the drilling/tapping operation.

The shape of the tank made it impractical to fixture on the mill, or so I thought anyway. But since there was the second non-damaged threaded hole, I used that to attach the quick hack of a drill/tap guide. I first drilled a 7/16” hole through the fixture, and ran an end mill of same size in a cordless drill, to enlarge and straighten out the bore in the tank. In that situation an endmill will try to screw itself deep in the hole, so chucked the endmill deep in the cordless chuck to prevent making the hole too deep, etc.

Then removed and re-chucked the guide in the lathe, opening it up to 1/2” so the tap would pass through. I made the insert from a chunk of 1/2-20 threaded rod. My bottle of Loctite 271 is quite old. I’m hoping it still bonds well!

The resulting tapped hole has deep threads on one side but only 1/8” or so depth on the other. The insert seemed to tighten up well against the bottom of threads, so am hoping that and the Loctite will keep it in place. The insert stood proud of the tank surface by about .025”, so I used the guide with a cordless drill-chucked 1/2” end mill to take it down flush.
image.jpeg
 
Top