High Quality Chainsaw Bars Husqvarna Toys Hockfire Saws

First time modifying a cylinder

STOVE

Well-Known OPE Member
Local time
8:42 AM
User ID
34149
Joined
Aug 29, 2025
Messages
115
Reaction score
300
Location
Eastern NC
Country flag
I am getting ready to start a 290-390 conversion.

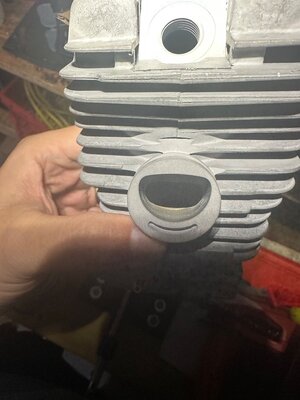
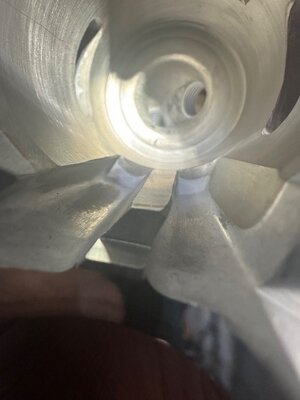
The Dukes cylinder that showed up has a few things that need to be addressed. However for the price i am very satisfied. Below are a few of the items that i was hoping to massage.

There is a slight lip all the way around the intake port. Can I use files and gradual grit sandpapers to clean this up?

The exhaust port needs a polish and edges cleaned up. Will polish this with a dremel. I don’t know if the shape is optimal however I will take off any lip or rough edge with some file and sandpaper work

The transfers have very sharp and somewhat uneven edges on one side. Will likely use small finger length files to round off these sharp edges.

Am I being too ambitious here in thinking I can use metal files? I am worried with it being my first time I will take away too much material attempting to use the dremel. Any help would be appreciated. I do have a Poulan 40cc jug I planned on practicing on with the files first.
 

hacskaroly

2100 Fanclub Member
Yearly GoldMember
Local time
5:42 AM
User ID
27954
Joined
Nov 24, 2023
Messages
2,836
Reaction score
9,183
Location
Northern Idaho, Ehh
Country flag
I would think it would be too easy to take too big of a bit with a file than it would be to use a Dremel or other spinny tool. Might be able to use really fine grit sand paper (1200 or 1600) and lightly work around the edges to smooth them. That's just my though though. I have only used sand paper, green scotchbrite and brake hones in cylinders (only cleanup, no modifications).
 

EFSM

Pinnacle OPE Member
Local time
7:42 AM
User ID
29079
Joined
Apr 30, 2024
Messages
1,010
Reaction score
2,429
Location
Extreme southern IL
Country flag
That lip is likely the cylinder plating intruding into the port. Some people have had trouble with the plating peeling off after modifying the ports. I have no experience with aftermarket cylinders, which I am fine with.
To your question: use a Dremel with a diamond cylindrical shaped bit (there are assortments available for cheap on Amazon or eBay) to take the burr off and then a ball or egg shaped to put the bevel/chamfer back on. I always finish with 600 or 1000 grit sandpaper though. https://www.amazon.com/Grinding-Dia...-2-spons&sp_csd=d2lkZ2V0TmFtZT1zcF9hdGY&psc=1
 

legdelimber

Pinnacle OPE Member
Local time
8:42 AM
User ID
8391
Joined
Jan 14, 2019
Messages
712
Reaction score
1,768
Location
N.C.
Country flag
Nail Files?
I've grabbed the metal ones at a Dollar store and used them to touch up kitchen knifes, rough edges on drinking glasses, etc.
You have to watch out for the abrasive plating, peeling or flaking off.
Could be pretty bad to have a flake of it to get lost in a cylinder.
 

MAF143

Super OPE Member
Local time
8:42 AM
User ID
16099
Joined
Mar 30, 2021
Messages
187
Reaction score
679
Location
North Central Ohio
Country flag
I've used small diamond file sets that have different curvy shapes to take plating ridges off ports and chamfer the port edges. I've gotten them at Menards and Harbor Freight. they come in a 4 or 5 pack with 5" or so handles with different shaped diamond filing surfaces about an inch or so long.


STOVE

Well-Known OPE Member
Local time
8:42 AM
User ID
34149
Joined
Aug 29, 2025
Messages
115
Reaction score
300
Location
Eastern NC
Country flag
I have been doing LOTS of reading on here and AS in prep for this build.

@Mastermind has a great thread on this and I am going to use some if not all of what he did as a blueprint. He widened the exhaust to 68% of the bore. Which would be 33.3mm.

Is that 33mm dimension a straight line across or a curved portion of the circumference of the piston?

What is the best way to make that before grinding? Mark it on a piston slide it in, start removing, and check every so often? Or draw it inside the jug with marker somehow?

He also increased duration by 10 degrees, if I am understanding that is making the intake floor deeper but not wider. How do you determine how much material to remove to get 10 degrees of duration?
 

STOVE

Well-Known OPE Member
Local time
8:42 AM
User ID
34149
Joined
Aug 29, 2025
Messages
115
Reaction score
300
Location
Eastern NC
Country flag
Continuing my prep for this conversion. I put a piece of cardstock in the jug and traced the existing ports for size and shape.

Exhaust is 27.7mm
Intake is 25.4mm

The second photo is my thought on how much to grind away. The exhaust won’t have much straight on the sides if I want the top and bottom to maintain some arch for ring health

The intake is throwing me off some. I understand you want to try and match the volume to the exhaust. But I don’t have much meat left to take away where the boot mounts.

IMG_1377.jpeg
IMG_1379.jpegIMG_1384.jpeg
 

Shane¹

Pinnacle OPE Member
Local time
8:42 AM
User ID
15023
Joined
Dec 21, 2020
Messages
1,618
Reaction score
4,766
Location
Kentucky
Country flag
You only want to widen on the cylinder side then blend it to the same shape it currently is at the intake and exhaust ports
 

STOVE

Well-Known OPE Member
Local time
8:42 AM
User ID
34149
Joined
Aug 29, 2025
Messages
115
Reaction score
300
Location
Eastern NC
Country flag
I wouldn't modify the intake. That's not what's holding this saw back. Make sure you give it a generous muffler mod; this is where the saws are hamstrung from new.
There is a pronounced lip on the bottom portion of the intake, would you take it out?
 

Sloughfoot

Pinnacle OPE Member
Yearly GoldMember
Local time
5:42 AM
User ID
26879
Joined
Jun 7, 2023
Messages
1,553
Reaction score
4,481
Location
Norcal
Country flag
That lip on the intake looks about like 10 degrees or more of duration. The 10 degrees Randy advises likely starts with it gone. If you just have to go at it and get what you get now, chamfer all edges, take that lip off the intake, remove humps and bumps in the transfers, widen exhaust to 1/16 of piston skirt,take bottom of lower transfer to within 1/8 of cylinder bottom. Cross your fingers and light it.

Also, get some carbide smaller toothed oval burrs. Files and diamond burrs are fine for chamfering edges but will take a bunch of them and a bunch of time to remove a fair amount of material like you're wanting to do.
 
Last edited:

EFSM

Pinnacle OPE Member
Local time
7:42 AM
User ID
29079
Joined
Apr 30, 2024
Messages
1,010
Reaction score
2,429
Location
Extreme southern IL
Country flag
There is a pronounced lip on the bottom portion of the intake, would you take it out?
I would compare it to an original and see what the timing should be. If there is a little plating lip, then that could be removed. but lowering the exhaust port can increase spitback through the carburetor and at some point will reduce crankcase compression.
 

STOVE

Well-Known OPE Member
Local time
8:42 AM
User ID
34149
Joined
Aug 29, 2025
Messages
115
Reaction score
300
Location
Eastern NC
Country flag
The jug kit came with a set of pins, the pop up did as well. What is the difference in shapes?

From what I understand the OEM Stihl clips don’t stay in the aftermarket pistons very well.

IMG_1385.jpeg
 
Top