


You are using an out of date browser. It may not display this or other websites correctly.
You should upgrade or use an alternative browser.
You should upgrade or use an alternative browser.
Wild Thing Hack-up
- Thread starter Ketchup
- Start date
- Local time
- 2:23 AM
- User ID
- 360
- Joined
- Dec 31, 2015
- Messages
- 22,536
- Reaction score
- 143,439
- Location
- East Jordan, MI
And yet both are rated 3 for air qualityHere’s my dumpster saw (older non-strato):
View attachment 287242
And here’s my Strato:
View attachment 287241
The newer saw has more than twice the durability period. Did the manufacturer actually improve something that makes an aluminum bore last longer? Or did the EPA require a longer durability period, so they changed the number?
Nutball
Here For The Long Haul!
- Local time
- 1:23 AM
- User ID
- 7732
- Joined
- Oct 31, 2018
- Messages
- 4,042
- Reaction score
- 11,037
- Location
- Mt. Juliet, TN
Beats an ms170 which gets a 10/10 for air quality. I wonder how many hours they get?
- Local time
- 2:23 AM
- User ID
- 360
- Joined
- Dec 31, 2015
- Messages
- 22,536
- Reaction score
- 143,439
- Location
- East Jordan, MI
I was just comparing an old-school version versus the supposedly cleaner burning stratoBeats an ms170 which gets a 10/10 for air quality. I wonder how many hours they get?
Nutball
Here For The Long Haul!
- Local time
- 1:23 AM
- User ID
- 7732
- Joined
- Oct 31, 2018
- Messages
- 4,042
- Reaction score
- 11,037
- Location
- Mt. Juliet, TN
I know. So my poulan blower says 50hrs 3/10, it appears to have a chrome bore, 201tc says 50hrs, 2511t & 490 say 300hrs, 550mkII 300hrs.
Ketchup
Epoxy member
- Local time
- 12:23 AM
- User ID
- 5594
- Joined
- Mar 12, 2018
- Messages
- 1,808
- Reaction score
- 5,142
- Location
- Colorado
Welp, she fired on about the 30th or so pull. I had several moments of doubt there. It didn’t pull over very hard.
But it finally popped and with a little carb tweaking I got some cookies cut.
The truth is, I’m not satisfied. The compression doesn’t seem high enough. I can’t lean on it like I want to, and after a long cut the carb surges. Also, the oiler wasn’t working.
So I tore it back down. Checked my numbers. They’re right.

Ex 103, Trans 121, Intake 69
Insides don’t look too bad. Piston wash is slightly uneven. There’s a tiny bit of transfer around the transfer uppers. But it’s a trash jug. I assume the bore is slightly uneven.


I’m going to sleep on it, but I think I’ll take off another 20 thousandths. That should bring the exhaust down to 105ish. I’ll raise the transfers back to 121. With the exhaust matched piston I think a shorter blowdown will be fine and hopefully buy me some more torque. I think I’ll tighten squish some more as well. Not much time left on this build!
But it finally popped and with a little carb tweaking I got some cookies cut.
The truth is, I’m not satisfied. The compression doesn’t seem high enough. I can’t lean on it like I want to, and after a long cut the carb surges. Also, the oiler wasn’t working.
So I tore it back down. Checked my numbers. They’re right.
Ex 103, Trans 121, Intake 69
Insides don’t look too bad. Piston wash is slightly uneven. There’s a tiny bit of transfer around the transfer uppers. But it’s a trash jug. I assume the bore is slightly uneven.
I’m going to sleep on it, but I think I’ll take off another 20 thousandths. That should bring the exhaust down to 105ish. I’ll raise the transfers back to 121. With the exhaust matched piston I think a shorter blowdown will be fine and hopefully buy me some more torque. I think I’ll tighten squish some more as well. Not much time left on this build!
Attachments
Ketchup
Epoxy member
- Local time
- 12:23 AM
- User ID
- 5594
- Joined
- Mar 12, 2018
- Messages
- 1,808
- Reaction score
- 5,142
- Location
- Colorado
I put some more time into this between other projects. I cut another 0.025” off the base and sanded the pockets.

I brought the squish in as tight as I felt would run. That widened the band as well, so compression feels better now.
I got it all sealed up and was moving along happily. Then this happened.

The threads completely gave up on one cylinder corner. In true hatchet style, I just ground the flange enough to fit a nut and tightened it down.

I advanced the timing about that much. My intake is at 72 now so I thought a little ignition advance might be in order.
I also fixed the oiler, made a dawg and modded a bar to fit. The saw really seems better now. It pulls over harder, starts easier, and doesn’t have the bog it had before. I haven’t really had it in wood yet though. That’s tomorrow.


I brought the squish in as tight as I felt would run. That widened the band as well, so compression feels better now.
I got it all sealed up and was moving along happily. Then this happened.
The threads completely gave up on one cylinder corner. In true hatchet style, I just ground the flange enough to fit a nut and tightened it down.
I advanced the timing about that much. My intake is at 72 now so I thought a little ignition advance might be in order.
I also fixed the oiler, made a dawg and modded a bar to fit. The saw really seems better now. It pulls over harder, starts easier, and doesn’t have the bog it had before. I haven’t really had it in wood yet though. That’s tomorrow.
Ketchup
Epoxy member
- Local time
- 12:23 AM
- User ID
- 5594
- Joined
- Mar 12, 2018
- Messages
- 1,808
- Reaction score
- 5,142
- Location
- Colorado
I agree, stock intake was 76. The AM cylinder was 61 before grinding. Total garbage.
I wanted to hold as much case pressure as possible, so the first grinding I kept the Mixed intake really conservative. But surprisingly the saw was a little fat at 69.
Another factor is I’m at 5,400’. So I have air problems. When I went back in I raised the piston skirt to 72 and lowered the transfer floors to 76 (cold air is 4 degrees ahead of mixed). The Mixed air is matched to the port, so it’s wide open as soon as it cracks.
I haven’t really done any carb tuning yet. Right now it’s fat. Hopefully that will help the torque in bigger cuts.
Edit: I also don’t find smaller displacements saws like as much intake duration in general. I don’t think the pistons are big enough to generate the same level of case pressure and transfer velocity. Below 50cc the 100/120/80 baseline doesn’t seem to work anymore.
Last edited:
Ketchup
Epoxy member
- Local time
- 12:23 AM
- User ID
- 5594
- Joined
- Mar 12, 2018
- Messages
- 1,808
- Reaction score
- 5,142
- Location
- Colorado
https://youtu.be/MFf9YQZyOLk
For Sale: Ported Wild Thing: 5hrs left!
I posted this vid in the build-off thread as well. I still haven’t found the tune and my bar and chain seems to be creating some extra friction. But for now my patience is worn through. If this saw had a chrome bore I would keep hammering on it, but every time I start it I worry it might be the end.
Right now I would guess this saw would hang with a ported 201. It’s relatively fun to cut with and it gets a laugh. I guess that’s good enough.
I do think there is more in there. After some tuning and a better bar, case stuffers and a better carb are the first things I would try. An air injected carb box has promise too. And @Nutball got me kind of excited about boring the jug and sleeving it at a larger bore.
Here’s my notes from the build. Maybe it will be helpful for someone.

I might come back to this saw some time. If there are new developments I’ll try to
post them. Any and all are welcome to Hijack this thread with there own Wild Thing adventures.
Cheers for now!

For Sale: Ported Wild Thing: 5hrs left!
I posted this vid in the build-off thread as well. I still haven’t found the tune and my bar and chain seems to be creating some extra friction. But for now my patience is worn through. If this saw had a chrome bore I would keep hammering on it, but every time I start it I worry it might be the end.
Right now I would guess this saw would hang with a ported 201. It’s relatively fun to cut with and it gets a laugh. I guess that’s good enough.
I do think there is more in there. After some tuning and a better bar, case stuffers and a better carb are the first things I would try. An air injected carb box has promise too. And @Nutball got me kind of excited about boring the jug and sleeving it at a larger bore.
Here’s my notes from the build. Maybe it will be helpful for someone.
I might come back to this saw some time. If there are new developments I’ll try to
post them. Any and all are welcome to Hijack this thread with there own Wild Thing adventures.
Cheers for now!
smokey7
Pinnacle OPE Member
- Local time
- 2:23 AM
- User ID
- 761
- Joined
- Feb 3, 2016
- Messages
- 1,538
- Reaction score
- 3,554
- Location
- Detroit
Right now I think you win the contest with a dam good running saw after all that work. I don't think many of us would ever go that far with one
I have a 3314 here that I have a stupid amount of time into it. It runs dam good except its still a throw away saw. Odd as it be i have another 3314 and I think a poulan 250 handheld blower thats been running 100:1 saber for a few years now. Both are non plated bores and even 100:1 tuned really sharp /right on the edge of a burn down tune and top ends are just fine.
I have a 3314 here that I have a stupid amount of time into it. It runs dam good except its still a throw away saw. Odd as it be i have another 3314 and I think a poulan 250 handheld blower thats been running 100:1 saber for a few years now. Both are non plated bores and even 100:1 tuned really sharp /right on the edge of a burn down tune and top ends are just fine.
- Local time
- 1:23 AM
- User ID
- 1377
- Joined
- Jun 5, 2016
- Messages
- 31,070
- Reaction score
- 194,202
- Location
- Northwoods of Wisconsin
The Purple shirt really shows the commitment here.
merc_man
merc_man
- Local time
- 2:23 AM
- User ID
- 933
- Joined
- Feb 24, 2016
- Messages
- 4,952
- Reaction score
- 21,578
- Location
- southern ontario
His purple sweater and bright green gloves and helmet matched the saw perfectly.The Purple shirt really shows the commitment here.
Sent from my SM-G950W using Tapatalk
- Local time
- 1:23 AM
- User ID
- 1377
- Joined
- Jun 5, 2016
- Messages
- 31,070
- Reaction score
- 194,202
- Location
- Northwoods of Wisconsin
His purple sweater and bright green gloves and helmet matched the saw perfectly.
Sent from my SM-G950W using Tapatalk
#WildMan
Nutball
Here For The Long Haul!
- Local time
- 1:23 AM
- User ID
- 7732
- Joined
- Oct 31, 2018
- Messages
- 4,042
- Reaction score
- 11,037
- Location
- Mt. Juliet, TN
How long did it take to sand the pockets? What rpm? Were there issues with the sand paper loading up?I thought I’d do a write up of my experience trying to build a Wild Thing for the buildoff.
Not long after @Stump Shot announced the Wild Thing build off I found PA Dan’s thread on AS. Dan made it seem like the Wild Thing had potential.
And I thought it would be fun to do a no consequence port job. I’ve wanted to crack the nut of clamshell porting and had several marginal ideas I wanted to try.
So I asked around and it turned out my buddy Bill had one in a back room. He said it ran and gave it to me. He’s pretty great like that. He even fished a second one out of a dumpster for me. So he cleared his shelf and mine filled up. I like to see orange in my shop. Neon green and purple just looks weird.
View attachment 286989
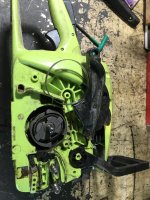
So I started into the “runner”. (That’s the right one, strato version.) On start up I discovered it wouldn’t cut the cheese, much less wood. Normally I would spend more time diagnosing, but I really just wanted to get into it, so I stripped it down and pulled numbers.
View attachment 286991
Stock: 106ex, 128trans, 75ntk
And, it was scored. Since these are aluminum bore with a chromed piston, scoring means a whole new top end.
I bought an aftermarket kit for $36. I feel ripped off. The ports were very rough and irregular, Piston quality was low.
AM kit: 108ex, 126trans, 62ntk(!)
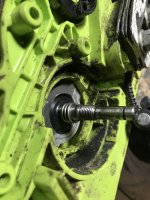
View attachment 286990
I measured squish 5 times. 0.044” was the tightest spot. The band was so irregular that several places it wouldn’t compress braided 0.042” solder. The average squish was around 0.058”.
View attachment 286992
0.060” Base cut.
It’s a clammy so I had to devise some way to raise the bearing pockets 60 thousandths as well.
View attachment 286993
This is a mandrel cut to fit the bearing pockets with 100 grit sticky sand paper on it. It needed a keyway cut into it so the ends of the paper would be tucked out of contact. I skipped that part and it ended up costing me a lot of time because the paper kept peeling. 60 thousandths is a lot to sand away at low speed. Going slow isn’t all bad though. I made a guide the same diameter as the bearings and checked it many times. I sanded the final 0.005 by hand.
Also, using abrasives on a lathe is dangerous. You have to protect the ways from any particulate and it’s best to wash and oil afterwards to be safe. Abrasives will grind into the ways and cause permanent runout.
Last edited:
Nutball
Here For The Long Haul!
- Local time
- 1:23 AM
- User ID
- 7732
- Joined
- Oct 31, 2018
- Messages
- 4,042
- Reaction score
- 11,037
- Location
- Mt. Juliet, TN
Glue it on? I could superglue it. I wonder if a nylon rod would be strong enough. It takes forever to turn my big AL rods down that far. Huge waste too.
- Local time
- 1:23 AM
- User ID
- 1377
- Joined
- Jun 5, 2016
- Messages
- 31,070
- Reaction score
- 194,202
- Location
- Northwoods of Wisconsin
Glue it on? I could superglue it. I wonder if a nylon rod would be strong enough. It takes forever to turn my big AL rods down that far. Huge waste too.
How about a piece of hardwood?
Ketchup
Epoxy member
- Local time
- 12:23 AM
- User ID
- 5594
- Joined
- Mar 12, 2018
- Messages
- 1,808
- Reaction score
- 5,142
- Location
- Colorado
I used steel. It took quite a while to turn it down from 50mm. I tried on a dead jug first and had all kind of problems with adhesion. What I figure out is that my sandpaper sticks a lot better when cold. So I put it in the freezer for 30 minutes. That worked! I still replaced the sandpaper. I started with 100 grit until it was loaded up, did another round of 100 to get pretty close and then 220, then 400. It was helpful that the paper wasn’t glued on.
Nutball
Here For The Long Haul!
- Local time
- 1:23 AM
- User ID
- 7732
- Joined
- Oct 31, 2018
- Messages
- 4,042
- Reaction score
- 11,037
- Location
- Mt. Juliet, TN
Might even work to drive a clamping screw into the wood to pinch the sandpaper ends in place.How about a piece of hardwood?