High Quality Chainsaw Bars Husqvarna Toys

Wild Thing Hack-up

Ketchup

Epoxy member
Local time
3:14 AM
User ID
5594
Joined
Mar 12, 2018
Messages
1,808
Reaction score
5,142
Location
Colorado
Country flag
I thought I’d do a write up of my experience trying to build a Wild Thing for the buildoff.

Not long after @Stump Shot announced the Wild Thing build off I found PA Dan’s thread on AS. Dan made it seem like the Wild Thing had potential.

And I thought it would be fun to do a no consequence port job. I’ve wanted to crack the nut of clamshell porting and had several marginal ideas I wanted to try.

So I asked around and it turned out my buddy Bill had one in a back room. He said it ran and gave it to me. He’s pretty great like that. He even fished a second one out of a dumpster for me. So he cleared his shelf and mine filled up. I like to see orange in my shop. Neon green and purple just looks weird.

9804FC74-AF27-468B-B6BD-F2BCE56FEF02.jpeg


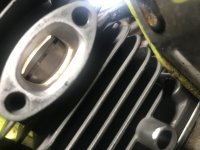
So I started into the “runner”. (That’s the right one, strato version.) On start up I discovered it wouldn’t cut the cheese, much less wood. Normally I would spend more time diagnosing, but I really just wanted to get into it, so I stripped it down and pulled numbers.

2D60430C-B886-4430-9C62-84C361FC7247.jpeg

Stock: 106ex, 128trans, 75ntk

And, it was scored. Since these are aluminum bore with a chromed piston, scoring means a whole new top end.

I bought an aftermarket kit for $36. I feel ripped off. The ports were very rough and irregular, Piston quality was low.

AM kit: 108ex, 126trans, 62ntk(!)

A457CB8F-06B0-4B0E-995D-A4640549397C.jpeg

I measured squish 5 times. 0.044” was the tightest spot. The band was so irregular that several places it wouldn’t compress braided 0.042” solder. The average squish was around 0.058”.

42CCEFC1-8CC7-4493-8A30-82D6BDB8B1BA.jpeg

0.060” Base cut.

It’s a clammy so I had to devise some way to raise the bearing pockets 60 thousandths as well.

A5C59A3C-68A2-4171-919A-A09F97271970.jpeg

This is a mandrel cut to fit the bearing pockets with 100 grit sticky sand paper on it. It needed a keyway cut into it so the ends of the paper would be tucked out of contact. I skipped that part and it ended up costing me a lot of time because the paper kept peeling. 60 thousandths is a lot to sand away at low speed. Going slow isn’t all bad though. I made a guide the same diameter as the bearings and checked it many times. I sanded the final 0.005 by hand.

Also, using abrasives on a lathe is dangerous. You have to protect the ways from any particulate and it’s best to wash and oil afterwards to be safe. Abrasives will grind into the ways and cause permanent runout.
 

Ketchup

Epoxy member
Local time
3:14 AM
User ID
5594
Joined
Mar 12, 2018
Messages
1,808
Reaction score
5,142
Location
Colorado
Country flag
CFF790CD-AA0E-4363-A3FE-80527CF93FF8.jpeg

I was inspired by @Moparmyway to try a diagonal squish band. The theory (for me at least) is that it adds a larger surface area for the explosion to push down on the piston. It’s hard to see in the photo, but there is a band cut at a 30degree angle on the outside of the piston crown. Sort of a hybrid of a popup and a dome piston.

02E76DF0-990A-4D5C-AE3C-AA7FEFD50D04.jpeg

This is the mandrel I hacked up to cut the squish in the jug. The cutter is a piece of HSS ground to a 30 degree angle. I used the same bit on the lathe to cut the piston so they match.
 

Ketchup

Epoxy member
Local time
3:14 AM
User ID
5594
Joined
Mar 12, 2018
Messages
1,808
Reaction score
5,142
Location
Colorado
Country flag
Some quick and dirty port work:
388C1C81-A12C-4828-AF65-9E106503768F.jpeg 976FFBA2-DEFC-466A-AD7B-D3338E600882.jpeg

I wasn’t happy with how much curve the exhaust roof had here. I went back in and changed it, but didn’t take a photo.

87371636-9C1F-44AD-A47F-DF53BAB8C518.jpeg

I did very little on the intake side. Mostly just cleaned up casting flash. I may regret not lowering the mix intake more. I was hoping to try some ideas with strato intake but the cold air is already advanced more than I wanted. The cold air ports are also really high. They almost freeport at BDC.

3960532D-1C3F-4763-A052-54ED914D9654.jpeg

You can see the awful beveling in the air ports. The exhaust was even worse. The squish band also has flaws I wasn’t able to cut out.

I left the transfers rough. Too much time to smooth them and polish. They’re aimed a good bit higher than stock now.

It is an aftermarket Wild Thing. Keep going, who cares?
 

Ketchup

Epoxy member
Local time
3:14 AM
User ID
5594
Joined
Mar 12, 2018
Messages
1,808
Reaction score
5,142
Location
Colorado
Country flag
Might as well make it interesting.

F4326354-F194-4750-B317-1D40E2A8A84C.jpeg

I wanted to do round trenches in the crank, but quickly lost patience and grabbed a triangle file.

9770E6B2-E1F6-472A-845D-2D05784A1469.jpeg

I widened the cold air window in the piston where it opens into the transfer upper and cut the skirt so it doesn’t close the transfers at BDC. I think that is especially important considering the crank weights.

CDE54FF3-DF7A-4E72-B3B1-A87EE31820C9.jpeg

I also notched the piston crown to match the exhaust roof and ground a few grams out of the inside.

9F593F8C-AB10-4434-B15E-E6173E14F402.jpeg

I forgot to include this earlier. Guys always show squish measurements like they are the same everywhere. Mine often aren’t. This one turned out pretty well. 0.018“Int, 0.017”ex, 0.0175”pto, 0.0165”fw.
 

Attachments

  • E3573F98-87B4-4FEB-AA68-E636E66C55A0.jpeg
    E3573F98-87B4-4FEB-AA68-E636E66C55A0.jpeg
    115.6 KB · Views: 36

popopboat

Super OPE Member
Local time
11:14 AM
User ID
10479
Joined
Sep 17, 2019
Messages
403
Reaction score
637
Location
Croatia
Country flag
Is there a purpose for those crank trenches or?
 

Ketchup

Epoxy member
Local time
3:14 AM
User ID
5594
Joined
Mar 12, 2018
Messages
1,808
Reaction score
5,142
Location
Colorado
Country flag
It’s debatable. I think people call it a Turbo Crank. It may create extra turbulence that assists in Transfer feeding. It also might extend the transfer pressure wave farther past BDC. The trenches are cut at a diagonal and aimed into the direction of rotation, so they should create an exit stream towards the outside of the case and transfer lowers.

But how much resistance it creates may make any benefits moot. It also compromises the structural integrity of the crank weights.

There isn’t much on the web about it. Here’s a discussion that highlights how questionable it is:

https://www.snowmobileforum.com/threads/has-anyone-heard-of-this-mod.31394/
 

rogue60

Here For The Long Haul!
Local time
7:14 PM
User ID
578
Joined
Jan 18, 2016
Messages
1,326
Reaction score
8,209
Location
AU
Country flag
Might as well make it interesting.

View attachment 287001

I wanted to do round trenches in the crank, but quickly lost patience and grabbed a triangle file.

View attachment 287002

I widened the cold air window in the piston where it opens into the transfer upper and cut the skirt so it doesn’t close the transfers at BDC. I think that is especially important considering the crank weights.

View attachment 287003

I also notched the piston crown to match the exhaust roof and ground a few grams out of the inside.

View attachment 287005

I forgot to include this earlier. Guys always show squish measurements like they are the same everywhere. Mine often aren’t. This one turned out pretty well. 0.018“Int, 0.017”ex, 0.0175”pto, 0.0165”fw.

I got some decent hook using a dremel and file doing a turbo crank. As you say not much out there about that mod but I've read a bit in the bike world guys testing and some bikes pick up power on the dyno and some don't as far as different models and cc go but that's part of the fun trying different things.

2 (3).JPG
 
Last edited:

Nutball

Here For The Long Haul!
Local time
4:14 AM
User ID
7732
Joined
Oct 31, 2018
Messages
4,042
Reaction score
11,037
Location
Mt. Juliet, TN
Country flag
I wonder if you could electroplate the bare cylinder yourself with chrome or at least brass or bronze? Maybe graphite could help the life of it?
 

Ketchup

Epoxy member
Local time
3:14 AM
User ID
5594
Joined
Mar 12, 2018
Messages
1,808
Reaction score
5,142
Location
Colorado
Country flag
I wonder if you could electroplate the bare cylinder yourself with chrome or at least brass or bronze? Maybe graphite could help the life of it?

It’s a pretty huge rabbit hole. Aluminum can be hardened through a submerged heat treatment process, though it is still relatively soft. In combination with other metals that hardness can be increased. I believe both nickel and silicon alloys are used in chainsaw aluminum. Unfortunately the amount of effort and money required to figure it out would equate to a lot of ported jugs.

In my junkyard machining world the only viable options I can think of are making a ring out of something softer than aluminum or just running the jug until it scores, then boring it larger and finding a larger chromed piston.

I hate designed obsolescence, but I don’t see an efficient way around it here.
 

Ketchup

Epoxy member
Local time
3:14 AM
User ID
5594
Joined
Mar 12, 2018
Messages
1,808
Reaction score
5,142
Location
Colorado
Country flag
88AF1CBB-A016-4C7E-92D4-5E0EB404CBC8.jpeg

So I was stuck at home and the only pipe I had was a greasy old snow blower bushing. Both the muffler and the bushing are mystery allows and neither liked the rod I had here. I’m a better tree cutter than I am a welder, but it will do.

E8D73D8F-FE0F-4161-B11E-C8C3D4D6E70C.jpeg
 

Ketchup

Epoxy member
Local time
3:14 AM
User ID
5594
Joined
Mar 12, 2018
Messages
1,808
Reaction score
5,142
Location
Colorado
Country flag
I wonder if you could electroplate the bare cylinder yourself with chrome or at least brass or bronze? Maybe graphite could help the life of it?

Here’s my dumpster saw (older non-strato):

E3485471-1F41-4360-A68D-AB530A111626.jpeg

And here’s my Strato:

21223FFD-AE33-4ABB-8871-E8D8DCD433C9.jpeg

The newer saw has more than twice the durability period. Did the manufacturer actually improve something that makes an aluminum bore last longer? Or did the EPA require a longer durability period, so they changed the number?
 

jetsam

Super OPE Member
Local time
5:14 AM
User ID
15814
Joined
Feb 24, 2021
Messages
112
Reaction score
330
Location
Trogdoria
Country flag
Here’s my dumpster saw (older non-strato):

View attachment 287242

And here’s my Strato:

View attachment 287241

The newer saw has more than twice the durability period. Did the manufacturer actually improve something that makes an aluminum bore last longer? Or did the EPA require a longer durability period, so they changed the number?

Could have more to do with the cat in the muffler than the engine. That means it's tested to not exceed allowable emissions for 125 hours. If it had a good enough cat, it could probably spray gas into the exhaust and still pass.


:flamethrower2:
 

Nutball

Here For The Long Haul!
Local time
4:14 AM
User ID
7732
Joined
Oct 31, 2018
Messages
4,042
Reaction score
11,037
Location
Mt. Juliet, TN
Country flag
My Poulan blower says 50hrs, but mentions nothing about durability. I've always wondered if that number meant the enging only lasts that long, or after that many hours it builds up enough gunk to not run clean or what. Makes me want to see what kind of bore my blower has. 50hrs is nothing :mad: But at least I run it on 40-32:1. I may have to round the ring if a sharp edged ring is what ruins these bare bore engines.
 
Top