High Quality Chainsaw Bars Husqvarna Toys

MS390 / 039 pop up piston

stretch5881

Pinnacle OPE Member
GoldMember
Local time
3:20 AM
User ID
4859
Joined
Dec 23, 2017
Messages
761
Reaction score
2,281
Location
Hatley, Wisconsin
Country flag
I have an 029s with a worn out cylinder and have a Cross 039 kit on the way. Maybe I missed it somewhere, But, does anyone, know of anyone, that has put a popup in their 039, and noticed any benefit?
I plan on doing other mods also. I just want to know if getting a popup is worth it.
 

Dub11

Saw R skeery
GoldMember
Local time
3:20 AM
User ID
2014
Joined
Oct 21, 2016
Messages
34,438
Reaction score
146,043
Location
Kansas
Country flag
I have an 029s with a worn out cylinder and have a Cross 039 kit on the way. Maybe I missed it somewhere, But, does anyone, know of anyone, that has put a popup in their 039, and noticed any benefit?
I plan on doing other mods also. I just want to know if getting a popup is worth it.

He has some video on page 3 of this thread showing the pop up in action.
 

beaglebriar

The Peanut Gallery
GoldMember
Local time
4:20 AM
User ID
377
Joined
Jan 1, 2016
Messages
18,620
Reaction score
104,229
Location
Warren Center, PA
Country flag
I have an 029s with a worn out cylinder and have a Cross 039 kit on the way. Maybe I missed it somewhere, But, does anyone, know of anyone, that has put a popup in their 039, and noticed any benefit?
I plan on doing other mods also. I just want to know if getting a popup is worth it.
I ran the one I just built with the pop up against a friend's ported 039 that's running a standard cross piston. The pop up saw has noticably more torque and it was a little faster.

The one I built had timing advance / his did not.
His is running an OEM cylinder/mine Hyway.
 

Terry Syd

Pinnacle OPE Member
Local time
6:20 PM
User ID
575
Joined
Jan 18, 2016
Messages
1,589
Reaction score
5,973
Location
Comboyne, NSW Australia
Country flag
There is a potential reliability issue with this series of saw. There is a 'hot spot' in the cylinder where the muffler bolt casting on the PTO side blocks the flow of air. The bolt casting will also expand with the heat, which means it reduces clearance in the cylinder. The combination is reduced clearance and more heat. I've pulled two 029 jugs that had been seized in this area. Perhaps others may have noticed it?

The manufacturing process of casting sometimes creates these issues, however, the fix is easy. Just drill out the area behind the where the bolt attaches. Then stick a Dremel bit in there and open it up so the air can flow through. Not only does this allow the air flow, it gets rid of the casting that can expand inward.
 

beaglebriar

The Peanut Gallery
GoldMember
Local time
4:20 AM
User ID
377
Joined
Jan 1, 2016
Messages
18,620
Reaction score
104,229
Location
Warren Center, PA
Country flag
There is a potential reliability issue with this series of saw. There is a 'hot spot' in the cylinder where the muffler bolt casting on the PTO side blocks the flow of air. The bolt casting will also expand with the heat, which means it reduces clearance in the cylinder. The combination is reduced clearance and more heat. I've pulled two 029 jugs that had been seized in this area. Perhaps others may have noticed it?

The manufacturing process of casting sometimes creates these issues, however, the fix is easy. Just drill out the area behind the where the bolt attaches. Then stick a Dremel bit in there and open it up so the air can flow through. Not only does this allow the air flow, it gets rid of the casting that can expand inward.
This bit of info would've been real handy a couple days ago Terry. Lol
 

Terry Syd

Pinnacle OPE Member
Local time
6:20 PM
User ID
575
Joined
Jan 18, 2016
Messages
1,589
Reaction score
5,973
Location
Comboyne, NSW Australia
Country flag
I've posted it before, however with the way this thread is going with all things MS390, I thought I should re-post it.

Maybe the next time you do one of these things (I never intend to do another one...) you can throw that on the to-do list. LOL
 

Terry Syd

Pinnacle OPE Member
Local time
6:20 PM
User ID
575
Joined
Jan 18, 2016
Messages
1,589
Reaction score
5,973
Location
Comboyne, NSW Australia
Country flag
I did a compression test before I tore the engine down. I don't have much confidence in my gauge as it read 120 lbs. Crikey, without the compression release being on it was a bugger to pull over. I'll have to check the compression after the piston swap and get a % increase.

I started to clean the thing up so I could put it back together. I looked at the plastic recoil wheel and I had already filled it all the way up to the top to get the most leverage. Then I thought maybe a bigger saw has a larger recoil wheel that will fit on this thing, there's enough room for one.

The saw is no problem to crank over with the compression release, but if I had to replace the wheel it would be a neat mod to use a larger wheel.

Anybody know if another wheel will fit that has a larger diameter?

EDIT: It could be a good mod for someone who has a jug without the compression release.
 
Last edited:

Lightning Performance

Here For The Long Haul!
Local time
4:20 AM
User ID
677
Joined
Jan 26, 2016
Messages
10,991
Reaction score
28,050
Location
East of Philly
That jetting may be in the form of the air bleed/transition holes. In which case, all we need to do to duplicate the carb is to pull the welch plug and measure the sizes of the air bleed holes. - Then drill another carb to those specs and put in a fresh welch plug.

The bigger the air bleed holes are, the more fuel is running through the low speed circuit. The bigger holes allow more air to lean out the idle mixture. Then when the throttle butterfly moves across them, there is less air bleed and the mixture becomes richer.
How long did it take you to figure that out? @Terry Syd
 

Terry Syd

Pinnacle OPE Member
Local time
6:20 PM
User ID
575
Joined
Jan 18, 2016
Messages
1,589
Reaction score
5,973
Location
Comboyne, NSW Australia
Country flag
I spent four months trying to figure out these diaphragm carbs. EVERYTHING on the 'net had errors in it. The best document I found was the Mukuni manual for their diaphragm carbs. However, by the time I found it, I had already figured out everything except why the metering orifice under the metering needle could be different sizes. The Mukuni documentation cleared that up.

When I was modding the Zama twin jet carb I had increased the idle jet size and I needed to lean out the idle mixture going to the idle adjustment. I had to pull the idle/transition jet and drill one of the air bleed holes one size larger - that fixed the idle issue.

You will find that the guys that are running alcohol have to drill the transition holes much larger. The alcohol burners run a lot more fuel through the carbs.

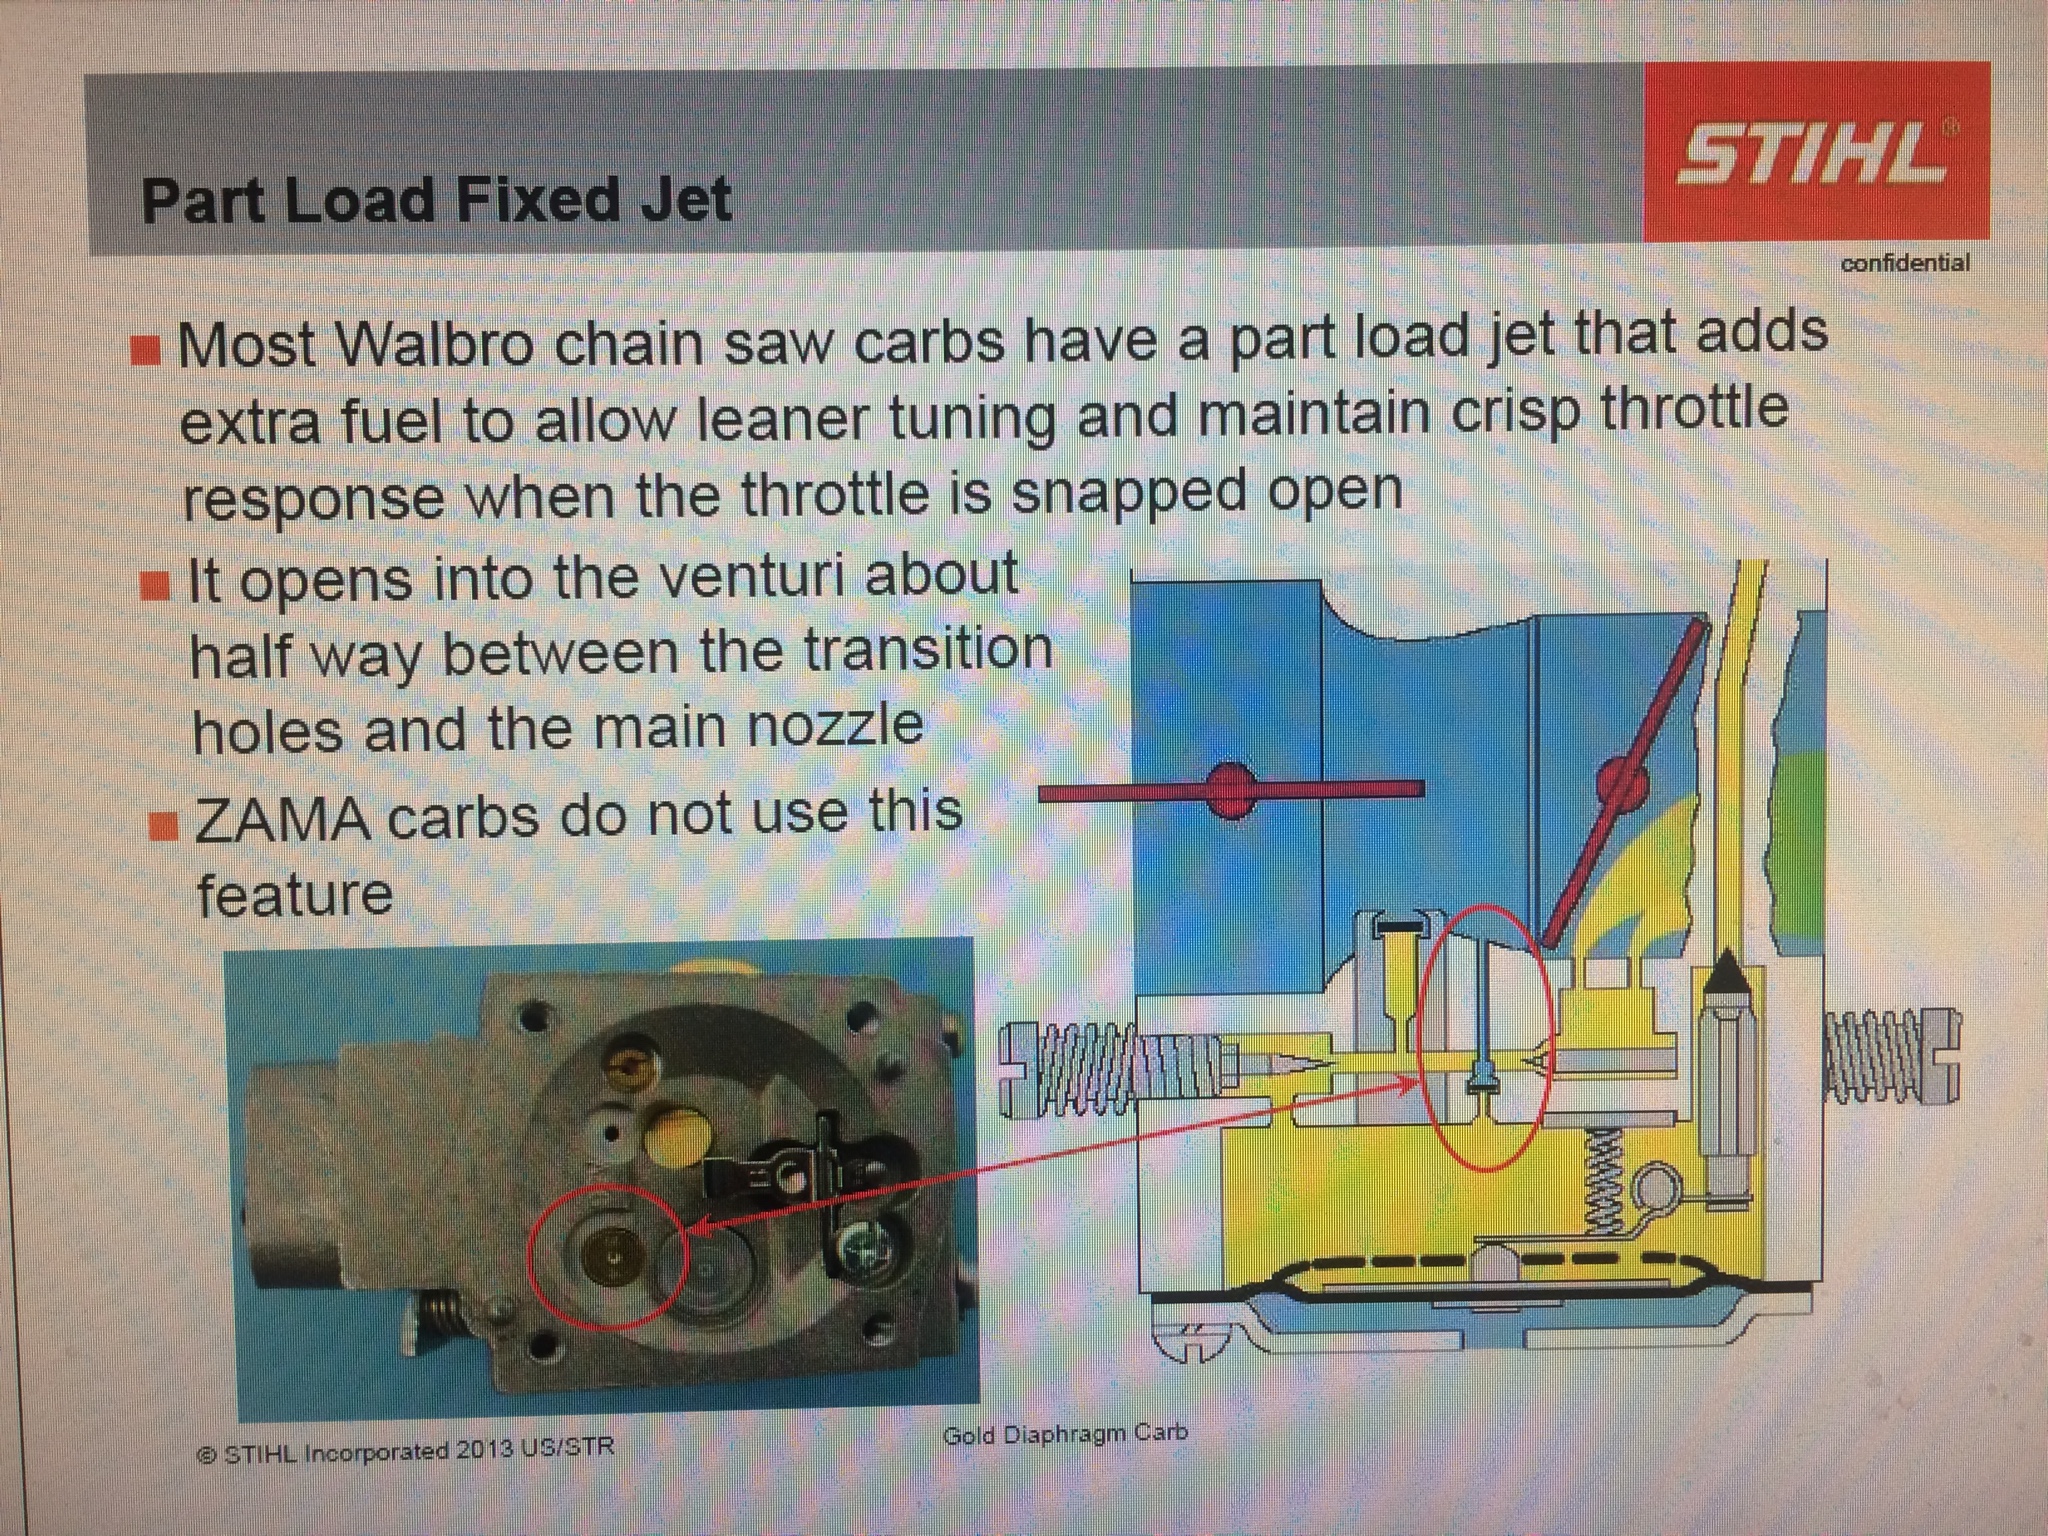
On the HDs I've seen there's two ways to increase the flow in the low speed circuit. One is to increase the size of the air bleed/transition holes the other is to increase the size of the auxiliary jet in the low speed circuit. I don't know what would be the easier mod to do. If the brass jet is really hard, then drilling out the aluminum body would probably be easier.

However, if you go too big on the auxiliary jet it is no problem to GB Weld a piece of copper/soft aluminum over it and start again. Drilling the transition holes in the carb body may only be a one shot affair.

I expect that modding the carb will be easy once people know where to drill and what size to go to. Someone just has to do it the first time.
 
Last edited:

Lightning Performance

Here For The Long Haul!
Local time
4:20 AM
User ID
677
Joined
Jan 26, 2016
Messages
10,991
Reaction score
28,050
Location
East of Philly
Not really once and done. Every motor every build is a bit different. I learned to mod low and mid range in carbs from an old stock car racer. He said if your duration gets long increase the air idol bleeds size. When you open the throttle plate too far and lose the transition slots just close it back down some and drill a hole in the throttle plate opposite the transition area. It still held true for every carb type. I stuck to it. Tuning the H is the easy part.
 

Terry Syd

Pinnacle OPE Member
Local time
6:20 PM
User ID
575
Joined
Jan 18, 2016
Messages
1,589
Reaction score
5,973
Location
Comboyne, NSW Australia
Country flag
Not really once and done. Every motor every build is a bit different.

I was referring to modding this 64cc engine. If we got something in the ballpark for this series of engine with a muffler mod, timing adjustment and a decent air filter - then the carb mod would be in the ballpark.

I have a preference to changing jets (or drilling them), however for the average guy trying to build a saw, the drilling of the carb body may be the way to go.

The first run through the jet is using a .3mm drill (actually a 'reamer' in this case). It takes a fair bit of PATIENCE to ream out the jet with the .3mm reamer. The later size increases are much easier, but the first run takes some time. Many guys would try to hurry the process and 'SNAP!' there goes the drill.

Doing the carb body you start with a bigger starting hole, say .5mm, and the drills are stronger and the aluminum is softer. There would be less of a potential problem in doing the mod.
 

X 66 stang347 X

Pinnacle OPE Member
Local time
4:20 AM
User ID
1884
Joined
Sep 23, 2016
Messages
804
Reaction score
2,318
Location
Georgia
28e13d2a777324804b7da149124db9a5.jpg
 

Terry Syd

Pinnacle OPE Member
Local time
6:20 PM
User ID
575
Joined
Jan 18, 2016
Messages
1,589
Reaction score
5,973
Location
Comboyne, NSW Australia
Country flag
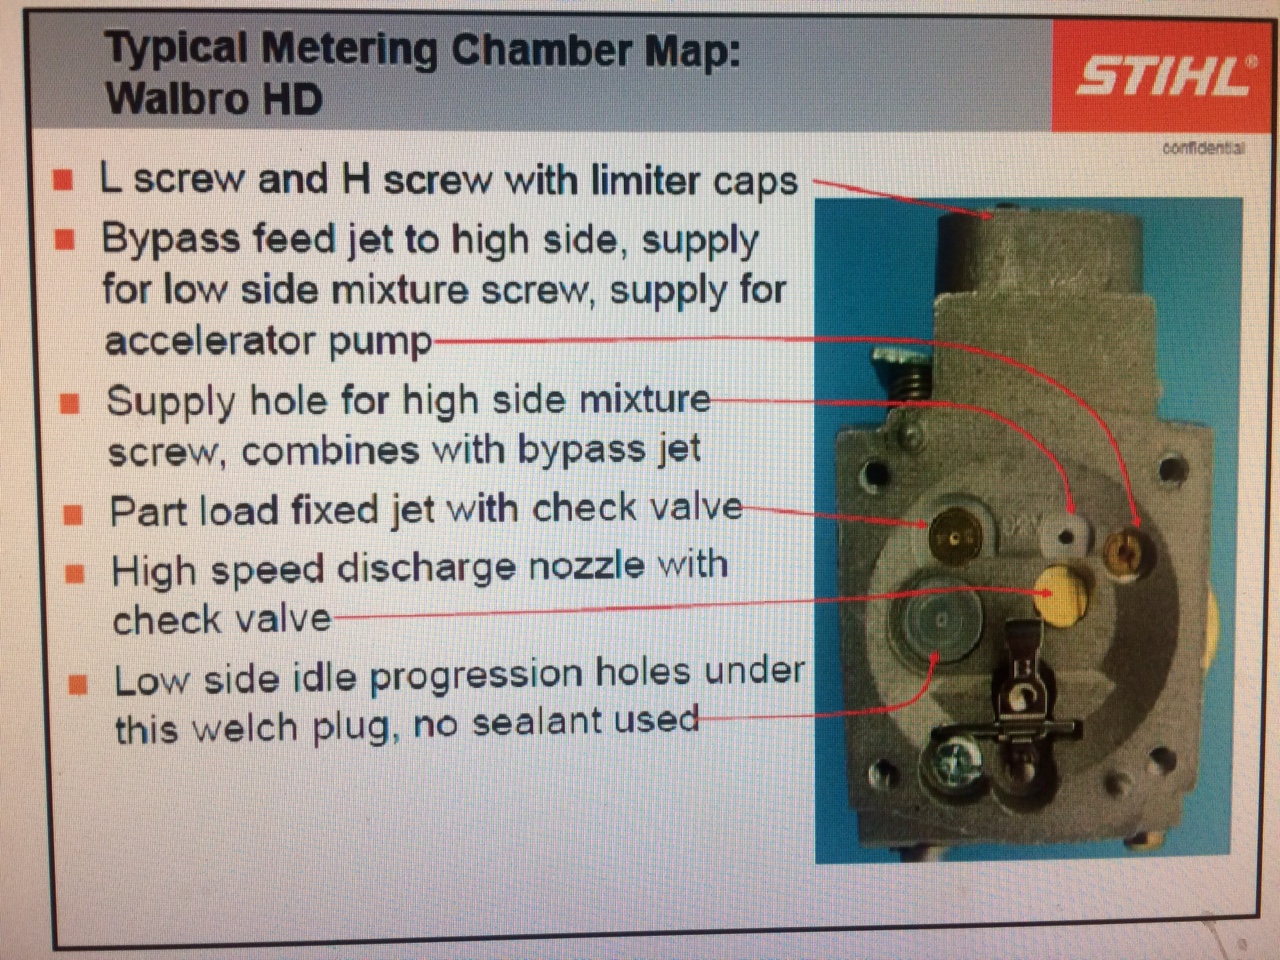
The jet marked "Part load fixed jet with check valve" is the one that can be drilled to increase the flow in the low speed circuit.

If the low speed flow is substantially increased, it may become impossible to lean out the high speed circuit. In which case, you just put a dab of GB Weld on the "Bypass feed jet to high side".

Both the "Bypass feed jet" and the high speed needle feed the "High speed discharge nozzle".

In the nozzle tunnel not only do the "Bypass feed jet" and the high speed needle enter, but also a circuit that takes fuel from the tunnel and sends it to the "low side mixture screw". This is the EPA circuit I referred to. You can block that circuit and drill a hole in the wet side just in front of the seat of the low speed needle.
 

Terry Syd

Pinnacle OPE Member
Local time
6:20 PM
User ID
575
Joined
Jan 18, 2016
Messages
1,589
Reaction score
5,973
Location
Comboyne, NSW Australia
Country flag
I wish I could use a drill press on something like this. The drills are just so damn small that you need to use the pin vise to hold them. - The drills are 'fragile', perhaps in a factory with a large drill press where the feed can be rigidly controlled you could have them machined out.
 
Top