High Quality Chainsaw Bars Husqvarna Toys

044 project

MattG

Chainosaurus Rex
Local time
2:51 PM
User ID
3111
Joined
Apr 30, 2017
Messages
896
Reaction score
1,432
Location
Cambridgeshire, England
Do you never worry about distortion or paint peeling inside the case?
Adam, when I did my 2oot it had original stihl paint on the inside casing - and it was surprising little affected by the torch. Went a tad beige in hue.......god knows what they use.....but it's 'kin tough.
 

Adamski

Plebus Splederns
Local time
2:51 PM
User ID
3128
Joined
May 3, 2017
Messages
1,120
Reaction score
2,684
Location
Essex, UK
Country flag
How long do you keep your flame on the cases then Brad. I had played the propane torch on my 044s for just over a minute......they would not fall into place. At first I pressed them down using thumb pressure, but only by a couple mil. I had to hammer them down the rest.

It's that dodgy saw you won on eBay. It looked like it had been run over by a tractor, bearing cups are probably out of round [emoji23]
 

Lightning Performance

Here For The Long Haul!
Local time
9:51 AM
User ID
677
Joined
Jan 26, 2016
Messages
10,991
Reaction score
28,050
Location
East of Philly
You guys make *s-word too hard. Buy a heat gun or use your oven/toaster oven. Real cheap real easy. They also make a great hotbox for press in wristpin work. No more burns for you. Although I still use a torch on split cases and have zero issues. Back off a bit with the tip.
 

Adamski

Plebus Splederns
Local time
2:51 PM
User ID
3128
Joined
May 3, 2017
Messages
1,120
Reaction score
2,684
Location
Essex, UK
Country flag
You guys make *s-word too hard. Buy a heat gun or use your oven/toaster oven. Real cheap real easy. They also make a great hotbox for press in wristpin work. No more burns for you. Although I still use a torch on split cases and have zero issues. Back off a bit with the tip.

I didnt find it too hard... Case on hob, 30 seconds later bearing in cup. Then the next case side on hob, 30 seconds later bearing pushed in with a clamp and hammer. 2 minutes in total. No sweat, no costs associated with the process.

Think the OP has an anomaly of a case.
 

Wonkydonkey

Plastic member
Local time
2:51 PM
User ID
3189
Joined
May 14, 2017
Messages
4,609
Reaction score
18,458
Location
Sussex, UK.
Country flag
I think about 120/150C is a good temp. But as always if oousing round and round with a propane gun , it's a darn sh!te hotter than we want in one place for a long or short time. And it's cooling while not there
I think that's why and there's temp settings on a heat guns And then having a IR temp thing makes it simples for us simpletons in other words... nice and slow.. And keep checking. Oh I wait for the day I'm doing it
 

MattG

Chainosaurus Rex
Local time
2:51 PM
User ID
3111
Joined
Apr 30, 2017
Messages
896
Reaction score
1,432
Location
Cambridgeshire, England
I think about 120/150C is a good temp. But as always if oousing round and round with a propane gun , it's a darn sh!te hotter than we want in one place for a long or short time. And it's cooling while not there
I think that's why and there's temp settings on a heat guns And then having a IR temp thing makes it simples for us simpletons in other words... nice and slow.. And keep checking. Oh I wait for the day I'm doing it
TBH wonkey a propane gun will get them a lot hotter than 120/150. I wouldn't worry about "too hot", play the hottest part of the flame around the casing mouth for minute or so, I think. On my 200T I saw the inner paint/coating just start to beige etc. then I wacked them. I think @Mattyo has youtubed the odd demo, I think, using a torch for the heat.
 

Wonkydonkey

Plastic member
Local time
2:51 PM
User ID
3189
Joined
May 14, 2017
Messages
4,609
Reaction score
18,458
Location
Sussex, UK.
Country flag
I think that's what I was saying, go round and round, it's hotter than we really want, " darn hot"

Anyhow beer o clock for me... its a wet Sunday in more ways than one...
Cheers..:banana::drink:
 

MattG

Chainosaurus Rex
Local time
2:51 PM
User ID
3111
Joined
Apr 30, 2017
Messages
896
Reaction score
1,432
Location
Cambridgeshire, England
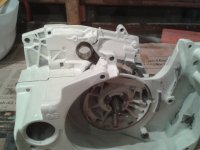
Guys, I'm happy to report that after considerable distractions, e.g. touching up bits of paint wrecked after my cack handed bearing install, that I've finally got the 12mm crank + new bearings + tractor-painted casings back together.

Behold:
2017-10-04 13.47.09.jpg
The next thing to do, will probably be to fit the new seals or perhaps fit the jug and look at the squish clearance.
 

Adamski

Plebus Splederns
Local time
2:51 PM
User ID
3128
Joined
May 3, 2017
Messages
1,120
Reaction score
2,684
Location
Essex, UK
Country flag
Guys, I'm happy to report that after considerable distractions, e.g. touching up bits of paint wrecked after my cack handed bearing install, that I've finally got the 12mm crank + new bearings + tractor-painted casings back together.

Behold:
View attachment 90966
The next thing to do, will probably be to fit the new seals or perhaps fit the jug and look at the squish clearance.
Excellent! If the wife doesn't mind (and before you slip the seals in, no innuendo) throw it in the oven when the oven is cooling after dinner every chance you get. Bake Bake and then Bake that paint some more!
 

MattG

Chainosaurus Rex
Local time
2:51 PM
User ID
3111
Joined
Apr 30, 2017
Messages
896
Reaction score
1,432
Location
Cambridgeshire, England
People,

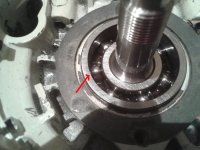
I wanna ask you lot e.g. @MustangMike , @Canadian farm boy , @drf256 or anyone else for that matter for some advice on fitting the new seals. Being the impatient guy that I am, I forgot to measure, or photo the exact position that the seals should be drifted down to when I took the old ones out.

So starting with output side, should I drift the seal until the outer face (i.e. the one you see once they're installed) is basically flush with this outer bearing race (i.e. the plane that I've arrowed):

output.jpg
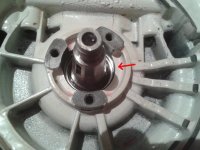
and similarly for the ignition side should I drift in to be flush with the surface that I've arrowed below? I.e. the recessed surface a few mil further in than the generator mounts?
ign.jpg

As usual, any help / advice etc. appreciated.

Thanks Matt!
 

MustangMike

Mastermind Approved!
Local time
9:51 AM
User ID
338
Joined
Dec 30, 2015
Messages
11,433
Reaction score
35,921
Location
Brewster, NY
Country flag
I'm not the expert, but usually they are in not quite enough to be flush, just sticking up a hair.

Anyone with better knowledge please chime in.
 

Mattyo

Youtube speciawist
GoldMember
Local time
9:51 AM
User ID
441
Joined
Jan 8, 2016
Messages
4,282
Reaction score
10,906
Location
Farmington, CT
Country flag
Matt....I'm pretty sure that's in my 440 vids somewhere. I put the seal flush...with a large socket. So the socket can't drive the seal in too far.
 

MattG

Chainosaurus Rex
Local time
2:51 PM
User ID
3111
Joined
Apr 30, 2017
Messages
896
Reaction score
1,432
Location
Cambridgeshire, England
I'm not the expert, but usually they are in not quite enough to be flush, just sticking up a hair.

I put the seal flush...with a large socket. So the socket can't drive the seal in too far.
Thanks for your advice, guys. I PMed Canada Farm Boy - he pretty much echoed what you two have said.

Anyway, I'm gonna be a big girl, and I've gone and ordered the STIHL press sleeve tools. I ain't so worried with the output side, since like Matty says, a large socket will foul on the outer bearing race anyways.

The ign. side looks a little bit more horrid though. I've not inspected it properly yet, but, is it one of those Bakelite types like they use for 200Ts?

Do any of you fellas use sealant on the outer diameter of the seal or just a slip of grease to assist it's passage? No innuendo meant there!
 

Mattyo

Youtube speciawist
GoldMember
Local time
9:51 AM
User ID
441
Joined
Jan 8, 2016
Messages
4,282
Reaction score
10,906
Location
Farmington, CT
Country flag
Rubber...not bakelite

No need for stihl sleeves....cool tools but unnecessary.

Here is 660.... a little different but the coke can trick will help


And the 394 seals...


The 440 has that stupid bushing just like the 372xp....so the coke can trick applies when you are inserting the bushing. Take your time. Don't just shove it in there.
 

Wonkydonkey

Plastic member
Local time
2:51 PM
User ID
3189
Joined
May 14, 2017
Messages
4,609
Reaction score
18,458
Location
Sussex, UK.
Country flag
If it's steel outer, as the ms260 is, then yep I've used a little sealant, smeared around the casings, just to be sure. But the ones I pulled out didn't have any sealant around them or the casings.
I,m sure the peeps that fit them all the time prolly don't use it.
I i have done a fs55 strimmer just by pushing it in, as it was a hard rubber.
 

Adamski

Plebus Splederns
Local time
2:51 PM
User ID
3128
Joined
May 3, 2017
Messages
1,120
Reaction score
2,684
Location
Essex, UK
Country flag
If it's steel outer, as the ms260 is, then yep I've used a little sealant, smeared around the casings, just to be sure. But the ones I pulled out didn't have any sealant around them or the casings.
I,m sure the peeps that fit them all the time prolly don't use it.
I i have done a fs55 strimmer just by pushing it in, as it was a hard rubber.

Loctite loc n seal is beautiful for stuff like this. It's as thin as oil and gets in all the places sealant gets pushed out of.
 
Top