High Quality Chainsaw Bars Husqvarna Toys Hockfire Saws

Husqvarna 50/51/55 repair thread.

malk315

Running Saws for Therapy
Local time
11:24 AM
User ID
421
Joined
Jan 6, 2016
Messages
2,101
Reaction score
10,140
Location
Lancaster, MA
Country flag
Thanks Eric, great thread, I had read it back when you first posted but had forgotten all about it. I guess that makes this thread a little redundant. :BangHead:
Redundancy is good! Helps to learn all possible tricks when working with these saws. The 50/51/55 chassis is a cool setup.

Sent from my XT1585 using Tapatalk
 

rattler

Here For The Long Haul!
Local time
11:24 AM
User ID
301
Joined
Dec 28, 2015
Messages
2,522
Reaction score
13,435
Location
NC
Country flag
Great thread Joe thanks
 

PogoInTheWoods

Pinnacle OPE Member
Local time
11:24 AM
User ID
1190
Joined
Apr 23, 2016
Messages
1,954
Reaction score
3,881
Location
Ohio
Country flag
Had time to read the other thread. Good one there, too.

It's pretty well known that stock squish on these is in the .060 range..., but they still pull in the neighborhood of 160psi give or take due to a very compact combustion chamber. Even so, I still check squish when using any aftermarket top end that isn't a Meteor just to be safe. Dirko is my sealant of choice and I've never had a problem with it.

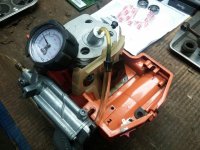
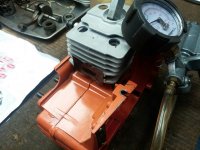
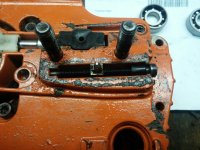
And here's is quick vac/pressure test approach using Gorilla Tape for checking the seals and intake bulkhead before putting everything back together. Works great on clean surfaces. Do vac first to seal it a little better than just pressing it on. Then it'll hold 6~7 lbs. of pressure no problem (if the surfaces were clean when the tape went on). Obviously a redneck leak check, but it's fast and if everything is tight you're good to go. If there's a leak you can trouble shoot it up to a point using pressure and soapy water before needing to go with block-offs for smaller leaks needing more pressure to isolate.

Anyway, I've taken some raggin' for the Gorilla Tape, but it works. Will get ya another 100 miles out of a pair o' cheap Nikes too!

1110171813_resized.jpg

1110171813a_resized.jpg

0325161833a_resized.jpg
 

PogoInTheWoods

Pinnacle OPE Member
Local time
11:24 AM
User ID
1190
Joined
Apr 23, 2016
Messages
1,954
Reaction score
3,881
Location
Ohio
Country flag
Another tip if you haven't discovered it (or something better) already...

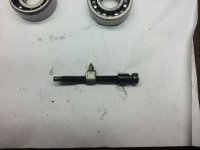
When that little square retainer on the bar adjuster disintegrates and the adjuster bolt keeps backing out, just use a snip of fuel line instead. Butt simple and works great on any saw that uses the retainer piece. I just happened to try it first on a 55.

1110171957_resized.jpg

1110171956_resized.jpg
 
Last edited:

Stump Shot

Disciple of Monkey's
GoldMember
Local time
10:24 AM
User ID
1377
Joined
Jun 5, 2016
Messages
31,740
Reaction score
199,488
Location
Northwoods of Wisconsin
Country flag
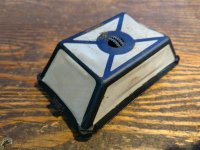
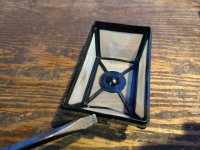
The air filter on a 50 is also the choke. It just pushes against the air horn when the lever is pushed on the cover.
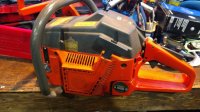
This one had the retaining tabs broken by its owner so it didn't stay on, sucked some dust through. Sometimes the little details matter.

IMG_20170814_151706030.jpg

IMG_20170814_151843949.jpg

IMG_20171111_164701342.jpg

IMG_20171111_164727098.jpg
 

PogoInTheWoods

Pinnacle OPE Member
Local time
11:24 AM
User ID
1190
Joined
Apr 23, 2016
Messages
1,954
Reaction score
3,881
Location
Ohio
Country flag
Pretty nice 300th. I just sold one nearly as nice. Wish I would have kept it now.

And I do I like those ultra-fine screen filters. Think I'd be fixing that one somehow (if you haven't already).
 

Stump Shot

Disciple of Monkey's
GoldMember
Local time
10:24 AM
User ID
1377
Joined
Jun 5, 2016
Messages
31,740
Reaction score
199,488
Location
Northwoods of Wisconsin
Country flag
Pretty nice 300th. I just sold one nearly as nice. Wish I would have kept it now.

And I do I like those ultra-fine screen filters. Think I'd be fixing that one somehow (if you haven't already).

Would be nice to have a sticker for the starter cover, but they're like De Soto's now. :(
 

PogoInTheWoods

Pinnacle OPE Member
Local time
11:24 AM
User ID
1190
Joined
Apr 23, 2016
Messages
1,954
Reaction score
3,881
Location
Ohio
Country flag
Yep. That's a sweet one.

Back to Spike's video for a second...

He mentioned something really important toward the end that was just sorta casually tossed in regarding the screw-on air filters
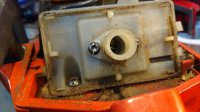
AND THAT DAMNED NUT just slid into the filter base. If you're taking one of those types apart for the first time and disassembling the entire intake setup there is a high probability that the damned nut will fall out somewhere along the line. You'll either lose it and not even know it until you try to tighten the air filter screw again sayin' "whuh?", or find it laying somewhere wonderin' where the hell it came from until you try to tighten the air filter screw again and realize, "Ah Ha!" Trust me, I've scratched my head over that one a coupla times.
 

Dub11

Saw R skeery
GoldMember
Local time
10:24 AM
User ID
2014
Joined
Oct 21, 2016
Messages
34,438
Reaction score
146,048
Location
Kansas
Country flag
Yep. That's a sweet one.

Back to Spike's video for a second...

He mentioned something really important toward the end that was just sorta casually tossed in regarding the screw-on air filters
AND THAT DAMNED NUT just slid into the filter base. If you're taking one of those types apart for the first time and disassembling the entire intake setup there is a high probability that the damned nut will fall out somewhere along the line. You'll either lose it and not even know it until you try to tighten the air filter screw again sayin' "whuh?", or find it laying somewhere wonderin' where the hell it came from until you try to tighten the air filter screw again and realize, "Ah Ha!" Trust me, I've scratched my head over that one a coupla times.
Is there a fix?
 

Stump Shot

Disciple of Monkey's
GoldMember
Local time
10:24 AM
User ID
1377
Joined
Jun 5, 2016
Messages
31,740
Reaction score
199,488
Location
Northwoods of Wisconsin
Country flag
Thanks,I like these saws,There not the fastest 50 cc saws but I like the feel of them just enjoyable to use.

I hear you, I find myself reaching for this one more and more. Since it broke in it really runs great and is a treat to cut with. Spools up quick and is hell on limbs. Open ports are still ports. Lol


Stump Shot

Disciple of Monkey's
GoldMember
Local time
10:24 AM
User ID
1377
Joined
Jun 5, 2016
Messages
31,740
Reaction score
199,488
Location
Northwoods of Wisconsin
Country flag
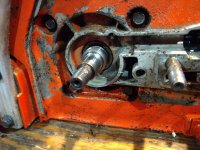
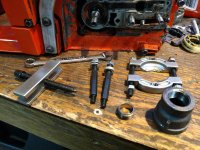
Changing out the seals, worm gear in the way. Let's find a way to get it out of there right quick and easy. There's the Husqvarna way and all the 5,000 other ways people have come up with. If it works for you, it's the right way. This is just my way, and if it helps or inspires someone to help find their way, then it's all good.

IMG_20171122_171231124.jpg

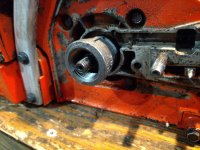
A half to three quarter pipe adapter is screwed on the gear threads.
IMG_20171122_171249477.jpg

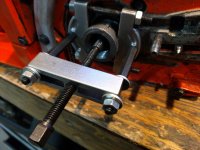
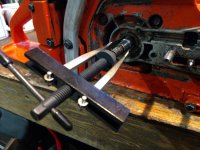
Here's where I deviate, instead of finding a bolt, I just use a clamshell puller.
IMG_20171122_171647536.jpg

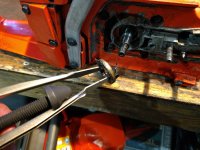
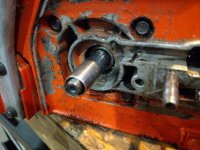
Comes right off and the worm gear can be threaded out with just your finger.
IMG_20171122_172006095.jpg

To reinstall after the seal is put in, heat up the worm gear and just drop it on the shaft.
 

Stump Shot

Disciple of Monkey's
GoldMember
Local time
10:24 AM
User ID
1377
Joined
Jun 5, 2016
Messages
31,740
Reaction score
199,488
Location
Northwoods of Wisconsin
Country flag
Used the FIT puller to get the seals out. Pretty easy...
IMG_20171122_173259109.jpg
IMG_20171122_173321533.jpg

I really like the Husqvarna tool for putting the seal on the PTO side.
While they don't show one for it, the 272 series does the job. 502 50 53-01
IMG_20171122_174102427.jpg

Important note: Seal on the flywheel side should be 1 mm proud, PTO side 1 mm sunk under flush.
 

huskihl

Muh fingers look really big
GoldMember
Local time
11:24 AM
User ID
360
Joined
Dec 31, 2015
Messages
22,841
Reaction score
145,710
Location
East Jordan, MI
Country flag
Had time to read the other thread. Good one there, too.

It's pretty well known that stock squish on these is in the .060 range..., but they still pull in the neighborhood of 160psi give or take due to a very compact combustion chamber. Even so, I still check squish when using any aftermarket top end that isn't a Meteor just to be safe. Dirko is my sealant of choice and I've never had a problem with it.

And here's is quick vac/pressure test approach using Gorilla Tape for checking the seals and intake bulkhead before putting everything back together. Works great on clean surfaces. Do vac first to seal it a little better than just pressing it on. Then it'll hold 6~7 lbs. of pressure no problem (if the surfaces were clean when the tape went on). Obviously a redneck leak check, but it's fast and if everything is tight you're good to go. If there's a leak you can trouble shoot it up to a point using pressure and soapy water before needing to go with block-offs for smaller leaks needing more pressure to isolate.

Anyway, I've taken some raggin' for the Gorilla Tape, but it works. Will get ya another 100 miles out of a pair o' cheap Nikes too!

I'd never hack on anyone for using Gorilla tape as a block off. Grab a piece, poke a couple holes in it, or put the intake clamp over it, and go. If the exhaust port surface is clean, you almost don't need to install the muffler over it to do just a vacuum test. That stuff works great
 

Tor R

Novice
GoldMember
Local time
5:24 PM
User ID
439
Joined
Jan 8, 2016
Messages
5,495
Reaction score
36,208
Location
Mandal
Country flag
Used the FIT puller to get the seals out. Pretty easy...
View attachment 97846
View attachment 97848

I really like the Husqvarna tool for putting the seal on the PTO side.
While they don't show one for it, the 272 series does the job. 502 50 53-01
View attachment 97850

Important note: Seal on the flywheel side should be 1 mm proud, PTO side 1 mm sunk under flush.
Steve, lathe out a seal adapter system, special on models you often swap seals on.
The one I plan to use as a base is the seal mandrel to 550, #575 34 70 01

try 505 38 17-23 for the seal protector sleeve
I can recommend them seal protector sleeves, I don't have the 55 sleeve (not yet), but I've used the sleeves for 242 and 346&550, they are worth every dolar.


Question for your 55 guys (for some odd reasons I've never got any 50,51,55 projects from my dealer).... There is two different crank mounting kits from Husky who both are ment for this serie.
502 50 30 09, 50>9250856, 45>9251168, 40>9101116
502 50 30 12, on them newer ones.

Anyones knows if there was different crank threads on them 40/45/50's through their life span?
 

RIDE-RED 350r

Here For The Long Haul!
Local time
11:24 AM
User ID
839
Joined
Feb 8, 2016
Messages
3,228
Reaction score
12,761
Location
Blossvale NY
Another good thread @Onan18

I have a 55 open port mostly torn apart. The P&C is smoked and it needs several other bits and pieces and some TLC. Once my 242 is done I'll probably dig into that one. I'm thinking I might try the Huztl 55 Closed Port P&C kit on this one. I don't really NEED another saw in this size as I have a solid 359 and a ported 357, but the chase to make something out of nothing is where the fun lies.

Good tips on the oil pump worm gear removal @Stump Shot . Do all 51 and 55 have this setup?

I can see why these saws remain popular. All of the benefit of "professional class saw" construction but at a lower price point and a bit less performance compared to the XP counterpart of it's day. Not unlike how the 359 related to the 357xp and the triple-nickel relates to the 562xp now.
 
Top