High Quality Chainsaw Bars Husqvarna Toys

g395 + hyway hackorama

srcarr52

Shop rat, backyard slice cutter.
GoldMember
Local time
7:07 AM
User ID
522
Joined
Jan 12, 2016
Messages
3,937
Reaction score
25,982
Location
Iowa City
Country flag
Not a fan of grinding the AM cylinders as the plating is specious at best, once u break into the edge & it begins to flake that cylinder is now compromised. OEM top ends would make a better starting place, even a used one.

There are even some OEM cylinders that like to flake so you have to be extra careful. A few that come to mind are the new Husqvarna 585/592 cylinders, and old Stihl 064 cylinders.

Some AM cylinders are worse than others. The worst ones I've dealt with where HyWay 359 cylinders. Some, like Dukes 660 cylinder I just did showed no signs of flaking.
 

buckin-wood

Well-Known OPE Member
Local time
7:07 AM
User ID
10835
Joined
Oct 29, 2019
Messages
64
Reaction score
94
Location
North East
Country flag
Not a fan of grinding the AM cylinders as the plating is specious at best, once u break into the edge & it begins to flake that cylinder is now compromised. OEM top ends would make a better starting place, even a used one.

OEM P&C is $200+, while the hyway is $80. If the FT cylinder can be reworked and a duke's or other piston can be had for $20-30 that seems like the best way tot go in terms of why most people are getting these saws. No way I'd buy a $350 Chinese 395 and then spend $200 on a top end for it. Although I suppose if I had OEM jug laying around or got my hands on it cheap enough I could talk myself into it :) Even with what little run time I have on the stock FT and reworked Hyway, there is simply no comparison between the two. I don't think I could bring myself to run a stock FT cylinder after getting a taste of a reworked one.

To anybody trying to get a flywheel to stop breaking the key. Lap the two together as best you can then make them both clean and dry of anything. Put nothing on the taper and assemble and properly torque. Ive had stuff sid down too far and the nut couldnt torque the assembly properly due to the shoulder of the taper stuck up too high.

I usually just wipe everything down with acetone and stick the flywheel on... washer... nut... piston stop, torque to "pretty tight" but not rod bending tight. I'll give it another shot with no loctite I guess. Worse that can happen is that it spins again. I'm tempted to stick a timing light on it and see where it's at.

@srcarr52 I really wanted to run a couple different burrs and doodads in the contra handpiece and spent countless hours designing the perfect fixture to convert some shafts to latch style. I can send the dxf over if you want... behold...

PXL_20220830_193202051.jpg


PXL_20220830_193506513.jpg
 

srcarr52

Shop rat, backyard slice cutter.
GoldMember
Local time
7:07 AM
User ID
522
Joined
Jan 12, 2016
Messages
3,937
Reaction score
25,982
Location
Iowa City
Country flag
@srcarr52 I really wanted to run a couple different burrs and doodads in the contra handpiece and spent countless hours designing the perfect fixture to convert some shafts to latch style. I can send the dxf over if you want... behold...

It might be interesting to others with the handpieces but I use my CNC lathe and a makeshift toolpost grinder to modify the burrs.


afleetcommand

Pinnacle OPE Member
Local time
7:07 AM
User ID
2524
Joined
Jan 25, 2017
Messages
960
Reaction score
3,868
Location
CNY
Country flag
To "Back's" point, I actually do have a used OEM P&C laying around. Carburetor as well. Snagged them for $75 bucks on eBay a while back. Found another from a pile I bought from a dealer going out. Ebay is a good place to start. I would still go there & OEM used before going to AM. I've also stuck a grinder n a few cylinders over time and learned Hyway's flake just as bad as the rest if you aren't careful, and there is a definition of "careful" for me. :) But time is money . A day in the woods cutting is more productive than grinding on a AM cylinder to have it cost me time to repair if the plating flakes....so it's a risk I'm not willing to take anymore. AND A couple of days in the woods along with a the resultant triaxle load sold way more than pays for an extra $100 or so to find a better pallet ( cylinder) to paint on (grinding my idea's into aluminum) My humble opinion. TO the "why most people are getting these saws" ( On the cheap) Tell you what, from what I'm seeing you can get a whole bunch of triaxle loads out for under $500 ( saw, bar, OEM upgrades, & chain ) with one of these g395's, even if it's a "POS" as compared to some $1500 option for some similar displacement option. Wonder how long the g395 with an OEM top end would last relative to something like a $1200 Husqvarna or Stihl. Where I could spend the $500 to $700 dollars to close the potential gap in value. Something to ponder. I have to get back to the woods now. The reason I like these things is they are fun, but pay for themselves. A hobby that pays. Build a saw...cut until it pays for itself, move it along, do it again. ( The 361's clones were NOT fun, neither were the clone 360's and g372xt & xp's. This g395 is ) I do have to say it's really cool what you are building. Hoping it is a success, prolly will. A VIDEO of it kicking azz would b fun, looking forward to your build on display :)
 
Last edited:

buckin-wood

Well-Known OPE Member
Local time
7:07 AM
User ID
10835
Joined
Oct 29, 2019
Messages
64
Reaction score
94
Location
North East
Country flag
It might be interesting to others with the handpieces but I use my CNC lathe and a makeshift toolpost grinder to modify the burrs.


haha, nice. I figured you weren't eye balling and cutting them by hand :) In version 2.0 of my setup I might step up the game and drill the hole in scrap wood with a drill press. it will be amazing. haha

To "Back's" point, I actually do have a used OEM P&C laying around. Carburetor as well. Snagged them for $75 bucks on eBay a while back. Found another from a pile I bought from a dealer going out. Ebay is a good place to start. I would still go there & OEM used before going to AM. I've also stuck a grinder n a few cylinders over time and learned Hyway's flake just as bad as the rest if you aren't careful, and there is a definition of "careful" for me. :) But time is money . A day in the woods cutting is more productive than grinding on a AM cylinder to have it cost me time to repair if the plating flakes....so it's a risk I'm not willing to take anymore. AND A couple of days in the woods along with a the resultant triaxle load sold way more than pays for an extra $100 or so to find a better pallet ( cylinder) to paint on (grinding my idea's into aluminum) My humble opinion. TO the "why most people are getting these saws" ( On the cheap) Tell you what, from what I'm seeing you can get a whole bunch of triaxle loads out for under $500 ( saw, bar, OEM upgrades, & chain ) with one of these g395's, even if it's a "POS" as compared to some $1500 option for some similar displacement option. Wonder how long the g395 with an OEM top end would last relative to something like a $1200 Husqvarna or Stihl. Where I could spend the $500 to $700 dollars to close the potential gap in value. Something to ponder. I have to get back to the woods now. The reason I like these things is they are fun, but pay for themselves. A hobby that pays. Build a saw...cut until it pays for itself, move it along, do it again. ( The 361's clones were NOT fun, neither were the clone 360's and g372xt & xp's. This g395 is ) I do have to say it's really cool what you are building. Hoping it is a success, prolly will. A VIDEO of it kicking azz would b fun, looking forward to your build on display :)

I can definitely understand the fun factor. These saws are probably best suited for those capable and willing to futz with them a bit. If you can use them commercially while keeping reliable enough with minimal down time and cost kudos to you. I'm just cutting firewood for myself and occasionally helping a friend drop a tree here and there. I've got a grapple load to buck... maybe I'll have this G395 sorted by the time the weather cooperates. If not, my dolkitas will get all the fun.
 

buckin-wood

Well-Known OPE Member
Local time
7:07 AM
User ID
10835
Joined
Oct 29, 2019
Messages
64
Reaction score
94
Location
North East
Country flag
I ordered an "OEM" washer. A standard looking zinc plated washer showed up in a husqvarna bag. guess I was thinking it would be some sort of hardened precision ground washer for the price :facepalm: 
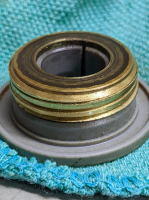
The seller probably bought washers in bulk for pennies per pound and selling them as OEM. At least the OD/ID dimensions are much closer to what they're supposed to be and its substantially thicker than the farmertec washer.

"OEM" on left FT on right
PXL_20220909_190820850.jpg

PXL_20220909_190840379.jpg
 
Last edited:

buckin-wood

Well-Known OPE Member
Local time
7:07 AM
User ID
10835
Joined
Oct 29, 2019
Messages
64
Reaction score
94
Location
North East
Country flag
The plot thickens. I ordered another OEM washer from a different seller. I don't know for sure what an OEM 395 flywheel washer is supposed to look like, but I'm pretty dang sure whatever FT decided to put on my saw has no business being between the nut and flywheel.

Latest "OEM" washer vs FT shim/flexy spring steel pile of poop:

Screenshot from 2022-09-12 16-42-54.png

Screenshot from 2022-09-12 16-43-10.png


While I've had this saw apart for longer than its been together I sometimes hold it up and pretend it runs and makes glorious saw sounds and smells. At one point with the top covers off while imagining I was bucking a 40" red oak log I noticed when I pull the throttle it doesn't actually open the throttle plate all the way. I futzed with it a bit but the issue remained, throttle stops opening 90-95%. With my finger I could push it open the rest of the way. What was happening is the bracket the throttle cable goes through is too far forward in relation to the carb's throttle lobe. I took the bracket out gave it some heat and bent the arm down and back a bit. I probably should have taken before and after pictures or measured things, but I was too much of a rush to get 100% throttle out of this amazing pile of mediocre parts. For reference here is a picture after I bent it back a bit...


Screenshot from 2022-09-12 17-00-23.png
 

Nutball

Here For The Long Haul!
Local time
6:07 AM
User ID
7732
Joined
Oct 31, 2018
Messages
4,042
Reaction score
11,036
Location
Mt. Juliet, TN
Country flag
I think @Moparmyway may have had a similar issue, but when using a 394 cable on a 395. I'm not sure if those problems are related.
 

Moparmyway

Its just a saw
GoldMember
Local time
7:07 AM
User ID
21
Joined
Dec 4, 2015
Messages
5,237
Reaction score
28,047
Location
In a meeting
Country flag
Yup, I elected to add some safetywire under the crimped barrell, which removed the slack and allowed full throttle operation.

Like stated, this was on Husqvarna saws, I’ve not touched these clones, nor will I
 

srcarr52

Shop rat, backyard slice cutter.
GoldMember
Local time
7:07 AM
User ID
522
Joined
Jan 12, 2016
Messages
3,937
Reaction score
25,982
Location
Iowa City
Country flag
Yup, I elected to add some safetywire under the crimped barrell, which removed the slack and allowed full throttle operation.

Like stated, this was on Husqvarna saws, I’ve not touched these clones, nor will I

It's common to have to do this on 394's after dropping the jug or and on 395 from wear on the trigger parts. I usually take add a spacer to the trigger side.
 

buckin-wood

Well-Known OPE Member
Local time
7:07 AM
User ID
10835
Joined
Oct 29, 2019
Messages
64
Reaction score
94
Location
North East
Country flag
This was something different I guess. I actually tried making it tighter.... even pulling the line with pliers from the trigger side would not open the throttle wide open. Maybe someone else with a g395 could pop the top covers off and give the trigger a pull and see if the carb is going wot
 

srcarr52

Shop rat, backyard slice cutter.
GoldMember
Local time
7:07 AM
User ID
522
Joined
Jan 12, 2016
Messages
3,937
Reaction score
25,982
Location
Iowa City
Country flag
This was something different I guess. I actually tried making it tighter.... even pulling the line with pliers from the trigger side would not open the throttle wide open. Maybe someone else with a g395 could pop the top covers off and give the trigger a pull and see if the carb is going wot

You should double check the WOT stop on the carb. Many AM carbs I've seen are opening the butterfly past horizontal and the stop needs to be bent to prevent it.
 

buckin-wood

Well-Known OPE Member
Local time
7:07 AM
User ID
10835
Joined
Oct 29, 2019
Messages
64
Reaction score
94
Location
North East
Country flag
You should double check the WOT stop on the carb. Many AM carbs I've seen are opening the butterfly past horizontal and the stop needs to be bent to prevent it.

Good thinking, I checked and it seems ok. With throttle against the stop I'm getting .383 between carb and throttle plate on one side and .393 on the other side... just a hair shy of wide open There's more left, I better start bending or grinding :)

PXL_20220913_181315822.PORTRAIT.jpg


The screw on the choke is just begging to be ground down a bit?!

PXL_20220913_181644135.PORTRAIT.jpg


I guess it was too much effort for FT to drill the plastic for access to the carb bolts? Not an issue when you pull the P&C with intake intact, but handy when you just want to pop the carb off. Easy to remedy, I ran a drill bit through real quick. Wonder if it was an issue with the injection molding or someone just forgot to tidy up the plastics. The list of these little things is growing.

PXL_20220913_182643062.PORTRAIT.jpg


Anyone want to guess what I'll see for timing? fixed or progressive curve? Not knowing what it's supposed to be at I'll get base numbers and then try moving it a few degrees. I know its janky, just stuck the timing hashes on with spray adhesive and then clear coated over it. Should be fine for a little while. The orange color bleed through and some marks I had been using to get an idea of how I'd mark the degrees are bleeding through as well. I should have used some thicker paper I guess. Maybe I'll redo it with metal stamps if I get bored, or maybe not. probably not


PXL_20220913_181901849.jpg
 

srcarr52

Shop rat, backyard slice cutter.
GoldMember
Local time
7:07 AM
User ID
522
Joined
Jan 12, 2016
Messages
3,937
Reaction score
25,982
Location
Iowa City
Country flag
Good thinking, I checked and it seems ok. With throttle against the stop I'm getting .383 between carb and throttle plate on one side and .393 on the other side... just a hair shy of wide open There's more left, I better start bending or grinding :)

View attachment 348485


The screw on the choke is just begging to be ground down a bit?!

View attachment 348484


I guess it was too much effort for FT to drill the plastic for access to the carb bolts? Not an issue when you pull the P&C with intake intact, but handy when you just want to pop the carb off. Easy to remedy, I ran a drill bit through real quick. Wonder if it was an issue with the injection molding or someone just forgot to tidy up the plastics. The list of these little things is growing.

View attachment 348482


Anyone want to guess what I'll see for timing? fixed or progressive curve? Not knowing what it's supposed to be at I'll get base numbers and then try moving it a few degrees. I know its janky, just stuck the timing hashes on with spray adhesive and then clear coated over it. Should be fine for a little while. The orange color bleed through and some marks I had been using to get an idea of how I'd mark the degrees are bleeding through as well. I should have used some thicker paper I guess. Maybe I'll redo it with metal stamps if I get bored, or maybe not. probably not


View attachment 348483

Just bend the tab of the throttle stop to adjust it, no need to grind on the stop.

There are no holes in a 395 carb box because it has a rubber boot. You can just flex the carb up out of the box to get to the screws.

I've found stock timing of a 395's to between 20-24deg. They don't have much of a curve if any. AM coils I've found to be 10-15deg behind an OEM coil.

You know you have to change your timing mark locations when you advance the flywheel, so no sense making them permanent. I normally just put a sharpie mark for TDC and use a timing light with advance on it.
 

buckin-wood

Well-Known OPE Member
Local time
7:07 AM
User ID
10835
Joined
Oct 29, 2019
Messages
64
Reaction score
94
Location
North East
Country flag
Just bend the tab of the throttle stop to adjust it, no need to grind on the stop.

There are no holes in a 395 carb box because it has a rubber boot. You can just flex the carb up out of the box to get to the screws.

I've found stock timing of a 395's to between 20-24deg. They don't have much of a curve if any. AM coils I've found to be 10-15deg behind an OEM coil.

You know you have to change your timing mark locations when you advance the flywheel, so no sense making them permanent. I normally just put a sharpie mark for TDC and use a timing light with advance on it.

Guess I can't blame FT for not drilling out the hole if the OEM wasn't either. From now on I'm going to refer to my carb bolt access holes as a "light weight mod". By the time I'm done hacking on this saw it will be 12lbs... probably in a box on the shelf.

The FT coil I have on there now is running 19 degrees from 2900ish through about 10k rpm where my light stops working. Maybe its time to upgrade my older than dirt timing light and get a fancy one with adjustable timing? I have another 395 AM coil I might toss on to see what its does. I assume if oem runs upto 24 degrees I should push closer to that... or more?

I figure I can set the crank/flywheel at 0 and then move the flywheel 6 degrees counterclockwise to bring me to 25 degrees total advance. Or am I not thinking about this correctly?
 

qurotro

Cookie Cutter
Local time
6:07 AM
User ID
6198
Joined
May 19, 2018
Messages
1,284
Reaction score
5,198
Location
Ar
Country flag
OEM brand new carb box or new saw have that carb screw hole undreilled. I always think these 2 little holes will draw fine dust.
 

buckin-wood

Well-Known OPE Member
Local time
7:07 AM
User ID
10835
Joined
Oct 29, 2019
Messages
64
Reaction score
94
Location
North East
Country flag
been a while... since last post I managed to catch a ring on the exhaust port when I was starting it one day. Luckily no major damage, had some streaks in the piston I didn't like, but cylinder walls seemed well enough. I assume this happened because of my crappy chamfering and a 38mm wide exhaust port? Re-chamfered the ports, did a light hone on the cylinder, replaced piston and rings, and put it back together. Got more time on it since and it runs strong. No more top end problems and no flywheel issues so far.

additional thoughts and observations
-the dual port muffler I made is loud as hell, second guessing whether it's worth it
-my gosh it's a thirsty saw
-wow, could the orange paint FT used be any crappier?
-it looks like FT did final clearancing of the crank case after the cases were painted?
-overall this thing rips pretty good. I guess the updated port timing, higher compression and advanced timing will do that

It was going pretty well until it wasn't. My beloved chinese 94cc sound machine started having oiling problems. I guess FT decided to help reduce pollution by limiting bar oil consumption. Or maybe this is a power mod! less power is used to drive the oil pump which puts more power to the chain?!

upload_2022-10-11_19-48-42.png


Clearly there is a clearance/alignment issue somewhere. Do I just buy oem parts and ditch the FT pump and worm gear? They included a spare worm gear with the saw... almost as if they knew I was going to need it in short order. Maybe this is just a consumable part, one worm gear every other gallon of gas?
 

Attachments

  • upload_2022-10-11_20-4-28.png
    upload_2022-10-11_20-4-28.png
    583.1 KB · Views: 1

buckin-wood

Well-Known OPE Member
Local time
7:07 AM
User ID
10835
Joined
Oct 29, 2019
Messages
64
Reaction score
94
Location
North East
Country flag
Took the oil pump apart last night and cleaned it out and put it back together. Today I tossed the spare worm gear that FT included in and got the saw out to make some noise. It lasted almost exactly 1 tank of gas this time. Something is amiss and getting worse.

I threw a dial indicator on the crank and there's no discernible runout. I guess I'm buying another oil pump and pile of worm gears
 

Maintenance Chief

Disrupting the peace with an old chainsaw
Local time
7:07 AM
User ID
11378
Joined
Jan 4, 2020
Messages
3,782
Reaction score
11,958
Location
South Carolina
Country flag
Screenshot_20221012-214534_Drive.jpg
I see theres a washer in the mix in the 394xp ipl , sure you got the right depth with it ? Or didn't use your flywheel nut washer in there?
 

buckin-wood

Well-Known OPE Member
Local time
7:07 AM
User ID
10835
Joined
Oct 29, 2019
Messages
64
Reaction score
94
Location
North East
Country flag
View attachment 351251
I see theres a washer in the mix in the 394xp ipl , sure you got the right depth with it ? Or didn't use your flywheel nut washer in there?


There's a washer in there... 27.80mmx15mm, 1mm thick. It seems close to a reference I found online that indicated OEM is 28x15mmx1mm. Really hoping its just an out of spec oil pump gear? I have another AM oil pump and worm gears on order, but will be a few days for them to get here. It will be interesting to compare the bunch. I also ordered the OEM shim/washer for giggles.
 
Top