High Quality Chainsaw Bars Husqvarna Toys Hockfire Saws

Ms260 Rebuild by a beginner

Kiwioilboiler

346 Pic Examiner
Local time
6:22 AM
User ID
12322
Joined
Apr 20, 2020
Messages
9,653
Reaction score
63,527
Location
Marsden Pt, NZ
Country flag
So take a ball hone to it lightly and look at the possibly scored area again?
TC the Mastermind method referenced by Canadian Farm Boy is the industry standard, but I have had good success with a piece of 120 grit emery tape lubed with a squirt of wd40. Use your finger of choice to rub the emery paper on the transfer and check often. Up and down, side to side. Good cylinder feels slippery with the wd40, ally piston transfer not so much.
 

drf256

Dr. Richard Cranium
GoldMember
Local time
2:22 PM
User ID
319
Joined
Dec 29, 2015
Messages
9,592
Reaction score
63,143
Location
Strong Island NY
Country flag
S

So take timing numbers with and without a gasket, figure out the squish, and get some fuel resistant sealant? Also, do you see the scored area in the last pic? It looks like it’s through the plating if my eyes don’t lie
Take them the way you will eventually run the saw. I can tell you that the ex will be 95ish, this intake floor around 68-70 and the uppers 127ish with the gasket.
So take a ball hone to it lightly and look at the possibly scored area again?
Please don’t, use the sanding method above, most damage below the exhaust roof usually doesn’t matter. You won’t have any irregularity of the bore where compression occurs. The rings stop riding on the plating near the exhaust floor. You just need to make sure there isn’t any transfer left and that any other damage isn’t proud to the bore.
 

Sagebrush33

Pinnacle OPE Member
GoldMember
Local time
2:22 PM
User ID
15779
Joined
Feb 19, 2021
Messages
1,439
Reaction score
4,054
Location
Upstater
Oh the little pic. I dont think I have ever changed mine.

Sent from my SM-G950W using Tapatalk
Dang my absent mind ...LOL
Could have sworn it was sometin else.
May be time to lock me up in a funny farm soon. I think I may be loosin my mind. LOL
 

Cooper264

Well-Known OPE Member
GoldMember
Local time
2:22 PM
User ID
15265
Joined
Jan 5, 2021
Messages
370
Reaction score
417
Location
Southern WV
I’m with you on the not skimping. What are some good brands of compression testers?

If you have another use for them ide say SNAPON, but I bought OTC as I have no other needs for a compression tester. Very good quality and fairly cheap priced for the quality. Proto sells nice ones but they are a little old style, mityvac has some nice ones as well
 

Tinkerer Carver

Well-Known OPE Member
Local time
1:22 PM
User ID
16348
Joined
Apr 27, 2021
Messages
41
Reaction score
74
Location
St Louis
Take them the way you will eventually run the saw. I can tell you that the ex will be 95ish, this intake floor around 68-70 and the uppers 127ish with the gasket.

Please don’t, use the sanding method above, most damage below the exhaust roof usually doesn’t matter. You won’t have any irregularity of the bore where compression occurs. The rings stop riding on the plating near the exhaust floor. You just need to make sure there isn’t any transfer left and that any other damage isn’t proud to the bore.
Alright, so I finally got around to watching the mastermind videos, work has been crazy and taking my time. I have one question. Why is it necessary to go through sandpaper and then scotchbrite at the end? Could I just get a more coarse scotchbrite and go through the grits that way?
 

RI Chevy

Mastermind Approved!
Local time
2:22 PM
User ID
1254
Joined
May 7, 2016
Messages
27,002
Reaction score
67,779
Location
earth
Country flag
I'm guessing its like honing the cylinder walls. Smooth out any sanding lines, etc.
 

Redfin

Meh...
Local time
2:22 PM
User ID
159
Joined
Dec 24, 2015
Messages
7,645
Reaction score
39,993
Location
Central Pa
Country flag
Alright, so I finally got around to watching the mastermind videos, work has been crazy and taking my time. I have one question. Why is it necessary to go through sandpaper and then scotchbrite at the end? Could I just get a more coarse scotchbrite and go through the grits that way?
You will be sanding for days with scotch brite depending how thick the transfer.
 

Mastermind

Chief Cat Herder
Staff member
Yearly GoldMember
Local time
1:22 PM
User ID
4
Joined
Dec 3, 2015
Messages
52,180
Reaction score
347,356
Location
Banner Springs Tennessee
Country flag
Alright, so I finally got around to watching the mastermind videos, work has been crazy and taking my time. I have one question. Why is it necessary to go through sandpaper and then scotchbrite at the end? Could I just get a more coarse scotchbrite and go through the grits that way?

After doing a BUNCH of these......well, just trust me here. LOL
 

Tinkerer Carver

Well-Known OPE Member
Local time
1:22 PM
User ID
16348
Joined
Apr 27, 2021
Messages
41
Reaction score
74
Location
St Louis
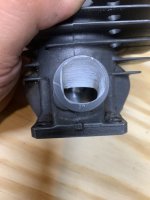
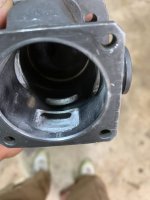
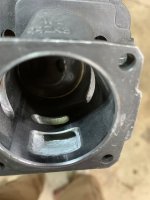
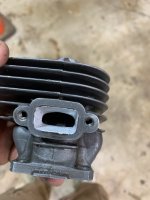
Managed to find a spare hour or so tonight to work on the 260. Haven’t made the degree wheel yet, so it was just some grinding. Ground some ridges in the intake the way Tinman does, cleaned up the exhaust and cleaned up the lower transfers. No timing was harmed in the making of these photosE181D2F7-802E-4A02-B941-E8A11715F999.jpeg105E3758-EF44-4DB0-A93D-984024388A89.jpeg61E740B3-2E49-4D54-97B5-D56C238AF52F.jpegD10FE3EC-2A04-4F33-99B9-B128673451D1.jpeg
 
Top