High Quality Chainsaw Bars Husqvarna Toys Hockfire Saws

Ms260 Rebuild by a beginner

Tinkerer Carver

Well-Known OPE Member
Local time
6:14 PM
User ID
16348
Joined
Apr 27, 2021
Messages
41
Reaction score
74
Location
St Louis
That jug definitely looks serviceable. I would stick a good meteor piston and caber rings in it, replace the previously mentioned common wear/air leak items of the impulse line, fuel line and intake boot, rebuild the carb and vacuum/pressure test it. This would be a good chance for some basic performance modifications if you were interested like deleting the cylinder gasket assuing it leaves enough squish, advancing the timing, and opening up the exhaust a bit or at least matching muffler gasket and inlet to the exhaust port outlet. And remember it's just a saw and you have plenty of "help"
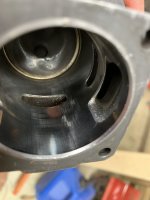
Since I’ve already ground on this one, I was thinking performance mods as well. I was thinking port match to where the intake boot sits, port match the exhaust, widen the port on the muffler. Also, for the base gasket delete, do you just use RTV? Or could I measure the squish with a new gasket and have my machinist buddy mill off the difference of the gasket?42E18EBA-449C-4697-95D0-7153E94191C4.jpeg Here is a closer pic of the scored area
 

Wonkydonkey

Plastic member
Local time
12:14 AM
User ID
3189
Joined
May 14, 2017
Messages
5,213
Reaction score
23,435
Location
Sussex, UK.
Country flag
I think you need to get some timing # first, as well as an accurate squish with out the gasket,

As I’ve never got a jug machined I,m not really sure from here, I just know around 18-20 thou is what is wanted for a good squish,

but I,m sure someone will jump in and school me at the same time.:aplastao:
 

drf256

Dr. Richard Cranium
GoldMember
Local time
7:14 PM
User ID
319
Joined
Dec 29, 2015
Messages
9,592
Reaction score
63,143
Location
Strong Island NY
Country flag
Since I’ve already ground on this one, I was thinking performance mods as well. I was thinking port match to where the intake boot sits, port match the exhaust, widen the port on the muffler. Also, for the base gasket delete, do you just use RTV? Or could I measure the squish with a new gasket and have my machinist buddy mill off the difference of the gasket?View attachment 294529 Here is a closer pic of the scored area
I think you’ve got a 44.7mm jug there. If it is, squish without gasket should come in around .017. You may just need a fuel resistant sealant on the bottom. Dirko, Motoseal, Yama/Hondabond, Loctite 518 all work.
 

Basher

Pinnacle OPE Member
Local time
8:14 PM
User ID
552
Joined
Jan 16, 2016
Messages
1,324
Reaction score
4,334
Location
Canada
Country flag
Since I’ve already ground on this one, I was thinking performance mods as well. I was thinking port match to where the intake boot sits, port match the exhaust, widen the port on the muffler. Also, for the base gasket delete, do you just use RTV? Or could I measure the squish with a new gasket and have my machinist buddy mill off the difference of the gasket?View attachment 294529 Here is a closer pic of the scored area
If you only need a few thou taken out of the squish band at the top of the cylinder you can sand it out by using the old piston, cleaned up and glue sandpaper to the crown, some turning of the piston is required but easily do able. A little scraping after sanding with a wood chisel real tight to the cylinder wall corner will remove any metal missed by the sandpaper.
 

Tinkerer Carver

Well-Known OPE Member
Local time
6:14 PM
User ID
16348
Joined
Apr 27, 2021
Messages
41
Reaction score
74
Location
St Louis
I think you need to get some timing # first, as well as an accurate squish with out the gasket,

As I’ve never got a jug machined I,m not really sure from here, I just know around 18-20 thou is what is wanted for a good squish,

but I,m sure someone will jump in and school me at the same time.:aplastao:
Looks like I will need to make a degree wheel
 

Tinkerer Carver

Well-Known OPE Member
Local time
6:14 PM
User ID
16348
Joined
Apr 27, 2021
Messages
41
Reaction score
74
Location
St Louis
S
I think you’ve got a 44.7mm jug there. If it is, squish without gasket should come in around .017. You may just need a fuel resistant sealant on the bottom. Dirko, Motoseal, Yama/Hondabond, Loctite 518 all work.
So take timing numbers with and without a gasket, figure out the squish, and get some fuel resistant sealant? Also, do you see the scored area in the last pic? It looks like it’s through the plating if my eyes don’t lie
 

Cooper264

Well-Known OPE Member
GoldMember
Local time
7:14 PM
User ID
15265
Joined
Jan 5, 2021
Messages
370
Reaction score
417
Location
Southern WV
Just a heads up for everyone thats looking to buy things like comp testers and leak down testers, don't skimp on them. Pay decent money and pick a decent brand. In my early saw days I got a cheap comp tester from harbor freight, cant tell you how many saws I passed over or sold way too cheap because I thought they had low compression... Live and learn
 

Mastermind

Chief Cat Herder
Staff member
Yearly GoldMember
Local time
6:14 PM
User ID
4
Joined
Dec 3, 2015
Messages
52,179
Reaction score
347,334
Location
Banner Springs Tennessee
Country flag
We are here to help. Personally have done a few of them 026/260’s.

Which parts do you have? Looks like a 44mm top end to me. I’d use that jug cleaned up, you won’t get the same performance from an AM P&C set. Meteor pistons are fine. That broken fin won’t do a thing.

Do you definitely have a carb with 2 adjustment screws? They came both ways, and IIRC only the Zama has an adjustment limiter. Never seen one on a Walbro on the 1121 model.

If you plan on working on saws, a vacuum and pressure testing tool is a must. In general. A small air leak will result in issues with keeping idle stable. You’ll chase it forever.

You are really forced to go through everything because the saw scored in the first place. Invest in a new oem fuel line and filter and a new oem impulse line. Carb needs to be gone through as well, may as well rebuild it in case there is an issue with fuel supply with the carb itself. The screen may be caked with the debris or there may be a metering issue.

The 1121 is one tough little saw. The bearings are oversized and usually last a very long time. If there is no radial play and they look good, you can probably get by with leaving them alone. A case split may be more than you’re up for at this point.

I know it sounds like a lot, but you can do it.

Great post Doc.

Good thread fellas.
 

stretch5881

Pinnacle OPE Member
GoldMember
Local time
6:14 PM
User ID
4859
Joined
Dec 23, 2017
Messages
1,001
Reaction score
3,000
Location
Hatley, Wisconsin
Country flag
S

So take timing numbers with and without a gasket, figure out the squish, and get some fuel resistant sealant? Also, do you see the scored area in the last pic? It looks like it’s through the plating if my eyes don’t lie

It's really hard to tell if there is scoring until you have all the transfer removed.
 

Chainmale

Super OPE Member
Yearly GoldMember
Local time
11:14 AM
User ID
14057
Joined
Oct 6, 2020
Messages
233
Reaction score
571
Location
Tasman New Zealand
Country flag
Just a heads up for everyone thats looking to buy things like comp testers and leak down testers, don't skimp on them. Pay decent money and pick a decent brand. In my early saw days I got a cheap comp tester from harbor freight, cant tell you how many saws I passed over or sold way too cheap because I thought they had low compression... Live and learn
Yep, I nearly striped down an 025 of all things to do rings because of the cheap one I first bought. Another time that browsing through these forums has saved me.
 

Wonkydonkey

Plastic member
Local time
12:14 AM
User ID
3189
Joined
May 14, 2017
Messages
5,213
Reaction score
23,435
Location
Sussex, UK.
Country flag
How do you plan to make your own? I'm all ears. Want to do some beginner port work myself but spent a bit much on tools and saws lately to buy one

you can print a degree wheel off the web, then stick it on a round plastic or metal thing, then fashion up something to fix it to a side of the crank.

I stuck it to a circular metal piece, and used a drill Chuck to tighten to the pto side

edit this is the first hit from googling degree wheel and is what I used

https://www.blocklayer.com/degree-wheel.aspx
 
Last edited:

Tinkerer Carver

Well-Known OPE Member
Local time
6:14 PM
User ID
16348
Joined
Apr 27, 2021
Messages
41
Reaction score
74
Location
St Louis
Just a heads up for everyone thats looking to buy things like comp testers and leak down testers, don't skimp on them. Pay decent money and pick a decent brand. In my early saw days I got a cheap comp tester from harbor freight, cant tell you how many saws I passed over or sold way too cheap because I thought they had low compression... Live and learn
I’m with you on the not skimping. What are some good brands of compression testers?
 

Nutball

Here For The Long Haul!
Local time
6:14 PM
User ID
7732
Joined
Oct 31, 2018
Messages
4,240
Reaction score
11,745
Location
Mt. Juliet, TN
Country flag
If it's a 44.0mm (probably isn't) cylinder it will need a lot of material removed from the squish band to work without a gasket.

Check squish with a thin (.025") piece of solder. Twist it on itself for more thickness if needed.

I have an OTC compression tester. Snap on or a chainsaw brand if available would be good too.
 
Top