High Quality Chainsaw Bars Husqvarna Toys

Dolmar 64xx/73xx/79xx series, smurfs and solo 665/675/681 thread

mettee

Pinnacle OPE Member
Local time
11:37 PM
User ID
5872
Joined
Apr 10, 2018
Messages
1,425
Reaction score
5,403
Location
Arizona
Country flag
Finally got to the timing advance. So you told me to file away the cast in key on the flywheel, he Mason? It is pretty tiny. Any chances in damaging the flywheel by filing into the cylindrical part instead of the nub?
View attachment 330550

My grandfather had files with one edge surface ground and I always wondered why.

I had something I needed to file, and I remember that one special file of his I still had! I didn't want to get into one side of the part.

So if you have a small file, grind one side down and make it smooth. That will keep it from cutting in where you don't want it.
 

Stefaan

Super OPE Member
Local time
8:37 AM
User ID
12483
Joined
May 4, 2020
Messages
110
Reaction score
440
Location
Belgium
Country flag
My grandfather had files with one edge surface ground and I always wondered why.

I had something I needed to file, and I remember that one special file of his I still had! I didn't want to get into one side of the part.

So if you have a small file, grind one side down and make it smooth. That will keep it from cutting in where you don't want it.


I did the same with a small file I used to grind on the key. Thanks, Mettee ;)
 

davidwyby

Tree felling enthusiast
GoldMember
Local time
11:37 PM
User ID
5156
Joined
Jan 24, 2018
Messages
7,945
Reaction score
29,366
Location
Extreme Southeast CA
Country flag
This thread is too long…7900 vs. 681? Thinking about a 681 for longer bars if the 1mm stroke is worth it, after welding the crank I guess?
 

mettee

Pinnacle OPE Member
Local time
11:37 PM
User ID
5872
Joined
Apr 10, 2018
Messages
1,425
Reaction score
5,403
Location
Arizona
Country flag
Parts aren't available for the solo as much as they are for the dolmar.

And dolmar is king

If you need a long bar saw go big as you can handle. 395, 9010. If you are really worried about the torque.

Wait don't you have a ported 7900
 

mettee

Pinnacle OPE Member
Local time
11:37 PM
User ID
5872
Joined
Apr 10, 2018
Messages
1,425
Reaction score
5,403
Location
Arizona
Country flag
POSTED WITH PERMISSION @Poleman

Well finally.....

I know a few of you have been waiting for this and others just want to know/see how it's done.

First off this is for the Zama C3M on Dolmar 6400-7900 and will also work for on Husqvarna 365-372's old style.
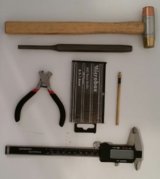
96452-f51b64e9e1db536137a451224dbcf4d4.jpg


Tools you'll need.
Micro Drill Bits , Caliper to measure and make sure of drill size being used.
Pin vice to hold drill bit for drilling
Modified pliers to pull main jet
Hammer and punch to reinstall main jet

Also if eye sight is poor a set of magnifying glasses. And a small magnet.

I drill totally by hand so I can feel what the bit is doing and when it goes threw the jet. I do this because there is a membrain beneath the main and auxilery jet. I can see no adverse results but don't recommend you drill threw it.

96463-e8800371f66c3b2ab61011e4c99e585c.jpg


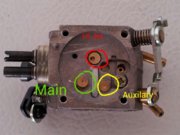
Here is the carb lay out, with jets identified.

I drill the main jet first then move to the auxilery jet.

I then use the modified pliers to get ahold of the main jet (firmly but not crushing). I find it will come right out when using a rocking motion. Again firm grip so it doesnt slip. You will probably deform the jet slightly wher you grab. Its just cosmetic. You can sand it smooth again but reinstalling it with a sharp rap will usually make the edges lay back down.

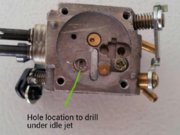
Next the mixing chamber hole under the main jet is drilled to .55 mm. This is the one constant jet size on all carbs. This helps ideling caricturistics.


96464-4fb35468ccf477c124dc6992be2e07dc.jpg


Drill the hole closest to the edge. Again very easy to drill by hand. Be patient.
The jets drill slghtly harder since they are brass.

Now look at the underside of the main jet you removed...is the membrain still in place? If it is you can reinstall the main jet...if not take your small drill bit and work it back in. The membrain can come out and block the mixing holes and cause tuning problems. I have not seen this happen with a true Zama only Aftermarket carbs.

This is why I drill both jets first so when I remove jet I can check it.

Reinstall jet with the hammer and flat punch.

At this point reassemble and set carb and install in saw for your first test run.

On a stock saw I would reccomend
.3 for main jet
.35 for auxillary
.55 for mixing chamber-this will always be the same.

Start saw and tune. If there are problems having enough idle screw to get saw to idle but saw is running good otherwise remove carb from saw as a hole will be needed in the throttle plate to give the saw more air it is requiering from the introduction of more fuel it is recieving

96476-568b242be8b1edd5915901ae018f01b9.jpg


Drill it on the top of the throttle plate away from the jet on the bottom. With stock I would recommend 1mm hole to start. Reassemble and retest saw, see if there is enough screw to set a satisfactory idle with more screw to spare.

Run and enjoy!!!!

Now for the brave and builders......LETS GO BIGGER!!!
This will be for the ported and Big Bored saws.


Jet sizes:
Main .3 to .35
Auxilery .40
Mixing chamber .55

When you go with bigger main and auxillary it also affects the top end fuel. You may find that the H screw is totally closed and you need more rpm's as the saw isn't reaching the rpm it should.

96478-421f0542d76a9e07e886c7eebaa84841.jpg


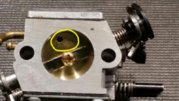
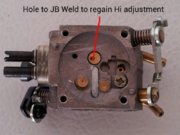
To regain the high speed adjustment you will need to JB weld the high speed jet closed. Clean carb with a shot of brake clean and let it dry. Mix a very small amount of JB weld and use a toothpick to place a small amount in the hole shown. The carb will need to dry over night at this point.

This should give you the high adjustability back an H screw will be totally adjustable.

The carb should be close to adjusting like stock when finished. If you find you went to far on the main or auxillary just JB weld them shut and redrill to the size that worked better.
Like wise on the throttle plate, if your getting to much air take the plate off carb, clean and solder shut and redrill smaller.

I have found you can correct things with JB weld if you go to big on any of yor drilling or if you just want to try bigger.

I hope this helps all interested and makes things easier to follow compared to the earlier thread.

Feel free if there are any questions.

Thank you, Terry Syd for your encouragement and your wisdom......this is you Buddy!!!!!

The end!

There is another thread on another site that is the extended version of this tutorial by @Poleman where there is lengthy discussion.

Just completed the mods on a carb for the saw I'm building for a buddy. I ported the sheet out of it so I decided to go bigger.

Main to .33 mm - .013"
Aux to .43 mm - .017"

Mix chamber to .55 mm - .0216"

I did JB weld the high speed jet as I want the carb to adjust normally, and also run right, ha!

@huskyboy thinned the shafts in his carb and said that that mod yielded noticeable gains so I thinned the shafts in this carb as well.

I'm having good luck pulling the jets. It's pretty stressful if you bork one up, as you create a potentially junk carb....unless you have donor carbs.

I want to try one more mod on the elbow slightly extending the reach to see if it will help the transition into the carb. This is the regular low top set up on this saw.
 

mettee

Pinnacle OPE Member
Local time
11:37 PM
User ID
5872
Joined
Apr 10, 2018
Messages
1,425
Reaction score
5,403
Location
Arizona
Country flag
There was no room to modify the elbow like I wanted to. Sadly. It could really use another 1/4 inch rearward, that would get the choke blade out of the way of downward air in that stock set up.
 

Kiwioilboiler

346 Pic Examiner
Local time
6:37 PM
User ID
12322
Joined
Apr 20, 2020
Messages
8,640
Reaction score
53,402
Location
Marsden Pt, NZ
Country flag
There was no room to modify the elbow like I wanted to. Sadly. It could really use another 1/4 inch rearward, that would get the choke blade out of the way of downward air in that stock set up.
Any room for a fraction of a quarter inch? I haven't looked closely at my @tree monkey via @huskihl 7900, but I have a couple of filtration options.
If a couple of mm gasket would help the airflow round the open butterfly tip then I'd find a way.
 

mettee

Pinnacle OPE Member
Local time
11:37 PM
User ID
5872
Joined
Apr 10, 2018
Messages
1,425
Reaction score
5,403
Location
Arizona
Country flag
Any room for a fraction of a quarter inch? I haven't looked closely at my @tree monkey via @huskihl 7900, but I have a couple of filtration options.
If a couple of mm gasket would help the airflow round the open butterfly tip then I'd find a way.


Yes for sure just trim out the back of the housing...it's not ideal but you won't really see it.

The one thing I did not check was if you would still be able to take the filter on and off.

That's with the factory clip.
 
Top