High Quality Chainsaw Bars Husqvarna Toys Hockfire Saws

Willard's vintage Hotsaw Builds

Billy Currie

Pinnacle OPE Member
Local time
1:43 AM
User ID
7398
Joined
Sep 21, 2018
Messages
507
Reaction score
1,938
Location
Asheboro, NC
Country flag
I chamfer all my ports. Tops and bottoms get more radius than sides. I lightly do the sides due to piston scuffing. I see this mostly on the intake and exhaust ports. I think it's mostly due to the amount of area that is open and not supporting the piston and uneven expansion of parts during warmup and operation.
 

Bigmac

Mastermind Approved!
Local time
10:43 PM
User ID
5937
Joined
Apr 19, 2018
Messages
5,611
Reaction score
39,083
Location
Oregon
Country flag
I touch up all the port edges and and give a light radius to the top and bottom of the ports, and a little more to the exhaust port. Have seen unprepared cylinders scored and no compression in a half hour of use, because of no chamfer. Have seen lots of pro-x cylinders for the 250r that people didn’t chamfer the sub exhausts and it would stick the rings directly at those ports!
I believe the transfers need to be eased, it’s easier on the rings, and it will wipe oil off if it’s too sharp. I also don’t think you need to go crazy with extreme chamfer. I have worked on a lot of cylinders that’s didn’t get chamfer and they were all showing signs of premature wear. I have also seen lots of bore distortion wear from non torque plate boring, and the cylinder stud located wear, cr500 are really bad for that!
 
Last edited:

Willard

Here For The Long Haul!
Local time
12:43 AM
User ID
3011
Joined
Apr 13, 2017
Messages
1,293
Reaction score
6,798
Location
Manitoba
Country flag
Alex here from Norway has quite the site going on trying to break the 50cc unstreamlined world speed record at Bonneville salt flats.
His first attempt last year got canceled as they got rained out.
He's at it again this year with new and improved technology.

This is one of his earlier videos on porting when his English wasn't as good.
He casts his own 50 cc cylinders with some up to 100% wide exhaust ports.
He advises about leaving the transfers alone and just removing burs.
 
Last edited:

Bigmac

Mastermind Approved!
Local time
10:43 PM
User ID
5937
Joined
Apr 19, 2018
Messages
5,611
Reaction score
39,083
Location
Oregon
Country flag
Alex here from Norway has quite the site going on trying to break the 50cc unstreamlined world speed record at Bonneville salt flats.
His first attempt last year got canceled as they got rained out.
He's at it again this year with new and improved technology.

This is one of his earlier videos on porting when his English wasn't as good.
He casts his own 50 cc cylinders with some up to 100% wide exhaust ports.
He advises about leaving the transfers alone and just removing burs.
I have watched a lot of his videos, he is a cool guy! But there is also a big difference in some of these different uses, stroke length and bore size also come into play, deburing is a form of chamfering, just minor. He also talked about the slip fit crank, and is some cases it can work, cranks that have enough step for the webs to not scuff the case, but on others the case scuffing would loose power and cause debris it enter the engine! He is entertaining and makes you think, but not all of his ideas are proven. Like the 100% exhaust port, many pipe builder would say that’s too big and too much fuel would go out the exhaust. Idk, I take it with a gain. Arlan thinks a bridged exhausts port is too wide for proper scavenging and you will loose too much fuel out the exhaust, or lost power. So who’s correct? It depends!! Lol
 

Bigmac

Mastermind Approved!
Local time
10:43 PM
User ID
5937
Joined
Apr 19, 2018
Messages
5,611
Reaction score
39,083
Location
Oregon
Country flag
The interesting thing is his advice in the video it completely different that his ultimate most powerful 2t cast cylinder. I would advise against using the 90° for working on the main exhaust port, it’s much easier to work through, and you can use a straight shaft tool. His advice on angles is pretty good, but these old cylinders are not as advanced as the cylinder he is working with, it’s a pretty nice cylinder to start with. I am battling with some theories for my next build, and some options I have. Transfer area vs reed valve size and cc displacement. I have the option to use cr250 cage or cr500, and interestingly enough the small cage makes more power, the same thing was true for my older option, the stock banshee cage made more than the 250 cage, given a certain transfer area and displacement. It’s all interesting an fun to bench race in your mind. Velocity is important, along with direction. It’s interesting to see the cp casting, extremely well designed and make fantastic power, there port shapes and designs are really close to ideal, they make proven power. It’s hard to beat 440cc that exceed 110hp at a moderate 9k rpm, looking to upgrade to 580cc and get closer to 140hp at 9k.
 

Willard

Here For The Long Haul!
Local time
12:43 AM
User ID
3011
Joined
Apr 13, 2017
Messages
1,293
Reaction score
6,798
Location
Manitoba
Country flag
I always tend to stir some speculation with different ideas to stir some debate and I do take it all with a grain of salt. Thanks to the others for adding your 2 cents!

Like you said it's all fun to bench race in our minds, but until we set it up and test it we find every application is different.

It appears Alex from Norge is in secret lockdown in his new build. Last video I found he's shooting for 19K rpm out of a little 50cc motor.
No more rotary valve or intake valve what so ever just relying on the best setup tune pipe.
And that Atkinson prototype piston with captive ring, covered wrist pin bores via screw on crown sounds extreme.
Gotta say he originally built a strong foundation of a crankcase for that motor to adapt on something someone with simple machining skills and patience can easily build with the right source of aluminum material.
Sure got my gears turning haha.
 
Last edited:

Willard

Here For The Long Haul!
Local time
12:43 AM
User ID
3011
Joined
Apr 13, 2017
Messages
1,293
Reaction score
6,798
Location
Manitoba
Country flag
Have to say I put my little project down on secret lockdown at the moment too.
Got some challenges with the fuel /oil tank. Experimenting with the idea of CNC build for a larger backup tank when running Alky/nitro.
Found a local retired nickel miner who bought his own CNC machine. Lots of possibilities, just waiting for him to get back from vacation in the Caribbean.

And seeing this thread is on a forum that is wide open to the internet I gotta be careful to not tick off anybody that's helping out.

Dead of winter here...in a time when I'm normally organizing and running a winter festival chainsaw speed cutting and carving competition.
One of my time keepers texted me a pic last night of a guy from Minnesota who took 1st place in the 4 hour carving event yesterday afternoon.
-35 below F windchill when he was carving. Only someone from Minnesota outside of Manitoba can work work comfortably in that.Lol.
907.jpeg
 
Last edited:

Willard

Here For The Long Haul!
Local time
12:43 AM
User ID
3011
Joined
Apr 13, 2017
Messages
1,293
Reaction score
6,798
Location
Manitoba
Country flag
My advice for anyone setting up a workshop for a hotsaw project or any kind of small engine build if you want to do most of the work yourselves in a cold or wet climate area.
You need to have a separate room for grinding, cutting, bead blasting, welding etc.

With wet weather and a pretty big patio project holding me back I did have a plan last summer to put up a 6'×10' shed against the back wall of my little shop. Run wiring into it from the shop's service. Take the side bench out and put it in there along with the spare base board heater, wall fan, grinders, other cutting tools.

Maybe it's just me but I like to have a clean workspace to spend most of my time in.
 

Willard

Here For The Long Haul!
Local time
12:43 AM
User ID
3011
Joined
Apr 13, 2017
Messages
1,293
Reaction score
6,798
Location
Manitoba
Country flag
How is everyone doing with your social distancing?
Thank gawd for saw projects eh?
My family and I are bunkered down comfortably. Once a week I do the grocery run with my N95 dust mask and safety glasses PPE.

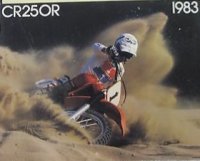
So today with my YZ125/CR250R hotsaw build update I'm reporting that I did some major upgrades.

Seeing the most certain chance of timbersport competitions being canceled everywhere this year I'm now not committed to a time line to have these saws ready in a few months.

The little YZ125 I'm discarding some of the design I put into it.
The CR250R I put in storage and will get to it later this year when I get the YZ125 up and going closer to to the tuning point.

On the YZ I rechecked its port #'s after a previous screwup measuring in the chamfers.
Here they are 202°/129° 36°blowdown. Much much better #'s then I earlier posted.
Basically it just needs bolt on parts like a new pipe and head work to finish it.
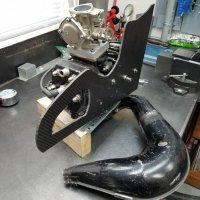
Shown in the 2nd pic of the YZ125 I'm replacing the aluminum side plate with carbon fiber. I'm building a whole new lightweight fuel/oil tank not needing the aluminum sideplate to weld into.
20200327_144654.jpg 20200327_144832.jpg

The Honda CR250R below is patiently waiting in the sidelines:cool:
20200126_152027.jpg
 

Willard

Here For The Long Haul!
Local time
12:43 AM
User ID
3011
Joined
Apr 13, 2017
Messages
1,293
Reaction score
6,798
Location
Manitoba
Country flag
So no more aluminum sideplate on the YZ125.
My new Dremel with a hole cutter and carbide cutter bit made up the 3mm carbon fiber plate fit perfect.
Opposite PTO sideplate is 5mm CF.
Still lots of trimming down to form the top handle uprights.

20200401_120233.jpg 20200401_184913.jpg
 

Willard

Here For The Long Haul!
Local time
12:43 AM
User ID
3011
Joined
Apr 13, 2017
Messages
1,293
Reaction score
6,798
Location
Manitoba
Country flag
Quarantine is working well with my project.
This morning I needed 14 inches of 2"×4"× 0.125 aluminum seamless tubing. I had to dig it out from under 4 feet of heavy snow, Lol.
Will have something new to post in a few days!
20200406_112040.jpg 20200406_112700.jpg
 
Last edited:

Lightning Performance

Here For The Long Haul!
Local time
1:43 AM
User ID
677
Joined
Jan 26, 2016
Messages
10,991
Reaction score
28,057
Location
East of Philly
That’s awesome on the ti! I have been looking into for my banshee! That stuff is spendy! The pivot bolt for the swingarm is $240, was looking into a it rear brake rotor, 180, but it turning weight, so thinking pretty hard about it! I have already dropped 40 lbs with a chromoly chassis and some deleting View attachment 220174View attachment 220175
Just put my narrow ass on it... 3/10ths ;)
Good stuffs


Start out your small saw with the small sprocket and mild numbers. Nothing to lose now with plenty of R&D time. Find the weak points early from leaning on it in the cut. :hello:
 

Willard

Here For The Long Haul!
Local time
12:43 AM
User ID
3011
Joined
Apr 13, 2017
Messages
1,293
Reaction score
6,798
Location
Manitoba
Country flag
Start out your small saw with the small sprocket and mild numbers. Nothing to lose now with plenty of R&D time. Find the weak points early from leaning on it in the cut. :hello:
Actually I thought my little YZ125 had aggressive numbers with its 202.23°/129.55° and 36° blowdown.

The small 11T .375 spur I've have had on the YZ since day one racing it from the early 1980's into the mid 1990s.
Originally in my build the 11T was for the big 22" Douglas fir competition wood in the 140cc open class out on the B.C. coast.

Ended up the 11T worked just fine in the smaller 10"×10" because the saw was so pipey...just kept the rakers at .040-.050.

I beat that saw hard for the 10 plus years, alot of shows when temps were down below -30F.
Always had alot bigger carb then the 38 SBN I have on it now.
Still got the standard bore OEM cylinder on it that I bought from the Yamaha dealer in the late 1980's.
 

Willard

Here For The Long Haul!
Local time
12:43 AM
User ID
3011
Joined
Apr 13, 2017
Messages
1,293
Reaction score
6,798
Location
Manitoba
Country flag
Tonight I was going to install the PTO side plate crank dust seal .
The 36 year old silicone seal in the YZ125'S old aluminum plate was still in good shape.
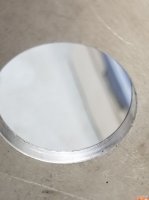
Pressed it out and thought I better practice first on a scrap piece before cutting a hole in my new expensive carbon fiber plate.
Had this old never used tile cutter laying around, must be old it says made in Taiwan not China.
Needed a 41.30mm hole cut so set it a little past 40mm.
Gave it a try in the drill press , seal pressed in perfect and tight, what a surprise!
But the cutter wasn't long enough to center on the crank stub's centering hole.
From looking at the old plate hole how the machinist left a .010" lip to retain the seal.
I'm seeing another machinist with a proper boring machine. Lol.
20200409_205349.jpg 20200409_210901.jpg
 
Last edited:

Willard

Here For The Long Haul!
Local time
12:43 AM
User ID
3011
Joined
Apr 13, 2017
Messages
1,293
Reaction score
6,798
Location
Manitoba
Country flag
I'm making good use of my bargin priced Chinese drill press I bought 10 years.
Tapping 5mm screws.

20200411_135208.jpg 20200411_162703.jpg
 

Willard

Here For The Long Haul!
Local time
12:43 AM
User ID
3011
Joined
Apr 13, 2017
Messages
1,293
Reaction score
6,798
Location
Manitoba
Country flag
Finally over the hump with the YZ125 fuel tank design, CR250R will get the same build later.
I got a pile of reject aluminum tank pieces in the corner of the shop, Lol.

At the moment cutting new tank aluminum sideplates to tie into the carbon fiber plates. When she's all lined up it's off to the tig welder.
Capacity:
fuel is 16oz. for alcohol/nitro.
Oil 4oz.

Still got to finish the titanium mount for the 12T .404 .063 rim sprocket.
And I also got a 14T .404 rim to have for a spare when it comes to ripping those tiny 8"×8" pine:D
With 202°/129.5° road race porting the rims are plenty big enough for the YZ125.

My projection of 22lbs PHO without pipe YZ125 still looks good.
20200413_114133.jpg
 
Last edited:

Willard

Here For The Long Haul!
Local time
12:43 AM
User ID
3011
Joined
Apr 13, 2017
Messages
1,293
Reaction score
6,798
Location
Manitoba
Country flag
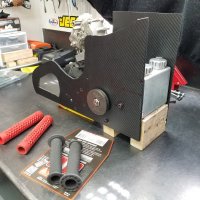
So here's the piece that took so long to figure out and fabricate.
This is the PTO side fuel/oil tank sideplate that sandwiches between the crankcase and outer carbon fiber sideplate. Still lots to trim away from the bottom half of the plate to clear the TRX style drag pipe.
The oil tank is only 1.5" wide ×4.5"long and runs into the main fuel tank just below the oil cap.
That cavity underneath the oil cap only has a 1/4" of clearance just enough to allow filling the main oil tank.
The oil cap and fuel cap share the same top cover on top of the tank.
The cover is sealed with Three Bond 1194 and held down with 3mm screws. There is total separation between the fuel and oil tanks.

3 ounces of oil is enough for the 1 minute warmup plus under 12 seconds in the wood.
Like I did 36 years the oiler will be pressurized with a small bicycle pump. The Schrader inline valve tee'd into the throttle linkage will squirt oil past 3/4 throttle into the bar pad.

20200413_154836.jpg
 
Last edited:
Top