High Quality Chainsaw Bars Husqvarna Toys Hockfire Saws

Measuring squish on my MS200T

MattG

Chainosaurus Rex
Local time
3:54 AM
User ID
3111
Joined
Apr 30, 2017
Messages
896
Reaction score
1,432
Location
Cambridgeshire, England
Country flag
Those casting flaws is the reason I prefer a machined squish band over a pop-up type piston.

.013 is a little too tight in my mind. So, I'd add a beer can gasket at least.

Well, it seems that I may not actually need to shim out to get the required clearance. Last night, I done the "machine the top of the dome" trick using an old piston with a disc of emery stuck on top. A guy I was chatting to on a Brit forum encouraged me to have a go. Have to say, it was a lot easier than I thought, and I reckon I've got a pretty decent squish clearance without the base gasket now, rough measurements being between 17 - 22 thou in the 4 different measurement points. Will try to get some piccies up in the next day or so.
 
Last edited:

MattG

Chainosaurus Rex
Local time
3:54 AM
User ID
3111
Joined
Apr 30, 2017
Messages
896
Reaction score
1,432
Location
Cambridgeshire, England
Country flag
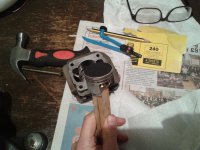
Got couple of a piccies, so the basic procedure with the old piston, with a well cut disc of emery on top....

2017-05-03 17.09.30.jpg
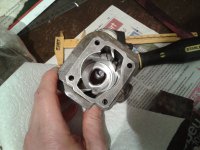
As you can I was pretty fortunate that my eldest girl had got a math geometry compass :), since that way I ended up cutting out the emery discs pretty accurate. I tried various ways to hold the disc to the old piston, superglue was one way.....good, but harder to remove, as I changed the disc a few times. Best option was double-sided tape, applied in a cross-pattern. So as you've probably guessed I just cleaned the inside of the jug well first, oiled the sides and a tiny bit on the dome to assist the cutting action, and then just pushed the piston to the bottom and applied a kind of valve grinding in type action using the old stick I'm holding. After a minute or 2, I'd lift the piston out and check, blah, blah.....and got kinda bored using P240 at first (damn slow), so I briefly lost it and used P80 - and man did that cut! So then I put a fresh of P240 on to give it a final polish. I'm pretty pleased with the result, I've got a nice squish band and got rid of those stupid casting issues. This pic below aint great but I guess you get the idea:
2017-05-03 18.37.53.jpg
In order not to f**k the bore up, I meticuously cleaned the bore and piston after each lift.

I guess the next thing for me to do, is raise the exhaust port by the same amount as the height I lost from deleting the base gasket (0.5mm).....
 

Wood Doctor

Edwin
Local time
9:54 PM
User ID
846
Joined
Feb 9, 2016
Messages
2,482
Reaction score
8,664
Location
Omaha, Nebraska
Country flag
I disagree, and you can watch me do it bolt for bolt on youtube so its not so intimidating. :)
Well, I must admit that the second one I worked on seems easier than the first. What I learned was what not to take apart. On the first attempt, I dismantled too much. An important avoidance is to NOT take apart the top handle and its internal components. Remove yes, but take apart no. That's a spider web with a black widow waiting to bite you. The second major gremlin is the impulse hose. Learning to cope with that little monster has made life easier. Anyway, I cut my work time in half on the second attempt.
 

Mattyo

Youtube speciawist
GoldMember
Local time
10:54 PM
User ID
441
Joined
Jan 8, 2016
Messages
4,285
Reaction score
10,915
Location
Farmington, CT
Country flag
Ya....those are a tad trixy. Probably a good idea to replace thay impulse hose fairly often. It has a nasty habit of slipping off the nipple on the top handle...which is one of the dumbest poorly designed things on the saw. Fresh hose doesn't slip off easily.
 

MattG

Chainosaurus Rex
Local time
3:54 AM
User ID
3111
Joined
Apr 30, 2017
Messages
896
Reaction score
1,432
Location
Cambridgeshire, England
Country flag
Well, I must admit that the second one I worked on seems easier than the first. What I learned was what not to take apart. On the first attempt, I dismantled too much. An important avoidance is to NOT take apart the top handle and its internal components. Remove yes, but take apart no. That's a spider web with a black widow waiting to bite you. The second major gremlin is the impulse hose. Learning to cope with that little monster has made life easier. Anyway, I cut my work time in half on the second attempt.
Yeah you're right there. This one is my second one, I've learnt a lot after the first. I've stripped the internals of the top handle before, since I had to diagnose a problem in the past. It's all good if you make notes and photos and take it slow, but if you don't need to do it then leave well alone. For this saw, the top handle is all wrapped away safe and sound waiting patiently for when it needs to go back.

The other thing which was a complete and utter tart for me on the first was when you reassemble the crank cases it really pays to have all the ignition cut-off lead, grommet, and the HT lead ready to go in the cases, and just slowly work the cases back together. On my first 200, I overlooked this, and working through old, twisted wires through the grommet and round the passageway on the other side that you can't see cos you closed the cases is like hell on earth!!! You live and learn!
 
Last edited:
Top