I'm not in the same county as where my saw things are stored now, or I'd try to get some photos for ya'll.
I did the sprocket mod to a clutch shell for a Poulan 2900. (hey it was good runner!)
The oiler is the type with the oiler mounted between the clutch and the crankcase, not driven by the clutch, so it doesn't affect your chain sprocket choice here.
First thing was to find a bolt that was a close fit through the bearing bore of the clutch hub.
You'll need the bolt and nut later on.
Then I held the rim on top of the clutch shell teeth and sharpie marked the general area to be removed of the teeth from the clutch drum.
Then I used a cutting disc mounted on a Chinese copy of a Dremal to freehand rough out the first bits of tooth removal.
Then I loosely put that aforementioned bolt (and nut) through the base of a drill press stand made for the rotary tool.
Now you need the rotary tool mounted on the drill press stand with whatever abrasive point you'll be using. The bit/point is straight sided, much like the little chain grinder abrasive bits or a diamond bit.
Now you get to adjust the bolt location (in the drill press base) so that that the clutch teeth just touch the first /tallest tooth left on the clutch hub.
Now you can power up and begin the process of slowly and carefully and slowly hand-spin the clutch shell and slowly grinding the tooth tops.
Only go for a few thousandths of tooth grind with each adjustment of the bolt location.
Now the next fun part is getting the teeth down to where you can feel~see that the sprocket is ready to slip on.
Third step is the really tedious one!
This is where you move the bolt or swing the drill press head in so that the grinding point is in between the teeth on the clutch hub and just a bit away from touching the hub between the teeth.
Now the fun part is turning the clutch shell against the side of each of the teeth and thining them to the point that the new rim will slip down over them.
You need to do the tooth thinning slowly with stopping to check each tooth against the rim teeth.
Did I mention that this was tedious??
Took me an afternoon going into the night with this ghetto rig.
Cooked the low priced Chinese rotary tool in the process also.
A rotary table with a pin in the center that fits the clutch center hole would be best.
Then do the work on a milling machine would be way better.
but I don't own either of them. So thus I was left curious and bored enough to try the poor mans rig.
Sometimes a fellow's just gotta try?
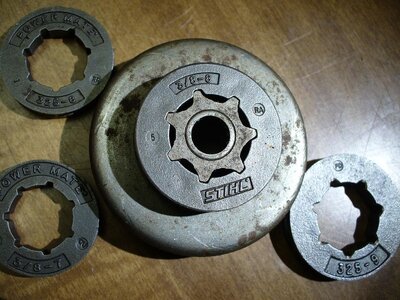
Edit: I ran across an image of the clutch shell that I described above.
memory's fuzzy, but I'm kinda thinking that it started life as a .325 x 7 tooth spur.