High Quality Chainsaw Bars Husqvarna Toys Hockfire Saws

Help me design my saw shack...

Red97

Mastermind Approved!
GoldMember
Local time
3:30 PM
User ID
385
Joined
Jan 2, 2016
Messages
7,496
Reaction score
54,159
Location
MI
Country flag
I still have the door I took off a few years ago. going to hinge it on the left. while it is open it will block the compressor noise.

Dosent seem like it, but it has been 8 years since I put the osb on the lower half..
 

dieselfitter

Pinnacle OPE Member
Local time
2:30 PM
User ID
266
Joined
Dec 26, 2015
Messages
499
Reaction score
2,752
Location
MN
Country flag
I still have the door I took off a few years ago. going to hinge it on the left. while it is open it will block the compressor noise.

Dosent seem like it, but it has been 8 years since I put the osb on the lower half..
I put an air filter on my compressor. A real one, not the piece of foam it came with. I mounted the air filter on the outside wall. It quieted the compressor down quite a bit. In the winter, it was pulling in some pretty dry dense air.
 

USMC615

Fapper Fi
GoldMember
Local time
3:30 PM
User ID
976
Joined
Mar 1, 2016
Messages
21,197
Reaction score
114,020
Location
Mid-Georgia
Country flag
I put an air filter on my compressor. A real one, not the piece of foam it came with. I mounted the air filter on the outside wall. It quieted the compressor down quite a bit. In the winter, it was pulling in some pretty dry dense air.
Excellent idea...seen it done before. Works great!
 

Red97

Mastermind Approved!
GoldMember
Local time
3:30 PM
User ID
385
Joined
Jan 2, 2016
Messages
7,496
Reaction score
54,159
Location
MI
Country flag


Thinking 5 more of these, plus all white walls/ceiling ought to be adequate light. They likely will be mounted directly to the ceiling

Plan for the bench to use the entire far wall, and right wall. 2 lights left to right over the far wall, and 3 over the bench along the right wall. last one will be off to the left side in front of the powerhead shelf.
 

USMC615

Fapper Fi
GoldMember
Local time
3:30 PM
User ID
976
Joined
Mar 1, 2016
Messages
21,197
Reaction score
114,020
Location
Mid-Georgia
Country flag


Thinking 5 more of these, plus all white walls/ceiling ought to be adequate light. They likely will be mounted directly to the ceiling

Plan for the bench to use the entire far wall, and right wall. 2 lights left to right over the far wall, and 3 over the bench along the right wall. last one will be off to the left side in front of the powerhead shelf.
Nail off all your OSB good and tight with 8's...looking good.
 

Red97

Mastermind Approved!
GoldMember
Local time
3:30 PM
User ID
385
Joined
Jan 2, 2016
Messages
7,496
Reaction score
54,159
Location
MI
Country flag
Nail off all your OSB good and tight with 8's...looking good.

1 1/2 deck screws. Think the true 2" oak studs are strengthening the osb lol. The spot on the wall to the left is an oops. First board is overhanging the stud 6"... Live and learn 18-26 centers..
 

USMC615

Fapper Fi
GoldMember
Local time
3:30 PM
User ID
976
Joined
Mar 1, 2016
Messages
21,197
Reaction score
114,020
Location
Mid-Georgia
Country flag
1 1/2 deck screws. Think the true 2" oak studs are strengthening the osb lol. The spot on the wall to the left is an oops. First board is overhanging the stud 6"... Live and learn 18-26 centers..
I hear ya. I probably missed it, how big is the shop?
 

USMC615

Fapper Fi
GoldMember
Local time
3:30 PM
User ID
976
Joined
Mar 1, 2016
Messages
21,197
Reaction score
114,020
Location
Mid-Georgia
Country flag
Furr out your framework for the pegboard with ripped down 1x's (3/4" deep) and rip them about 1" wide. No sense in cutting yourself short with anything wider so you can take full advantage of the holes offered you with the pegboard. The wider you go with the furring out, the less holes you get to take advantage of. Look on Amazon for several different types of pegboard hooks. Remember the pic I posted with my pegboard setup on the backside of my main workbench? I bought about four different styles of hooks and straight hooks. Worked great.
 

Red97

Mastermind Approved!
GoldMember
Local time
3:30 PM
User ID
385
Joined
Jan 2, 2016
Messages
7,496
Reaction score
54,159
Location
MI
Country flag
Furr out your framework for the pegboard with ripped down 1x's (3/4" deep) and rip them about 1" wide. No sense in cutting yourself short with anything wider so you can take full advantage of the holes offered you with the pegboard. The wider you go with the furring out, the less holes you get to take advantage of. Look on Amazon for several different types of pegboard hooks. Remember the pic I posted with my pegboard setup on the backside of my main workbench? I bought about four different styles of hooks and straight hooks. Worked great.

Might give the peg board a shot, a section over the teardown area and one over the assembly area.
 

USMC615

Fapper Fi
GoldMember
Local time
3:30 PM
User ID
976
Joined
Mar 1, 2016
Messages
21,197
Reaction score
114,020
Location
Mid-Georgia
Country flag
Might give the peg board a shot, a section over the teardown area and one over the assembly area.
There ya go. Just don't use anything other than a ripped 1x. All you need is an offset of 3/4" nothing more, to get the hooks of the pegboard hangers through the backside of the pegboard. Nail the pegboard off with 6's or hit it with 5/8" sheetrock screws about every foot or so into your furred out framework... it'll be fine and you could hang anything you need hand-tool wise on any hanger regardless of where the weight is.
 

dieselfitter

Pinnacle OPE Member
Local time
2:30 PM
User ID
266
Joined
Dec 26, 2015
Messages
499
Reaction score
2,752
Location
MN
Country flag
Might give the peg board a shot, a section over the teardown area and one over the assembly area.
I like steel peg board. It doesn't warp from moisture and load. It cleans up easy too. Use exterior oil base gloss paint on everything. It holds up to pressure washer pretty good.
 

Magic_Man

Oh Yea !
Local time
3:30 PM
User ID
9
Joined
Dec 4, 2015
Messages
1,151
Reaction score
3,561
Location
SE Ohio
Country flag
I know I'm a little late to the party but I built my benches at 42" height 2' depth. I'm about 5'9" tall and it allows me to stand and work without looking down all the time or I can sit on a tall stool and work. If you mount a vise keep a small box or step stool to stand on. Sometimes when I get things mounted in the vise on top of an already tall bench I either can't see or can't get the leverage I need.

I am not a fan of shelves over benches for a couple reasons. One reason is I feel like they block a lot of light that would normally reflect off the wall. Second is stuff will fall off of them at the worst moment and either hit you in the head or worse. Years ago when I first started working in a guitar shop I was working on a $3500 Martin guitar. I was doing a little hammer work, nothing major, but enough to knock a bottle of super glue from the shelf above that then spilled all over the finish. Needless to say the shop owner ended up buying that guitar from the customer, the finish all had to be stripped off and the whole thing refinished putting its value at about half.

When I built my guitar and amplifier shop I had a similar idea as you. I wanted to build a long bench with progressive stations. What I found was it took more time to move projects from area to area with the greater chance of lost parts than it did to transfer tools from one are to the next. So I ended up dividing my bench into zones and each zone is dedicated to that project start to finish.

Harbor Freight magnetic trays are invaluable, each zone has at least two of them. I used to use ziploc bags for small parts but found I never reused them. So that added to cost and always forgetting to restock. I ended up going to a dollar store and getting some small totes with lids that measure about 10" wide x 4" deep x 12" long. You can get several uses out of them and are easy to clean up. I also use them under my bench to store materials and specials tools. They stack nicely and keep things organized with a label on the end plus they are clear so you can easily see what's in them.
 

Red97

Mastermind Approved!
GoldMember
Local time
3:30 PM
User ID
385
Joined
Jan 2, 2016
Messages
7,496
Reaction score
54,159
Location
MI
Country flag
Things have changed a little since this picture. There is now a 5 drawer tool box on the end closest to us and the plastic totes mentioned before have been moved under the bench directly below it.
View attachment 40669
View attachment 40670

How big is your work area there?

Since I am low on ceiling height, I am looking for under bench storage ideas.

I do like the clear drawer organizer, thinking of doing section of shelf 2-3ft long 6-8" above the bench.

Thank you for the ideas. Even the small organizers kills bench space sitting directly on top.

I just gotta get the bench built, and see how things fit/flow.
 

Magic_Man

Oh Yea !
Local time
3:30 PM
User ID
9
Joined
Dec 4, 2015
Messages
1,151
Reaction score
3,561
Location
SE Ohio
Country flag
How big is your work area there?

Since I am low on ceiling height, I am looking for under bench storage ideas.

I do like the clear drawer organizer, thinking of doing section of shelf 2-3ft long 6-8" above the bench.

Thank you for the ideas. Even the small organizers kills bench space sitting directly on top.

I just gotta get the bench built, and see how things fit/flow.
You are looking at half my shop, the other half behind me is the storage space with shelves and racking built.
Bench top is 10' total length on the left, 8' across the back, and 6' on the right. Door opens into the end of the bench on the right. Small parts organizers are space killers, those small drawer organizers are made to be hung on the wall and could clear up a little space. Corners on this bench turn into dead zones, they don't get used much for anything other than pilling stuff up.
 

Magic_Man

Oh Yea !
Local time
3:30 PM
User ID
9
Joined
Dec 4, 2015
Messages
1,151
Reaction score
3,561
Location
SE Ohio
Country flag
Nice, that looks surgically sterile.
Because it is, originally the shop was built for vintage guitar and tube amp restoration. I now use it for saw building but have a " dirty bench" outside the door where I do all my cleanup and disassembly.

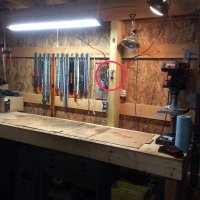
IMG_0404.JPG

I have also highlighted a very necessary accessory to any bench space. No more loosing or knocking over your water bottle on the bench top. It's always right at face height for easy finding. Although designed for holding a water bottle on a bicycle it also convienently holds 12 ounce glass bottles.
 
Top