High Quality Chainsaw Bars Husqvarna Toys

2511 Build

Ketchup

Epoxy member
Local time
1:12 PM
User ID
5594
Joined
Mar 12, 2018
Messages
1,843
Reaction score
5,317
Location
Colorado
Country flag
The Echo cs-2511t is an outstanding saw. I’ve had the pleasure of porting several and thought I would share my current build.

So here goes. Comments and criticism are welcome.

76387CA6-B06E-42AF-A9FC-E7B75A0A9C36.jpeg
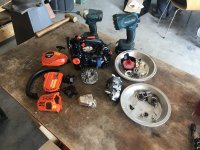
New saw amongst the typical dirty orange stuff.
492AC446-B3F6-4F52-AA4C-55AB1EF3DF24.jpeg
Some new parts.CD231C13-588E-4554-BCF7-9CA6697955F5.jpeg
I really love these saws. The strip down in about 15 minutes. The only finnicky part on the whole saw is the cover for the throttle linkages and that stays put for port work.
 

Attachments

  • 792A73F7-B2BA-4636-BC0C-9C505D847FC8.jpeg
    792A73F7-B2BA-4636-BC0C-9C505D847FC8.jpeg
    239.1 KB · Views: 28

Ketchup

Epoxy member
Local time
1:12 PM
User ID
5594
Joined
Mar 12, 2018
Messages
1,843
Reaction score
5,317
Location
Colorado
Country flag
I start with carb delimit. You can just run a drywall screw into the plastic screw covers and yank them out but the needles underneath are hard to get a screwdriver into. I ground down a pair of hemastats to pinch the plastic bits.
6D8C1776-5EF4-4A02-BD03-A5A6ECF302C6.jpeg
56C85C36-3FDD-4497-961A-4025DFB1A0A4.jpeg
It still takes a bit of finesse to get them out. I lock the hemastats down tight, then pinch the jaws down by the needle cover. The limiters have to be clocked to slots in the cover.
FD8D428A-7575-4F89-AB2B-3B648A3AE1C1.jpeg

Then I just shave the limiter tabs off with an exacto knife and put them back on. I try to keep the slots for the screwdriver head as crisp as possible.
 

PA Dan

Mastermind Approved!
Local time
3:12 PM
User ID
306
Joined
Dec 28, 2015
Messages
6,994
Reaction score
34,476
Location
White Oak PA
Country flag
You hear anything about the 1/4 pitch sprocket availability? I also heard the 2511 is being replaced in Echo's lineup?
 

Ketchup

Epoxy member
Local time
1:12 PM
User ID
5594
Joined
Mar 12, 2018
Messages
1,843
Reaction score
5,317
Location
Colorado
Country flag
BDD3720A-8300-4E4D-9F98-4AA6039ACA06.jpeg
I set the long block up in a pair of vice grips, then put that in a real vice and mount my timing wheel on the Flywheel side. This one is from different build and is upside down for some reason. You want the intake port facing up.

Stock #s:
Intake 66
Exhaust 110
Transfers 130

Squish 0.032”

The timing is pretty consistent but any port can vary 2 degrees or more.
 
Last edited:

Ketchup

Epoxy member
Local time
1:12 PM
User ID
5594
Joined
Mar 12, 2018
Messages
1,843
Reaction score
5,317
Location
Colorado
Country flag
You hear anything about the 1/4 pitch sprocket availability? I also heard the 2511 is being replaced in Echo's lineup?

Afraid not. They’re getting hard to find.
Haven’t heard, but I live under a rock.

Dropping 2511 would be a big mistake. It’s the best saw Echo makes.
 

Ketchup

Epoxy member
Local time
1:12 PM
User ID
5594
Joined
Mar 12, 2018
Messages
1,843
Reaction score
5,317
Location
Colorado
Country flag
I would love to see a battery saw with 2511 power:weight and size. Grinding these tiny buggers isn’t my favorite. And getting them tuned is a headache. No more pull start sounds dreamy.
 

Ketchup

Epoxy member
Local time
1:12 PM
User ID
5594
Joined
Mar 12, 2018
Messages
1,843
Reaction score
5,317
Location
Colorado
Country flag
7B67DFF2-91A1-4506-9DD7-35D1E1040954.jpeg
I really need to clean my lathe.

I take .038” off the base and flange. I bevel the flange. I like HSS for the base cut. It makes better chips and I can shape it to a nice point for cutting all the way up to the flange.

68D59FED-8308-479A-9D1C-80B6026A976A.jpeg

I cut the squish the old fashioned way. My cutter is sloped to match the shape of the piston. Those two are old dead ones with sticky sand paper for smoothing out the band.

I’ve gone back and forth on final squish. This one is 0.018”. I’ve done lots at 0.016”. Both seem good. My imagination says 0.018” revs higher and 0.016” has a hair more torque.
 

Nutball

Here For The Long Haul!
Local time
2:12 PM
User ID
7732
Joined
Oct 31, 2018
Messages
4,042
Reaction score
11,037
Location
Mt. Juliet, TN
Country flag
I found a battery powered 2500t 7.3lbs with battery, looks like similar run time to the 2511t, but at the expense of a couple more pounds. Not a replacement as far as I can tell.
 

Ketchup

Epoxy member
Local time
1:12 PM
User ID
5594
Joined
Mar 12, 2018
Messages
1,843
Reaction score
5,317
Location
Colorado
Country flag
Anyway,
90E3ADBD-C261-4B2E-AC43-579E3B17E277.jpeg
I raise and widen the exhaust, raise the transfers and don’t touch the intake.
C4FDA759-F22F-47C8-B2D4-8BB7DB2BD19E.jpeg
71FA9EE5-4E0F-423E-AFF6-30F1F3F8A45B.jpeg
I blend the lowers a bit. I like the dividers up inside the tunnels a few millimeters. That triangle on the flange wall of the flywheel side secondary irritates me. I leave it but I really want to get rid of it. It screams overengineered turbulence.
5CC7CFA1-9B89-462B-9F00-C7A0A0EC1773.jpeg
I’ve been ramping the uppers with good results. 4 degrees from cracking to full width.
 

Ketchup

Epoxy member
Local time
1:12 PM
User ID
5594
Joined
Mar 12, 2018
Messages
1,843
Reaction score
5,317
Location
Colorado
Country flag
How much lower does your exhaust end up after cutting base and squish before you grind on it? I assume the numbers you posted above are dead stock numbers.[/QUOTE

Those were stock numbers. After the base cut they usually land around 70/113/133 with the gasket. If you leave it that low you lose a significant amount of transfer port area. And RPM.
 

Ketchup

Epoxy member
Local time
1:12 PM
User ID
5594
Joined
Mar 12, 2018
Messages
1,843
Reaction score
5,317
Location
Colorado
Country flag
The transfer uppers on these tiny jugs are pretty difficult. The stock shapes have very sharp corners and the angles also pretty severe. I found my 182 was a little fat in the head for a really good shape. I managed to port with it but it was slow. And then…
778D7D47-84C2-4E9F-B13A-422CF154D4DC.jpeg
The bearings went out. This is the tool disassembled. If not for @Scarr and @huskihl, I would have never replaced the bearings. There’s a great write-up about it in the Technical Area. But the 182 is still too big for these tiny ports.
D6F4683F-0CA2-4E32-A3C3-95D9E908AE9B.jpeg
So I bit the bullet and got the teeny right angle from CCSpecialties. Twernt cheap. But it’s awesome and it takes dental bits.
 

Ketchup

Epoxy member
Local time
1:12 PM
User ID
5594
Joined
Mar 12, 2018
Messages
1,843
Reaction score
5,317
Location
Colorado
Country flag
Here’s a bit of grinding I don’t think most people do:
D0B9DBD4-A0CD-424F-BAA2-308D78DCAF7F.jpeg
The PTO side of the case constricts the secondary and that lump in the FW transfer ramp is just a boulder in the river. I gasket match the PTO side and grind away the boulder. Any suggestions on a better masking process are much appreciated. I haven’t found a tape that sticks very well.
 

Attachments

  • 562B92F9-E055-44DA-AB91-D179DEC02641.jpeg
    562B92F9-E055-44DA-AB91-D179DEC02641.jpeg
    83 KB · Views: 40

Ketchup

Epoxy member
Local time
1:12 PM
User ID
5594
Joined
Mar 12, 2018
Messages
1,843
Reaction score
5,317
Location
Colorado
Country flag
These saws go back together so easy. The only things I do are stretch the mount holes for the coil and the block mount behind the coil.
CAC15F7D-70D2-4C5A-B0E9-FAD6E40E9CE8.jpeg FE6D29AD-8840-4569-BA44-3B83FED6EC3C.jpeg

Not really porting related, but I open a lot of these up and find that someone has crushed the kill switch wiring while putting the pull start back on. I’m careful to tuck it back in.
DA89BC4B-2462-4605-AB74-1E121CC43722.jpeg
 

ktmtigger

Super OPE Member
Local time
3:12 PM
User ID
9994
Joined
Jul 20, 2019
Messages
226
Reaction score
969
Location
01431
That all looks amazing great work. I'm no porter but it looks good. Have you been into the 303 at all?

Sent from my SM-G973U using Tapatalk
 
Top