High Quality Chainsaw Bars Husqvarna Toys

Saw's grinding my chain's drive-links, can anyone tell me if this sprocket//chain looks aligned?

Cerberus

Cerberus the aardvark, not the hell-hound!!
Local time
5:56 PM
User ID
11523
Joined
Jan 20, 2020
Messages
292
Reaction score
120
Location
Florida (tampa area)
I don't know the history of this saw (will put all relevant specs below!), problem is that I got it, fixed it up, got it a bar&chain and a week later the chain wasn't moving smooth at all --- turned out the new chain's drive-links were getting chewed-up!!

Potential causes seem limited to:
1 - wrong bar/chain/sprocket setup, or
2 - sprocket/clutch assembly is out-of-place (which it DOES appear to be, although obviously this problem wouldn't be mutually-exclusive to problem #1!)

When I got the saw it had no bar/chain so I have nothing to go on BUT all advert materials online seem to say it's a 3/8"LP setup....

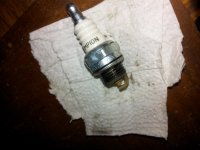
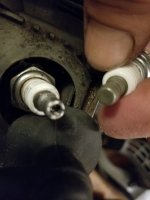
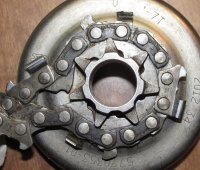
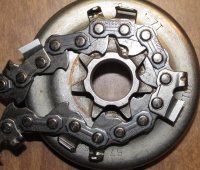
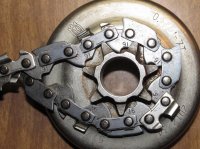
But the sprocket/clutch.....when I got this saw there was a ton of hair/fiber squeezed-into the crank/axle that the sprocket sits on (ie I was pulling hairs/fibers out-of the interface between that axle and where it enters the powerhead) Furthermore, see the lil washer in-between the powerhead and the sprocket? Thing just bounces all over, I mean literally I can slide it 1/4" back&forth in that space! My 1st thought is "it can't be that the sprocket isn't fully-seated, because the saw will seat it for you if it wasn't" but now I'm wondering because the drive-links *are* getting chewed-up on the outer side (sprocket-side) so makes sense this is simply an issue of the chain riding the very-edge of a chewed-up sprocket......would really like to push this machine til it dies though, so right now my best plan of attack is to simply remove the clutch/sprocket assembly & reinstall it in-hopes that it seats deeper, ANY advice here would be massively appreciated!!! In these pics the bar&chain are mounted properly *w/o* the side plate/body-panel that's usually over them I just mounted it w/o the body-panel to show what was what!
19700102_152710.jpg 19700102_152752.jpg


Specs:
Saw is a "Tanaka tcs33edtp"
Factory manual says for 12" and 14" setups it comes with Oregon 91PX's, a "VG045" for 12" and "VG052" for 14" (these chains seem to only be made for this saw, can't find info on them outside of Tanaka links)
The "offending" bar&chain combo I put on was a regular Oregon 16" 3/8"LP setup, *felt* like it was running perfect til it mangled my drive links!
16" Oregon setup:
Bar: 160SDEA041 (oddly, when googling this, I can find a variety of Oregon bars, so want to be clear my bar&chain came as a pre-packaged combo kit!)
Chain: S56

I guess it could be the chain(/bar) but the more I look at the sprocket the more I think "that sucker is 1/4" from fully-seated"...

Thanks a TON for any help on this, I know it's nothing impressive here but for me this saw was a many-weeks restoration of a "damaged beyond repair" unit so am very stoked to have had it in my arsenal and equally upset to remove it so soon due to shredding drive-links (FWIW I did just put a new chain on so I could do another session and see if it mangles them the same way, think I'm still hoping I just got a rock jammed-in there or some other manner of 1-time error!!!)
 

dahmer

Here For The Long Haul!
Local time
5:56 PM
User ID
3987
Joined
Sep 6, 2017
Messages
2,524
Reaction score
10,095
Location
Ellwood City, PA
Country flag
Everything I could find, not super in depth, on the chain size is 3/8 lp. Wondering if @jacob j. is correct and somebody put the wrong drive hub on. Do you have the chain that was on the saw when you got it?
 

legdelimber

Pinnacle OPE Member
Local time
5:56 PM
User ID
8391
Joined
Jan 14, 2019
Messages
562
Reaction score
1,321
Location
N.C.
Country flag
If you can remove the clutch and check your chain against the teeth, that could help to see if the chain fits.
Along with the correct pitch ,I grabbed some chains that were too large & too small of pitch, so as show a miss-match of either direction.

photo 1. This chain matches the sprocket.
You see how the chain drive teeth fit into the sprocket pockets all the way around, with no miss-alignment at the tops of the sprocket teeth or sides of the teeth. (.325")

. starting from top tooth and going to right....
photo 2. this chain does not fit, it's too large of a pitch.
You can see that the driver links do not even fit all the way into the sprocket teeth and are miss-aligned by the second tooth. (3/8" , "regular" profile chain)

photo 3. This chain does not fit. Even though the drive tooth will fit into one sprocket pocket, the next tooth is very noticeably out of alignment
with the sprocket. Although this chain may look smaller, the pitch is too long. You see how far the drive tooth is getting ahead of the sprocket tooth (3/8" "Low Profile" chain)

Sorry for not setting up the lighting properly, but with everyone viewing on cellphone screens, it doesn't seem worth the effort anymore.
 

Attachments

  • 1.JPG
    1.JPG
    138.1 KB · Views: 145
  • 2.JPG
    2.JPG
    153.4 KB · Views: 153
  • 3.JPG
    3.JPG
    146 KB · Views: 126
Last edited:

blades

Super OPE Member
Local time
4:56 PM
User ID
7181
Joined
Aug 30, 2018
Messages
288
Reaction score
424
Location
Leroy, WI
Country flag
note .325 and .375( 3/8") are both called 3/8s pitch- side by side there is a noticeable difference if one looks closely. What I have also noticed is that a lot of saws with the .325 pitch spacing are also .058 width vs .050 for most .375 set ups . Also most of the .325 stuff I see is of the short tooth height- what ever name the mfg give it.
 

Definitive Dave

Piss Rev Mafia Member
GoldMember
Local time
5:56 PM
User ID
297
Joined
Dec 28, 2015
Messages
5,189
Reaction score
34,122
Location
Central Ohio
Country flag
note .325 and .375( 3/8") are both called 3/8s pitch- side by side there is a noticeable difference if one looks closely. What I have also noticed is that a lot of saws with the .325 pitch spacing are also .058 width vs .050 for most .375 set ups . Also most of the .325 stuff I see is of the short tooth height- what ever name the mfg give it.
NO .325 is NOT called 3/8s pitch they are totally different chains
around here 3/8" is mostly .050 and .325 is mostly .063 but this definitely varies by region and sometimes by manufacturer
 

Cerberus

Cerberus the aardvark, not the hell-hound!!
Local time
5:56 PM
User ID
11523
Joined
Jan 20, 2020
Messages
292
Reaction score
120
Location
Florida (tampa area)
Is it fixed yet?
I....I thought so!

I'd "fixed it" by adding a washer and, yesterday with my chain properly aligned after putting a washer in-between clutch & clutch-drum, I happily began reassembly&cleaning - was to have my 32cc back :) I then struggled with the carb - mistakenly thinking the engine would only start while-revving, after putting the tach on it I realized my ears just suck and it wasn't that my carb was poorly tuned it was the damned washer was mating the clutch&clutch-drum together so it effectively "had no clutch" and would just spin-chain at whatever the powerhead was throwing it...

SO that sucked, I've "found the fix" but it doesn't work (quite a fix eh?!), hope I didn't destroy anything when I cut a ~4" limb with it yesterday (when the chain's ability to "slip" on the clutch was negated-by-washer) but do think this'll be the fix I think a different washer (quite possibly one I'll have to carve-to-shape) could go there while allowing the clutch to be free of the drum *and* push it inward to where it belongs! [I double checked the manual and OEM is definitely clutch&drum without a washer in between them, am used to a big washer there]

I'd love thoughts from here so posting this separately then an individual post w/ replies to the (awesome!!) responses here, don't want to have a novel ^ here and not resolve this, can finally "see light @end of tunnel" here I mean my rope got pinched by piston/cylinder and getting it out was a whole thing hell I even made a custom clutch-head-tool by carving-up a 16mm socket rofl:
19700103_011042.jpg perfect fit: 19700103_011030.jpg

^even with that I was close to posting "what to do if you're using max-force and it won't budge?" but finally got it, at any rate it's so damn close I just need to re-open and figure out how a washer needs to fit to allow both a press & free-spinning drum!

PS- interested what you vets would tell me after seeing the plug I pulled from this (I cleaned&gapped it before putting it back, of course)
19700103_022828.jpg
/setup w/o shell, with washer in-between clutch&clutch-drum:
19700103_022802.jpg
 

Attachments

  • 19700103_022828.jpg
    19700103_022828.jpg
    118.4 KB · Views: 40

Pincher

Pinnacle OPE Member
Local time
4:56 PM
User ID
2537
Joined
Jan 26, 2017
Messages
562
Reaction score
1,824
Location
sw corner of twin cities mn
Country flag
By the looks of your initial pictures, it appears that the chain is favoring the inside edge of the sprocket. By your shimming the drum/sprocket inward with your washer behind the clutch seems to be a good idea. The only other option would be to space the bar slightly from the powerhead. I checked the parts diagram and it only shows a guide plate on the outside.

The picture with your washer in the drum shows good alignment. Get your special washer figured out and you will be golden.
 

Wilhelm

Here For The Long Haul!
GoldMember
Local time
11:56 PM
User ID
1204
Joined
Apr 28, 2016
Messages
11,565
Reaction score
44,025
Location
Croatia
Country flag
Misalignment of sprocket and bar will show itself in form of wearing out the groove and blueing the rails on the bars tail.
Over time the chains DL's will show excessive side wear.
I may have some pictures on my desktop PC of the misalignment issue I encountered on two of my saws, but I just came from work and can't be bothered to dig them out.

It would have helped if You had posted pictures of the chain wear, as well as chain on sprocket fitment while You had the sprocket off.

One thing the others did not seem to have mentioned.
If Your chain stretched excessively the DL tangs and the sprocket will experience increased wear too.
 

Cerberus

Cerberus the aardvark, not the hell-hound!!
Local time
5:56 PM
User ID
11523
Joined
Jan 20, 2020
Messages
292
Reaction score
120
Location
Florida (tampa area)
I will give you an A for effort.
ROFL if you only knew.... I don't post pics of 'the worst' (though they still work-- like the copper-wire & elect.tape spark-plug-wiring on my ground saw :p ), this saw actually has the ultimate ugliest (but effective!) repair, prior owner had flywheel-fins (2) come off and mangle ignition-module....I compressed&formed it back and it worked but the two mounting-holes on the block were beyond destroyed, had to drill-out larger openings to remove broke shafts (and can't tap threading in metal myself) so could only "pin it in-place" using wider bolts 'resting' inside the two holes on the block...the module vibrated loose within minutes...and I didn't wanna have to go get the two mount-holes re-threaded...so did my best&ugliest McGuyvering to-date:
Module was put against block in-alignment w/ two factory holes on the block, held loosely with bolts(w/ jb weld as 'thread lock') and then lashed-tight in a secure, accurate position by taking (2) lengths of 12g Romex copper wire (stripped to individual strands, metal shrouded for elect.-leak as needed) and literally wrapping them around the engine-block to lash the ignitiion module (in an X with the two of them), twisted them to properly 'tighten' my ignition-module into place and then...this is great:
Made paper-and-tape "forms", poured ~3/4ths a tube of (red)Permatex, and squished it into-shape (on top half) by pressing into place that plastic 'shield' that resides under the outside plastic body-shell. ~1d of curing and I was able to carefully use the Xacto setup to carve as-needed, then set (4) bolts-with-washers into that shield so that, once the outer body panel is affixed to the saw, its placement "pushes-down on" the 'shield' which is form-fit to the top half of the new permatex 'washer-block', and has four 'corner pin-downs' from the bolts/washers for redundancy ;D
Had to use Tap-Con screws (maybe 5-10% thicker-than-spec/OEM screws) to affix the body panel as it was pushing-out a couple of the factory screws but since swapping those to Tap-Con's it's worked great / seen a lot of usage actually it's my best climb-saw at the moment (well my most-powerful, I prefer my tiny 25cc because I'm small :p)
 

Cerberus

Cerberus the aardvark, not the hell-hound!!
Local time
5:56 PM
User ID
11523
Joined
Jan 20, 2020
Messages
292
Reaction score
120
Location
Florida (tampa area)
By the looks of your initial pictures, it appears that the chain is favoring the inside edge of the sprocket. By your shimming the drum/sprocket inward with your washer behind the clutch seems to be a good idea. The only other option would be to space the bar slightly from the powerhead. I checked the parts diagram and it only shows a guide plate on the outside.

The picture with your washer in the drum shows good alignment. Get your special washer figured out and you will be golden.
I took a lot of pics of the sprocket and put a new chain on it, then reassembled and while it's still leaning to the outside it's not as-bad and it's not damaging DL's at all anymore (at least ~5-->8hr usage since that swap, had filed the bad DL's on the prior chain - was a nearly-new chain - but wanted to see the DL's on a new chain so replaced it and have kept an eye on DL's & sprocket and so far all's well)

I may mess w/ washers some more as it's a good 1mm off from where I'd like it but the room just isn't there... ANY ideas would be hugely appreciated on this but I think it's simply "tough *s-word" because the base of the clutch's threading has an indentation so that, once screwed-on and fully seated, there's just no excess room in-between the backside of the clutch and the inside of the clutch-drum//sprocket to allow anything*, everything I could try w/ on-hand hardware just led to a locked-clutch (and hilarious episode of me, confused, trying to tune my carb because my chain is flying on idle, it still accelerates normal and sounds normal and tach reads fine but chain is flying at idle....thankfully I didn't cut much before realizing 'duh the clutch/sprocket is fixed to the drive-shaft, it cannot 'spin free' and burying it hard into wood could destroy it"!!! Thankfully no damage, have used it several good sessions since then and saw/carb/chain's DL's and overall performance are all a-ok :)
 

legdelimber

Pinnacle OPE Member
Local time
5:56 PM
User ID
8391
Joined
Jan 14, 2019
Messages
562
Reaction score
1,321
Location
N.C.
Country flag
ROFL if you only knew.... I don't post pics of 'the worst' (though they still work-- like the copper-wire & elect.tape spark-plug-wiring on my ground saw :p ), this saw actually has the ultimate ugliest (but effective!) repair, prior owner had flywheel-fins (2) come off and mangle ignition-module....I compressed&formed it back and it worked but the two mounting-holes on the block were beyond destroyed, had to drill-out larger openings to remove broke shafts (and can't tap threading in metal myself) so could only "pin it in-place" using wider bolts 'resting' inside the two holes on the block...the module vibrated loose within minutes...and I didn't wanna have to go get the two mount-holes re-threaded...so did my best&ugliest McGuyvering to-date:
Module was put against block in-alignment w/ two factory holes on the block, held loosely with bolts(w/ jb weld as 'thread lock') and then lashed-tight in a secure, accurate position by taking (2) lengths of 12g Romex copper wire (stripped to individual strands, metal shrouded for elect.-leak as needed) and literally wrapping them around the engine-block to lash the ignitiion module (in an X with the two of them), twisted them to properly 'tighten' my ignition-module into place and then...this is great:
Made paper-and-tape "forms", poured ~3/4ths a tube of (red)Permatex, and squished it into-shape (on top half) by pressing into place that plastic 'shield' that resides under the outside plastic body-shell. ~1d of curing and I was able to carefully use the Xacto setup to carve as-needed, then set (4) bolts-with-washers into that shield so that, once the outer body panel is affixed to the saw, its placement "pushes-down on" the 'shield' which is form-fit to the top half of the new permatex 'washer-block', and has four 'corner pin-downs' from the bolts/washers for redundancy ;D
Had to use Tap-Con screws (maybe 5-10% thicker-than-spec/OEM screws) to affix the body panel as it was pushing-out a couple of the factory screws but since swapping those to Tap-Con's it's worked great / seen a lot of usage actually it's my best climb-saw at the moment (well my most-powerful, I prefer my tiny 25cc because I'm small :p)

Mercy sakes. I'm impressed by all of the effort to do that.
But I would wish for a couple pictures to see if it scares me (cheap thrill factor!) or makes me think of any blocked air flow or heat transfer.
 

Cerberus

Cerberus the aardvark, not the hell-hound!!
Local time
5:56 PM
User ID
11523
Joined
Jan 20, 2020
Messages
292
Reaction score
120
Location
Florida (tampa area)
Mercy sakes. I'm impressed by all of the effort to do that.
But I would wish for a couple pictures to see if it scares me (cheap thrill factor!) or makes me think of any blocked air flow or heat transfer.
You'd be right to be wary but I can say blockage-increase is minimal, used a scalpel and really the perma is more of a 'washer' it's the two copper wires lashing it to the block that do the heavy lifting the perma is for keeping it pegged just-right, I'll see if I can find some pics but the "middle cover" for the flywheel is holding (2) sets of screws that push-into the spacer to keep it pegged, and I reinstalled the flywheel covering itself using Tap-Con's in some places as I'd removed that cover dozens of times -- suffice to say I'm not taking it off until it needs me to lol!!
Saw is still running strong as hell, I opened its airbox wayyy up and gutted the muffler, gave that usual bump in power, it's a big of a pig (both weight and form-factor) but I still really like it, it's a great unit I just use it the least because I've got better ones (ie for a light saw I've got a great 25cc, for a heavier duty saw I have a realllly great 355t, so this tanaka kinda "doesn't have a place" in my arsenal but does get use often enough especially on-ground use and still runs flawless ever since that final reassembly, gah I'll try and find pics I know I took a ton just because of how absurd an undertaking it was I mean the ignition was clearly the craziest part but also had to build a chain tensioner into the clutch cover and other headaches, was a true test for me!!)


(PS- I already see most saws as anemic when it comes to airflow/cooling so very much had that in-mind, no doubt there was some trade-off there but FWIW I've done longer sessions with it and never found any heat issues like physical heat-shrouding of the unit or it acting unusual because it's running hot[no more than any saw, that is], wish I used it more often to know just how much use it really gets (hours-on use, only my 355t has a dedicated hours/tachometer mounted to it) but would be surprised if any of my fixes fail anytime soon!)
some pics (hair pulled from shaft, mangled ignition module &missing flywheel fins(2), upside-down & broken-string starter cable, 1st rebuild of the chain-tensioner[ended up making a new steel plate instead of trying to re-use the OEM one)
20191226_134823.jpg 20191226_145620.jpg 20191226_190850.jpg 20200101_154030.jpg
 

Attachments

  • 20191227_175903.jpg
    20191227_175903.jpg
    80 KB · Views: 5

Cerberus

Cerberus the aardvark, not the hell-hound!!
Local time
5:56 PM
User ID
11523
Joined
Jan 20, 2020
Messages
292
Reaction score
120
Location
Florida (tampa area)
aha ok here's the folder w/ the "real" fix (the one in the prior post was obviously not red perma lol, that was attempt #1 where I tried using steel-stick/jb weld stuff to do the holding), if you look closely you'll see the copper wire coming-below the perma-block, I did a lot of scalpel work cleaning it up but you get a rough idea here of the 'boundaries' I was working with!19700103_213730.jpg

19700103_214025.jpg 20200119_084929.jpg 20200120_104502.jpg
 

kneedeepinsaws

Pinnacle OPE Member
GoldMember
Local time
3:56 PM
User ID
12933
Joined
Jun 21, 2020
Messages
805
Reaction score
1,712
Location
Oil Country
Country flag
I'm wondering if you're running 3/8" LP pitch chain on a .325" sprocket? If that were the case, it would chew up the drink links in the fashion you describe.
This

also running 3/8 chain on a low pro sprocket will do the same. It will ‘peen’ the drive links in a way preventing them from pivoting. In turn when they come around the tip of the bar it cannot pivot and the chain literally start to jump quite violently.
I had this happen to myself years and years ago putting the wrong chain on the wrong sprocket.

Mixing 3/8 lopro and 3/8 absolutely will End in chain failure
 
Top