High Quality Chainsaw Bars Husqvarna Toys

Project TS420 Concrete Saw

Automender

Active OPE Member
Local time
10:15 AM
User ID
16276
Joined
Apr 18, 2021
Messages
40
Reaction score
26
Location
Ohio
Country flag
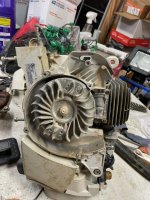
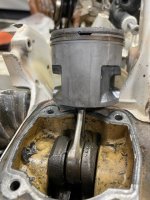
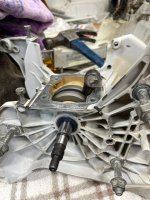
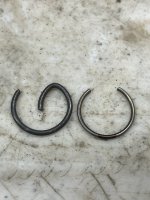
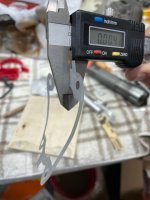
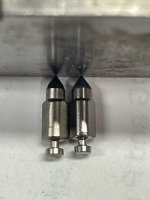
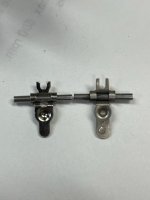
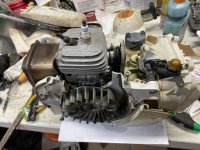
I picked up a Stihl TS420 saw for $50 and wanted to try to refurbish it. This is my first time to completely rebuild a saw. I have installed new rings in a Husky K970 cutoff saw and rebuilding the carb. I have no history on this saw nor why it failed other than the person said it was a top end issue. I decided to strip the saw down the other day and found two thing I could use some advice on. On the strip down I found play in the crank bearings and what looks like pieces of bearing cages in the crankcase. So those need to be replaced but the rod bearings do not have any play up or down and back and forth. The rod however rocks side to side and I am not talking the normal sliding side to side. I am thinking this needs to be replace due to the rocking motion but wonder why no vertical play.
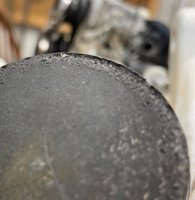
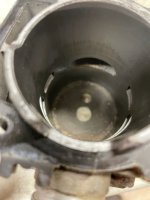
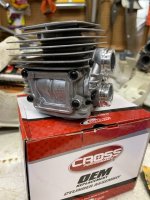
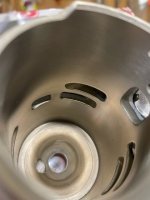
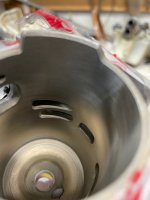
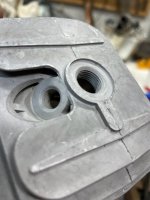
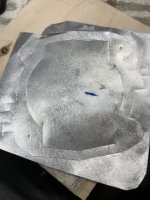
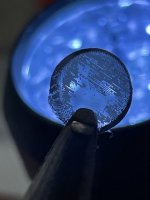
Second issue is that the piston looks pretty good and likewise the cylinder looks good compared to You tube videos on failed saws. However the piston top looks like it has some erosion on the top. What causes this type of damage?
 

Attachments

  • IMG_4207.jpg
    IMG_4207.jpg
    86.1 KB · Views: 18
  • IMG_4213.jpg
    IMG_4213.jpg
    71.2 KB · Views: 16
  • IMG_4224.jpg
    IMG_4224.jpg
    119.5 KB · Views: 16
  • IMG_4212.jpg
    IMG_4212.jpg
    38 KB · Views: 16
  • IMG_4227.jpg
    IMG_4227.jpg
    51 KB · Views: 17

Automender

Active OPE Member
Local time
10:15 AM
User ID
16276
Joined
Apr 18, 2021
Messages
40
Reaction score
26
Location
Ohio
Country flag
Ended up going to HL supply around Christmas while visiting my daughter in Florida. Picked up a crank and bearings along with a carb kit. I bought a Cross Performance cylinder and piston with rebuild kit during a sale in July.
I spent hours cleaning up concrete dust on the crankcase and stripping it down. I decided to install both bearings on the new crankshaft before putting the case halves together. I put the crank in the deep freeze for a few hours to get it to -5 degrees and heated the inner bearing races to 300 degrees per service manual. Both bearings just dropped into place with no resistance at all. I then placed the crank and bearings in the deep freeze for an hour.
I heated the bearing area of the case halves with a heat gun and the cold bearing just slid into place. I installed the case gasket that I coated with Motoseal on both sides on the one half and heated the other case halve bearing area. Case halves slide together without any force and then ran the case bolts in. I was happy to get that done, first time working on a case.
I oiled the bearings with two cycle oil using a syringe and oiled the shafts.
I made a install sleeve from thin plastic from a notebook page protector. Rolled it into a tube and slid it into the seal. Slid the sleeve and seal on the shaft, coated the seal with a dab of Motoseal and positioned it to press in. I used a 19mm deep well socket for the one side and a 17mm on the small seal. A few taps and the installed easy. Next I need to check the cylinder port chamfers on the Cross Performance Cylinder kit. Any tips on my next step on the cylinder install would be greatly welcomed.
 

Attachments

  • IMG_4309.jpg
    IMG_4309.jpg
    41.6 KB · Views: 9
  • IMG_4308.jpg
    IMG_4308.jpg
    44.3 KB · Views: 9
  • IMG_4310.jpg
    IMG_4310.jpg
    46 KB · Views: 9
  • IMG_4311.jpg
    IMG_4311.jpg
    52.2 KB · Views: 9
  • IMG_4313.jpg
    IMG_4313.jpg
    76 KB · Views: 10

Automender

Active OPE Member
Local time
10:15 AM
User ID
16276
Joined
Apr 18, 2021
Messages
40
Reaction score
26
Location
Ohio
Country flag
Looked at the aftermarket cylinder port chamfering and in general it looked decent to an untrained eye. There were a two transfer ports that seemed sharp so I decided to use a diamond file to ease the edge and then 400 grit wet/dry paper to smooth the chamfer even more. All feel smooth to the finger running over them in any direction. Diamond file fit perfectly in the port to ease both top and bottom edges at once. I think my next step is to measure squish in four different locations. Does any one know the minimum squish for Stihl saws. I am not looking for super just normal performance and reliability.
 

Attachments

  • IMG_4318.jpg
    IMG_4318.jpg
    69.2 KB · Views: 13
  • IMG_4315.jpg
    IMG_4315.jpg
    37.2 KB · Views: 13
  • IMG_4316.jpg
    IMG_4316.jpg
    38.5 KB · Views: 13
  • IMG_4319.jpg
    IMG_4319.jpg
    47.5 KB · Views: 13
  • IMG_4321.jpg
    IMG_4321.jpg
    69.2 KB · Views: 13

Automender

Active OPE Member
Local time
10:15 AM
User ID
16276
Joined
Apr 18, 2021
Messages
40
Reaction score
26
Location
Ohio
Country flag
Is there any advice on what I should do for the piston wrist pin clips? I have read a few articles on these clips which say never use a clip that isn't supplied with the piston. It is obvious that the AM clip is thicker than the OEM. Also that the clips if supplied with an "ear" you should cut it off. I suspect I would use a Dremel tool with a wafer wheel and keep it cool so it doesn't lose it's heat treatment.
 

Attachments

  • IMG_4324.jpg
    IMG_4324.jpg
    59.5 KB · Views: 6

Automender

Active OPE Member
Local time
10:15 AM
User ID
16276
Joined
Apr 18, 2021
Messages
40
Reaction score
26
Location
Ohio
Country flag
I decided to measure the depth of the squish bad on my OEM cylinder and then the Cross Performance one. I was hoping they were the same or maybe because the word performance is in the brand name that aftermarket one maybe a little shorter. The distance form the gasket surface to the squish ring on the OEM is 2.827 inches and the aftermarket is 2.847 inches. So I start out with .020 inches more squish. Using the old cylinder gasket I get squish in three locations of .0600, .0605 and .0595 inches. It looks like the original OEM squish was in the area of .038 inches by using data gathered.
I measured the aftermarket gasket to find that it is .0345 inches so if I used the new AF gasket with the AF cylinder I will have .0725 inch squish which I would give an uneducated guess is way too much. If I do a full gasket delete I will end up with .040, .044, .040. Not exactly to happy with the Cross Performance performance at this point but without a gasket at least I can get back to OEM squish.

Is it a good idea just to use Motoseal and no gasket at all or do I go with a thin gasket and have .040 squish? Or maybe just go with .060 to .070 squish?
 

Attachments

  • IMG_4332.jpg
    IMG_4332.jpg
    56.4 KB · Views: 6
Last edited:

Shane¹

Pinnacle OPE Member
Local time
10:15 AM
User ID
15023
Joined
Dec 21, 2020
Messages
998
Reaction score
2,490
Location
Kentucky
Country flag
I don't work on many Stihls or cutoff saws but I see you haven't got any responses i would say use the clips that came with the kit. Trim the ears off with a cutoff wheel. Use a sealer and run the cross cylinder with no gasket. I don't think you would notice any power difference especially with a cutoff saw and you said in an earlier post that you just want stock performance from it.
 

Automender

Active OPE Member
Local time
10:15 AM
User ID
16276
Joined
Apr 18, 2021
Messages
40
Reaction score
26
Location
Ohio
Country flag
Thank you for the response. This is my first full rebuild and although I have read all the articles that I can, I need some real life input. OEM parts would make it easier but for a learning experience I can't justify it. I think I will delete the gasket and trim the ears off as you suggested.
 

Shane¹

Pinnacle OPE Member
Local time
10:15 AM
User ID
15023
Joined
Dec 21, 2020
Messages
998
Reaction score
2,490
Location
Kentucky
Country flag
Oem is for the most part better but I have rebuilt several saws with aftermarket parts and never had any real issues. I think most aftermarket stuff gets a bad rep because it's not put together right or the cause for the original failure was never found. Make sure there is no sharp edges in the cylinder, set the end gap on the rings and put it together and I am sure you will have a good runner. Saw looks good by the way looks like you are making good progress
 

Automender

Active OPE Member
Local time
10:15 AM
User ID
16276
Joined
Apr 18, 2021
Messages
40
Reaction score
26
Location
Ohio
Country flag
Oem is for the most part better but I have rebuilt several saws with aftermarket parts and never had any real issues. I think most aftermarket stuff gets a bad rep because it's not put together right or the cause for the original failure was never found. Make sure there is no sharp edges in the cylinder, set the end gap on the rings and put it together and I am sure you will have a good runner. Saw looks good by the way looks like you are making good progress

This saw was scraped because of what looks like semi stripped sparkplug threads and leakage at the plug that melted a small hole through the plastic cylinder cover. On disassembly I found a bad cage in the one bearing but cylinder surface and piston was good. Other than the squish issue the cylinder quality was really good with good chamfers on all ports with just a slight touch on two of the transfer ports. I have a Mighty Mite to pressure/Vac test it after I get the cylinder mounted. I plan on using inner tube, backing plates and a C clamp to seal it while using the impulse tube for the test connection. Learning a lot about two cycle engines.

I'll check the ring gap which I didn't think about once I pull the cylinder. I did that on a K970 Husky that I just put in new rings to increase pressure. Rings were really worn.

IMG_4012.jpg IMG_4219.jpg
 
Last edited:

Shane¹

Pinnacle OPE Member
Local time
10:15 AM
User ID
15023
Joined
Dec 21, 2020
Messages
998
Reaction score
2,490
Location
Kentucky
Country flag
Sounds like you are well on your way to having it done
 

qurotro

Cookie Cutter
Local time
9:15 AM
User ID
6198
Joined
May 19, 2018
Messages
1,284
Reaction score
5,198
Location
Ar
Country flag
Bad gas for the piston damage.
 

Automender

Active OPE Member
Local time
10:15 AM
User ID
16276
Joined
Apr 18, 2021
Messages
40
Reaction score
26
Location
Ohio
Country flag
I guess I just couldn't do a total base gasket delete or maybe just wanted to try to make a base gasket. I used an aluminum soda can and sanded all the coatings off both sides with a random orbit sander. Used a base gasket as template and scored it with an razor blade but used an Exactor blade to puncture outline of the screw holes. I bet a paper hole punch would have work good. I flexed along the score lines to break the waste away. Reamed holes to perfect size with a roll of sand paper I finally place 220 grit wet/dry paper on a flat surface and sandwiched it between another one and lapped flat. It ended up being approximately .004 plus a thin layer of Motoseal on both sides. I guess final squish will be .043 vs OEM of .038.
 

Attachments

  • IMG_4340.jpg
    IMG_4340.jpg
    72.6 KB · Views: 10
  • IMG_4341.jpg
    IMG_4341.jpg
    43.3 KB · Views: 10
  • IMG_4342.jpg
    IMG_4342.jpg
    79.7 KB · Views: 10
  • IMG_4343.jpg
    IMG_4343.jpg
    69.1 KB · Views: 10
  • IMG_4344.jpg
    IMG_4344.jpg
    47.4 KB · Views: 10

Automender

Active OPE Member
Local time
10:15 AM
User ID
16276
Joined
Apr 18, 2021
Messages
40
Reaction score
26
Location
Ohio
Country flag
Finally got around to pressure/vac testing the crankcase today. I didn't have a plug to block off the decompression valve so I dabbed a little 5 minute epoxy on a closed decompression valve and let it harden. After an hour it hardened. I figure all I have to do is to wire brush the epoxy off it later. I need to put it on my list of stuff to pick up when I visit HL Supply when I visit Florida next month.
I can understand why people don't pressure test because it is a pain to completely seal the case off. The rubber inner tube worked well on the muffler but the intake was a pain. Rubber didn't work but the plastic covered cardboard that the gasket kit came in worked fine with a little silicone vacuum grease and clamps. I used the impulse nipple for the test connection. I used a Mity Vac to pump it up to 7 psi and it held without dropping any over ten+ minutes. Pulled vacuum to 7 in hg and it held the same. I am thinking the pressure test could also be done with 7 psi air from my compressor and just spray to find any bubbles. That way sealing up the inlet and muffler is not as critical. Next step is to tackle the carb which is caked with concrete dust. I need to also measure the finish squish since I eliminated the OEM gasket and installed a .004 soda can gasket plus Motoseal to correct the Cross Performance jug with an additional .020 squish.

.IMG_4353.jpg IMG_4358.jpg IMG_4360.jpg IMG_4361.jpg IMG_4359.jpg
 

Duce

Here For The Long Haul!
Local time
10:15 AM
User ID
809
Joined
Feb 6, 2016
Messages
2,203
Reaction score
7,527
Location
Roscommon, MI
Country flag
Let us know how it runs. Typical cut off saws turn slow rpm and cylinder porting is usually different.
 

Automender

Active OPE Member
Local time
10:15 AM
User ID
16276
Joined
Apr 18, 2021
Messages
40
Reaction score
26
Location
Ohio
Country flag
Let us know how it runs. Typical cut off saws turn slow rpm and cylinder porting is usually different.
It will be awhile until I fire this thing up, but will continue to post progress. Hopefully it helps someone in the future and I learn from advice. Only working on it an hour or so a day but definitely will post a video of the saw running. I have tuned a Husky concrete saw before so hopefully this tunes the same. I think spinning up a 14 inch blade vs a chain requires different torque requirements.
 

Automender

Active OPE Member
Local time
10:15 AM
User ID
16276
Joined
Apr 18, 2021
Messages
40
Reaction score
26
Location
Ohio
Country flag
Assembled the stuff on the crankcase today and measured the squish. I ended up at .o40 inches vs. the OEM .038. Had to reduce the base gasket because of the extra .020 inches of squish in the aftermarket jug. Moved on to the carb cleaning. These saws have a hard life. Total new meaning of carb cleaning. I guess duct tape over the openings and hoses on the nipples should keep the concrete out of the internals.

IMG_4373.jpg IMG_4374.jpg IMG_4376.jpg
 

Attachments

  • IMG_4368.jpg
    IMG_4368.jpg
    51.6 KB · Views: 11
Last edited:

Automender

Active OPE Member
Local time
10:15 AM
User ID
16276
Joined
Apr 18, 2021
Messages
40
Reaction score
26
Location
Ohio
Country flag
Been distracted on this project because of multiple snow storms and a little kitchen remodeling, Half an hour in my small ultrasonic cleaner and it was clean enough to start to disassemble. I posted a question in the Carb Forum about the pressure it should take to pop open the needle valve. It seems over 25 psi which seems excessive. I was also wondering what sealant they used on the oblong Welch plug?


IMG_4419.jpg IMG_4430.jpg
 

Automender

Active OPE Member
Local time
10:15 AM
User ID
16276
Joined
Apr 18, 2021
Messages
40
Reaction score
26
Location
Ohio
Country flag
Started on replacing the gaskets and needle valve but had some bad experience with the card rebuild kit. The gaskets seem ok but the needle valve was different length and the lever when installed didn't function properly. Had to put in the old stuff. Bad kit from HL Supply. Interesting thing about the inlet screen, looked good but put it up to the light and it was substantially block. Hopefully old needle valve will seal properly. On the pressure test it leaked down a hair in a minute.
 

Attachments

  • IMG_4440.jpg
    IMG_4440.jpg
    40 KB · Views: 11
  • IMG_4441.jpg
    IMG_4441.jpg
    30.4 KB · Views: 11
  • IMG_4445.jpg
    IMG_4445.jpg
    39.9 KB · Views: 11
  • IMG_4448.jpg
    IMG_4448.jpg
    31 KB · Views: 11
  • IMG_4449.jpg
    IMG_4449.jpg
    149.6 KB · Views: 11

Automender

Active OPE Member
Local time
10:15 AM
User ID
16276
Joined
Apr 18, 2021
Messages
40
Reaction score
26
Location
Ohio
Country flag
Finally got back to my winter project. Everything back together and finally filled tank with fresh mix. Tried to prime the carb but would pull any gas into the carb. I am a little confused on my findings. I connected the primer to the carb which I removed from the saw and was able to pull gas into the carb through a hose attached to the fuel inlet and into the tank. I found the new fuel line was a little long and may have been creased. Shortened the line and still no fuel.
Decided to pressure test the top of carb with my mityvac connected to primer connection and could hear an air leak. Placed carb in water and noticed air coming out of the main jet which I think is normal. When the carb was installed I hooked up the mityvac to the primer connection and tried to pull a vacuum to get gas into the carb but no luck. No vacuum and no fuel. I need to spend a little more time troubleshooting.
Need to restart troubleshooting. Need to try connecting a fuel line to the inlet of carb and primer bulb to the primer connection and try again. If it does pull gas then possible that the fuel filter is totally plugged. If it doesn't then I have a air leak in the lines somewhere. I did pressure test the fuel line from filter to needle valve and that was air tight.
 

qurotro

Cookie Cutter
Local time
9:15 AM
User ID
6198
Joined
May 19, 2018
Messages
1,284
Reaction score
5,198
Location
Ar
Country flag
Placed carb in water and noticed air coming out of the main jet which I think is normal.
I think the main jet is borken. Should be air tight.
 
Top