High Quality Chainsaw Bars Husqvarna Toys

TEMCo Auto Sharpener - User Review Thread

Ryan Browne

Pinnacle OPE Member
GoldMember
Local time
11:21 AM
User ID
1799
Joined
Sep 4, 2016
Messages
2,383
Reaction score
9,683
Location
Wisconsin
Country flag
LOL. That's what I'm trying to get at. Only real way is to put the chain into wood. Do tests of various chains. Same saw, same wood, and time them.

What's your PayPal address Jeff? I'll cover the shipping both ways for your loop if you'll do the test.

Personally I think it's a little silly that guys want philbert to do tests on these loops. If you're actually interested in how it cuts, take him up on his generous offer to grind a loop for you. Shipping probably won't even be $30 round trip, and how often do you actually get to try the results of something like this without buying the tool? Honestly, I think philbert is already doing us a solid by testing, photographing, and reporting his results. Setting up timed chain tests isn't a super quick job. If anyone is actually interested in the grinder and how the loops perform, just send the man a loop and do the rest yourself. And if your just kicking tires, give it a rest. I for one am happy to wait and see what philbert shows us. He always does a great job from what I've seen.
 

RI Chevy

Mastermind Approved!
Local time
12:21 PM
User ID
1254
Joined
May 7, 2016
Messages
27,002
Reaction score
67,761
Location
earth
Country flag
Thanks for the offer Ryan.
I'll pass at this time and step away...
No worries. [emoji106]
 

Wonkydonkey

Plastic member
Local time
5:21 PM
User ID
3189
Joined
May 14, 2017
Messages
4,598
Reaction score
18,379
Location
Sussex, UK.
Country flag
But then you'd know.

And since when did money come into play? These are chainsaws.

Lol. I'mma po boy.

It’s for the Research purpose, cost not a lot, compared to wasting time wif a dull/badly filed chain. just ask Philbert to hand file a new chain and put a grind another new chain, then compare it to your filings and a new chain..
This way you pay for new chain and shipping one way :D
 

wcorey

Pinnacle OPE Member
Local time
12:21 PM
User ID
29
Joined
Dec 11, 2015
Messages
1,067
Reaction score
4,606
Location
ma usa
Country flag
Jeff, just buy one and if you don’t like it send it back. The company seems to be completely ok with that.

I’m tempted but there’s almost no way I’ll be able to resist modding it and voiding any warranty...
 

RI Chevy

Mastermind Approved!
Local time
12:21 PM
User ID
1254
Joined
May 7, 2016
Messages
27,002
Reaction score
67,761
Location
earth
Country flag
LOL. I hear you Bill.
I would like to see if it is possible to get this auto grinder for CT and NY GTGs. Would get a lot of exposure quick. AND we could do up a chain AND put that chain into wood right away.
That sound good?
 

Woodpecker

Sassy Madam
Staff member
GoldMember
Local time
12:21 PM
User ID
570
Joined
Jan 17, 2016
Messages
7,133
Reaction score
45,644
Location
The middle of the land shaped like a hand
Country flag
What's your PayPal address Jeff? I'll cover the shipping both ways for your loop if you'll do the test.

Personally I think it's a little silly that guys want philbert to do tests on these loops. If you're actually interested in how it cuts, take him up on his generous offer to grind a loop for you. Shipping probably won't even be $30 round trip, and how often do you actually get to try the results of something like this without buying the tool? Honestly, I think philbert is already doing us a solid by testing, photographing, and reporting his results. Setting up timed chain tests isn't a super quick job. If anyone is actually interested in the grinder and how the loops perform, just send the man a loop and do the rest yourself. And if your just kicking tires, give it a rest. I for one am happy to wait and see what philbert shows us. He always does a great job from what I've seen.

Philbert doing 1 comparison between a factory chain and one ground by the auto grinder would save him a lot of work grinding loops for other guys. It would also save anyone interested paying round trip to ship loops to him. It should give anyone interested in it an idea if it will work for them or not.
 

GunTemco

Well-Known OPE Member
Local time
9:21 AM
User ID
8181
Joined
Dec 21, 2018
Messages
41
Reaction score
269
Location
Fremont
Jeff, just buy one and if you don’t like it send it back. The company seems to be completely ok with that.

I’m tempted but there’s almost no way I’ll be able to resist modding it and voiding any warranty...

That's right Jeff: just like with all our other products if you don't like it then send it back to us. No cost to you - we pay the shipping and refund you the full amount. No questions asked, no matter what, we take it back.

@wcorey you're welcome to mod, tinker, change, and do whatever the heck you want to the machine. In fact, if you break something, we'll send you a replacement part for free for as many screw ups you run into. Totally FUBARed the machine? We'll take it back and send you a new one. You won't void your warranty. In fact, we'd really appreciate it if on your part you could post here some of the mods you were doing - we'd be super excited to see what you're doing!

There is however, one very important point: You modify the machine at your own risk to body, property, etc. TEMCo Industrial is not liable for any conceivable (or inconceivable) harm that can be done by making changes to our products.

We think it's awesome you guys want to mod our product, but in general, don't do anything stupid like lose a finger - we can't send you a new one.
 
Last edited:

Philbert

Chainsaw Enthusiast
Local time
11:21 AM
User ID
737
Joined
Jan 30, 2016
Messages
4,434
Reaction score
17,906
Location
East Dakota
Country flag
Evaluation Update

Been a while so I wanted to post a few things. As noted a few times, I am evaluating the grinder and will not be doing cutting comparisons or videos. A few folks have expressed impatience with the pace of this thread, so I am asking the Mods to refund their OPEforum subscription fees for the month (@Mastermind).

I was also going to suggest that folks could still buy one of these off eBay with the unconditional warranty, and post their own evaluations, but @GunTemco beat me to it (these posts were not coordinated!). Seriously, the more input we get, and the more diverse viewpoints posted, the better for our members as well as for the manufacturer. It is their offer, not mine.

A couple of key points:
- This is a semi-automatic grinder: it runs by itself once set up, but you can't just drop a chain inside and hit the 'popcorn' setting;
- The user still has to understand what a sharp chain looks like, and what they are trying to achieve;
- Like a lot of things, it takes some time and experience to get familiar with the machine and achieve those goals.

I have not been satisfied with the results I was getting, compared to using a manual grinder, so I have not been posting those, and have been trying to understand how to use this machine better. *Some of it may be me* I may be over-thinking some things, and I may be too focused on my manual grinder experience, which took a lot of time and loops of chain to achieve.

Some of it may be due to the documentation, etc. 'Behind the scenes' I have been sending Gun many pages of comments and input.

Some of it is the design of the machine. E.g. the dual-function control buttons occasionally lead me to mistakes if I hold one too long, and I get a different function, where I have to shut down the machine and start again. Sometimes I turn a knob and nothing happens. I have also experienced one 'fault' where a right hand cutter was ground as a left hand cutter; this happened so fast that I could not intercept and stop the machine. Again, this feedback has been submitted separately.

I spoke to Justin at TEMCo today and he suggested that I 'look under the covers' to better understand how the sharpener works (see my next post). I, in turn, suggested that they add a video to their You Tube list of the machine operating without the covers (or with transparent guards), to help users understand the machine, and to also include 'factory reset' positions for all of the threaded knobs, for when someone gets really lost.

I am still confident that I can get good results, once I get the hang of this machine, and have positive expectations for improvements as it moves forward.

Philbert
 
Last edited:

Philbert

Chainsaw Enthusiast
Local time
11:21 AM
User ID
737
Joined
Jan 30, 2016
Messages
4,434
Reaction score
17,906
Location
East Dakota
Country flag
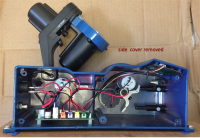
NAKED PICTURES!!!!

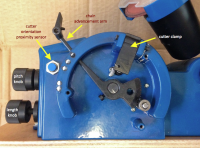
Looking under the covers helps explain how the machine works, and how to use it better. It also shows a remarkably simple and refined design for this type of machine, IMO.

Screen shot 2019-02-14 at 4.45.35 PM.png
This photo shows the chain advancement arm (and hinged pawl), the cutter clamp, and the Right / Left cutter proximity sensor.

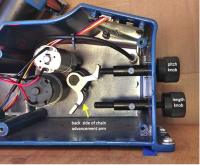
Screen shot 2019-02-14 at 4.45.07 PM.png
'Same' area from the other side, shows how the pitch and length knobs are related, and act as hard stops for the shaft that rotates the chain advancement arm. ***If these knobs are screwed out past a certain point, no additional adjustment in the shaft rotation is provided. A user has no way of knowing this with the covers in place*** This can lead to confusion and frustration (maybe I should cut a viewing window?).

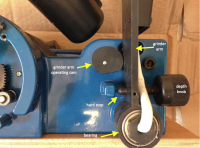
Screen shot 2019-02-14 at 4.11.38 PM.png

Similar situation on the grinder arm: a rotating cam allows the arm to move forward and back by gravity only - the depth knob is a hard stop which prevents the arm from going too deep. I labeled the large bearing which might be mistaken for a motor.

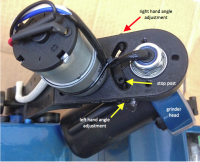
Screen shot 2019-02-14 at 4.14.53 PM.png

Hard, adjustable stops (Right and Left) limit the movement of the grinder head via a stop post.

Screen shot 2019-02-14 at 4.14.19 PM.png

Not exactly 'Full Frontal' nudity, but a good idea of what the guts look like, after the design has been refined down to a production version.

I hope that these help folks understand the machine - they will certainly help me with fine adjustments, which should help me get the cutter profiles I am trying to achieve, going forward.

Philbert
 
Last edited:

Philbert

Chainsaw Enthusiast
Local time
11:21 AM
User ID
737
Joined
Jan 30, 2016
Messages
4,434
Reaction score
17,906
Location
East Dakota
Country flag
Gravity of the Situation

A problem I had today was with the depth adjustment knob (see photos above). During set up, I would position the grinding wheel at a specific point in the gullet, but while grinding, the wheel only went a fraction of the way down, and was not consistent on each cutter. A big issue. Very frustrating.

Justin explained that the grinder arm works on gravity; the rotating cam allows it to move forward, up to the hard stop position set by the threaded knob. The cam also returns the grinder arm to its retracted position. ***But no mechanical, downward pressure is applied to the grinder arm, and thereby, to the grinding wheel (see photos in my post above).*** After a set period of time (?) the wheel retracts, whether or not it has achieved the desired depth of cut. Very different from a manual grinder.

On an early test, the grinder took off way more cutter material than planned, due to an incorrect setting adjustment I made; it ground right through the cutters, shortening them significantly. Today, I could not get the grinder to completely shave off a small amount from the front of some cutters that I was cleaning up. It left a step-like appearance, even after running the loop through a few times. I am suspecting 1) gravity, and 2) the grinding wheel.

1) I thought about taping a roll of quarters to the grinder arm to give it a bit more authority, but not sure if that would cause any other problems;

2) Maybe the wheel needs dressing? maybe the fine grit abrasive is not the best choice for this application, and a coarser grit, or the CBN wheel would perform better? When I tried some different grit wheels on inexpensive grinders (AS threads), the right wheel made a world of difference.

Philbert
 
Last edited:

huskihl

Muh fingers look really big
GoldMember
Local time
12:21 PM
User ID
360
Joined
Dec 31, 2015
Messages
22,532
Reaction score
143,405
Location
East Jordan, MI
Country flag
Gravity of the Situation

A problem I had today was with the depth adjustment knob (see photos above). During set up, I would position the grinding wheel at a specific point in the gullet, but while grinding, the wheel only went a fraction of the way down, and was not consistent on each cutter. A big issue. Very frustrating.

Justin explained that the grinder arm works on gravity; the rotating cam allows it to move forward, up to the hard stop position set by the threaded knob. The cam also returns the grinder arm to its retracted position. ***But no mechanical, downward pressure is applied to the grinder arm, and thereby, to the grinding wheel (see photos in my post above).*** After a set period of time (?) the wheel retracts, whether or not it has achieved the desired depth of cut. Very different from a manual grinder.

On an early test, the grinder took off way more cutter material than planned, due to an incorrect setting adjustment I made; it ground right through the cutters, shortening them significantly. Today, I could not get the grinder to completely shave off a small amount from the front of some cutters that I was cleaning up. It left a step-like appearance, even after running the loop through a few times. I am suspecting 1) gravity, and 2) the grinding wheel.

1) thought about taping a roll of quarters to the grinder arm to give it a bit more authority, but not sure if that would cause any other problems;

2) maybe the wheel needs dressing? maybe the fine grit abrasive is not the best choice for this application, and a coarser grit, or he CBN wheel would perform better? When I tried some different grit wheels on inexpensive grinders (AS threads), the right wheel made a world of difference.

Philbert
The cold weather could have some effect on the lubrication of the grinder head hinge if its run by gravity. Just a thought
 
Top